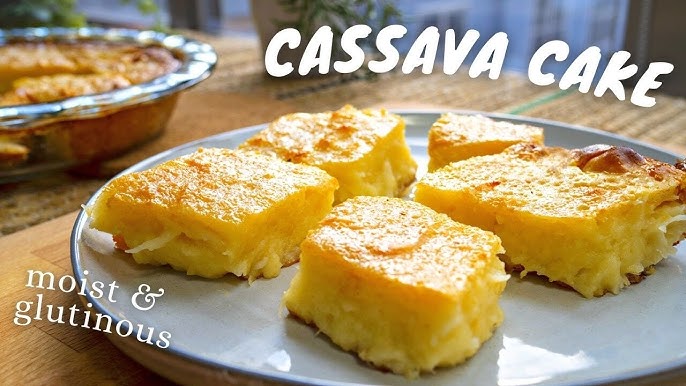
Cassava Cake Recipe: Cassava cake is more than just a dessert; it’s a piece of Filipino heritage baked into every golden slice.
Whether you’re a homesick Filipino expat or someone looking to explore new flavors, this step-by-step guide to cassava cake will help you recreate a beloved treat that’s soft, chewy, and topped with a rich, creamy custard.
Let’s get into the nitty-gritty of what makes this dish a favorite in many homes.
What is Cassava Cake?
Cassava cake is a traditional Filipino dessert made primarily from grated cassava (also known as yuca or manioc), coconut milk, and condensed milk. It’s typically baked until firm and topped with a creamy custard layer that adds richness and depth to every bite. This cake is especially popular during gatherings, fiestas, and holidays.
Originating from the Philippines, cassava cake reflects the country’s resourcefulness and its love for coconut-based dishes. Cassava, a root crop, grows abundantly in tropical climates, making it a staple in many Filipino households. The combination of affordable ingredients and indulgent flavor makes it a crowd-pleaser every time.
Why You’ll Love This Recipe
This cassava cake recipe is the perfect blend of creamy, chewy, and slightly crispy textures. Here’s why it deserves a spot in your recipe book:
- Unique Texture: The grated cassava gives the cake a chewy, moist interior that’s unlike any other dessert. It’s a delightful contrast to the smooth custard topping.
- Flavor Explosion: Between the richness of the coconut milk and the sweetness of condensed milk, each bite is layered with deep, tropical flavors.
- Easy to Customize: Add macapuno, ube, or cheese for a personal touch. It’s incredibly versatile, so feel free to get creative.
- Great for All Occasions: From simple family dinners to grand celebrations, this cake always fits the mood.
- No Fancy Equipment Needed: If you’ve got an oven and a mixing bowl, you’re halfway there!
Ingredients You’ll Need
Let’s talk ingredients. The magic of cassava cake lies in its simplicity. Here’s what you’ll need:
Main Ingredients:
- 2 lbs of grated cassava (frozen or fresh)
- 1 can (14 oz) sweetened condensed milk
- 1 can (13.5 oz) coconut milk
- 1 can (12 oz) evaporated milk
- 2 eggs
- 1 cup sugar
- 1/4 cup melted butter
- 1 tsp vanilla extract
Custard Topping Ingredients:
- 1 can (13.5 oz) coconut milk
- 1/2 can sweetened condensed milk (optional for added sweetness)
- 2 egg yolks
- 1 tbsp flour (for thickening)
Optional Add-Ins:
- 1 cup grated cheese (cheddar or processed)
- 1/2 cup macapuno strings
- 1 tsp ube extract for a twist
Pro tip: Always taste your mixture before baking. If you want it less sweet, adjust the sugar or condensed milk accordingly.
Tools Required
Before we dive into the fun part—mixing and baking—make sure you have the right tools ready:
- Large mixing bowl
- Whisk or electric hand mixer
- Baking pan (9×13 inch is ideal)
- Measuring cups and spoons
- Grater (if using fresh cassava)
- Oven
- Stove (for custard topping)
- Rubber spatula
Keep it simple and clean. You don’t need any fancy kitchen gadgets, just your standard baking tools and a good sense of timing.
Preparing the Cassava Mixture
Now comes the fun part—putting it all together. This step is crucial because it sets the foundation for your cake’s texture and flavor.
- Grate the Cassava: If you’re using fresh cassava, peel and grate it finely. If using frozen, thaw it completely and squeeze out excess water.
- Mix the Ingredients: In a large bowl, combine the grated cassava, eggs, coconut milk, evaporated milk, sweetened condensed milk, sugar, melted butter, and vanilla extract.
- Optional Add-Ins: This is where you can add extras like grated cheese or macapuno. Fold them gently into the mixture to avoid breaking them apart.
- Check Consistency: The batter should be thick but pourable. If it seems too dry, add a little more coconut milk. If it’s too runny, a tablespoon of flour can help firm it up.
Take your time with this step. Mixing thoroughly ensures even baking and a consistent flavor profile. Think of it as laying the groundwork for a flavor masterpiece.
Making the Custard Topping
The custard topping is where the magic happens—it adds a creamy, luscious layer that takes the cassava cake to the next level. It’s smooth, rich, and just the right amount of sweet to balance out the chewiness of the cassava base.
Here’s How to Make It:
- Combine the Ingredients: In a saucepan over medium-low heat, mix 1 can of coconut milk, 2 egg yolks, half a can of sweetened condensed milk (optional), and 1 tablespoon of flour. The flour helps thicken the mixture.
- Stir Continuously: Use a whisk to stir constantly and gently. The key is to avoid lumps and prevent the eggs from scrambling.
- Cook Slowly: Let the custard simmer until it starts to thicken. You want a creamy, pourable texture—like a light pudding. Don’t overcook or it will become too stiff to spread.
- Remove from Heat: Once it’s thick enough, take it off the heat and set aside. It will continue to thicken slightly as it cools.
Pro Tip: For a silky-smooth finish, strain the custard through a fine mesh sieve before pouring it on top of the cassava cake. This removes any lumps or cooked egg bits.
Assembling the Cake
Now that your base and topping are ready, it’s time to put it all together before baking. This step is like crafting a masterpiece—layering your flavors to ensure every bite is delicious.
Steps for Assembling:
- Preheat Your Oven: Set it to 350°F (175°C). Make sure it’s fully preheated before you place your cake inside.
- Grease the Baking Pan: Use butter or cooking spray to prevent sticking.
- Pour the Cassava Mixture: Evenly spread the cassava batter into the pan. Use a spatula to level the top.
- Bake the Base: Place the pan in the oven and bake for 45–50 minutes, or until the edges are golden and the center is firm.
- Add the Custard Topping: Take the cake out, pour the custard evenly over the top, and spread it gently.
- Bake Again: Return it to the oven for another 15–20 minutes, or until the custard sets.
Patience is key here. Let each layer set before moving to the next step for the best texture and appearance.
Baking the Cassava Cake
This is where everything comes together. Baking brings out the flavors, firms up the base, and gives the topping that signature glossy look.
Key Tips for Baking:
- Middle Rack Placement: Bake the cake on the middle rack to ensure even heat distribution.
- Watch the Edges: When the edges start to brown slightly and pull away from the pan, that’s your cue—it’s almost done.
- Toothpick Test: Insert a toothpick into the center. If it comes out mostly clean with just a few moist crumbs, it’s ready for the topping layer.
Once you’ve added the custard, bake again briefly until the topping is set and slightly golden. If you want a caramelized effect, broil it for the last 3–5 minutes—but watch it closely to avoid burning.
Finishing Touches
Finishing your cassava cake right can turn a good dessert into a memorable one. Here’s how to polish it off like a pro:
- Broil the Top: If you want a slightly toasted top layer, switch your oven to broil mode for a few minutes after baking. Keep the oven door slightly open and your eyes on the cake—this step can go from perfect to burnt very fast.
- Cool Completely: Let the cake cool at room temperature for at least 30–45 minutes. This helps the custard firm up and makes slicing easier.
- Slice Smart: Use a sharp, greased knife to cut through the custard without dragging or tearing it. Clean the blade between cuts for neat slices.
- Optional Garnish: Sprinkle shredded cheese or toasted coconut flakes on top for a delightful finish.
Presentation matters! Serve your cassava cake on a clean platter, and watch everyone’s eyes light up.
Serving Suggestions
Cassava cake is best enjoyed warm or at room temperature, where its texture and flavors truly shine. It’s versatile enough to be served as a dessert or even as a sweet merienda (snack).
Great Pairings:
- With Coffee or Tea: The sweetness of the cake pairs wonderfully with a strong cup of coffee or a light tea.
- Topped with Ice Cream: A scoop of vanilla or coconut ice cream adds an extra layer of indulgence.
- As Part of a Dessert Platter: Serve alongside leche flan, turon, or buko pandan for a full Filipino dessert experience.
Serving Tip: Cut the cake into small squares or diamond shapes for a traditional look. A little goes a long way because it’s rich and satisfying.
Storage and Reheating Tips
So, you’ve made this glorious cassava cake, and there’s some left over (if you’re lucky!). Good news: cassava cake stores and reheats beautifully, making it a perfect make-ahead treat.
How to Store It Properly:
- Room Temperature: If you plan to eat it within a day, simply cover it tightly with foil or plastic wrap and leave it at room temperature.
- Refrigerator: For longer storage, wrap the cake tightly and place it in an airtight container. It will stay fresh in the fridge for up to 5 days.
- Freezer-Friendly: Yes, cassava cake freezes well! Cut it into slices, wrap each in cling wrap, and store in a freezer bag. It can last up to 2 months this way.
Reheating Tips:
- Microwave: For quick reheating, pop a slice into the microwave for about 30 seconds to 1 minute.
- Oven: If you want it to taste just like freshly baked, reheat it in the oven at 325°F (160°C) for about 10–15 minutes. This brings back the chewiness and warms the custard layer without drying it out.
- Avoid Overheating: Be careful not to overheat or it might become too dry or rubbery.
A little planning goes a long way, and these tips ensure your cassava cake stays delightful even days after baking.
Cassava Cake Variations
Cassava cake is super adaptable. Once you’ve nailed the basic recipe, you can play around with a few exciting variations that put your own spin on it.
Popular Variations:
- Ube Cassava Cake: Add ube halaya (purple yam jam) or ube extract to the cassava mixture for a vibrant, colorful twist with a subtle nutty flavor.
- Cassava Cake with Cheese: Top your cake with grated cheddar cheese before baking or add cheese into the batter for a sweet-savory combo.
- Macapuno Delight: Mix in macapuno (sweetened coconut strings) to the batter for a gooey, chewy texture with coconut flavor overload.
- Cassava Cupcakes: Pour the batter into cupcake molds for individual servings—perfect for parties or on-the-go snacks.
- Latik Topping: Instead of custard, use latik (caramelized coconut milk curds) as a topping for a more traditional, rustic version.
Each of these versions can be adjusted to suit your taste or the ingredients you have on hand. It’s all about creativity in the kitchen!
Common Mistakes to Avoid
Even the simplest recipes have room for error. Here are some of the most common pitfalls to watch out for when making cassava cake:
Top Mistakes to Avoid:
- Using Too Much Liquid: This can make your cake soggy. Stick to the measurements and adjust only slightly if necessary.
- Skipping the Custard Topping: The topping isn’t just for looks—it adds flavor and creamy texture that balances the chewy base.
- Overbaking or Underbaking: An overbaked cassava cake will be dry and rubbery. An underbaked one will be too soft and dense. Always check for doneness using a toothpick.
- Not Greasing the Pan: Cassava is sticky! Failing to grease your baking dish will make removing the cake a nightmare.
- Overmixing the Batter: Be gentle with your mix. Overmixing can lead to a gummy texture, which we definitely don’t want.
Avoiding these mistakes ensures your cassava cake comes out perfect every time—golden on top, creamy in the middle, and chewy underneath.
FAQs about Cassava Cake Recipe
What is cassava cake made of?
Cassava cake is made primarily from grated cassava (also known as yuca), coconut milk, condensed milk, eggs, sugar, and sometimes cheese or custard topping. It’s a sweet, creamy Filipino dessert that’s both chewy and rich.
Can I use frozen grated cassava?
Yes, absolutely! Frozen grated cassava is a convenient substitute for fresh cassava and works just as well. Just make sure it’s completely thawed and well-drained before mixing.
Is cassava cake gluten-free?
Yes, cassava cake is naturally gluten-free since cassava is a root vegetable and doesn’t contain any wheat-based flour.
How long does cassava cake last?
Cassava cake can last up to 3 days in the fridge and around a month in the freezer. Store it in an airtight container to keep it fresh and moist.
Can I reheat cassava cake?
Definitely! Just pop it in the microwave for 30–60 seconds or reheat in a low oven (about 300°F or 150°C) until warm. This brings back its soft texture and delicious aroma.
Why is my cassava cake watery?
A watery cassava cake often means too much liquid or underbaking. Make sure to measure your ingredients properly and bake until the top is golden and set.
What topping goes best with cassava cake?
Popular toppings include a creamy custard layer, grated cheese, or even a sprinkle of coconut flakes. Want to level it up? Try a sweetened macapuno (coconut string) topping for that extra flair.
Conclusion
Cassava cake isn’t just another dessert—it’s a nostalgic journey to the Philippines, a symbol of comfort, and a crowd-pleaser that always hits the sweet spot. Whether you’re making it for the first time or perfecting your own family recipe, this step-by-step guide has all you need to create a cassava cake that’s rich, chewy, creamy, and totally irresistible.
This cake is versatile, easy to customize, and most importantly, made with love. So get your cassava, roll up your sleeves, and start baking. One slice, and you’ll understand why this cake holds such a special place in so many Filipino hearts—and stomachs.


