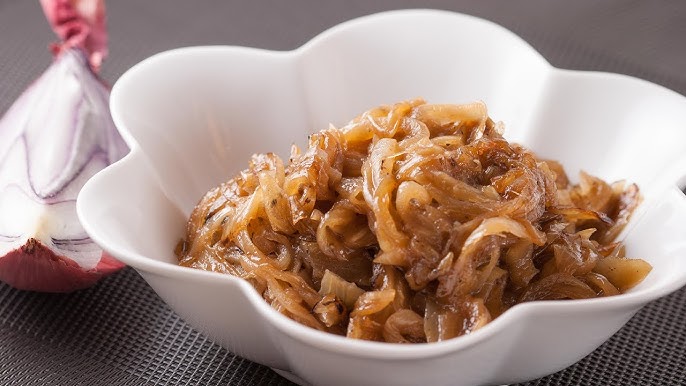
Caramelized Onion Recipe: Caramelized onions are a rich, golden-brown delight that transforms the humble onion into something utterly magical. Through slow cooking, the natural sugars in onions break down and caramelize, creating a sweet, savory, and slightly tangy flavor that’s hard to resist. Unlike raw or even sautéed onions, caramelized onions offer a depth of flavor that elevates any dish they touch. They’re not just onions anymore—they’re a gourmet ingredient that adds complexity to anything from burgers to French onion soup.
Why Caramelize Onions?
The beauty of caramelized onions lies in their versatility. You can use them in sandwiches, mix them into pasta, serve them as a topping for meats, or even stir them into dips. Plus, the process of caramelizing onions isn’t just about taste—it’s therapeutic. Watching the transformation from sharp and pungent to sweet and golden is immensely satisfying. It’s also an incredible way to add flavor to your cooking without relying on extra salt or sugar.
If you’ve never tried making them at home, you’re in for a treat. It’s a slow but simple process that anyone can master with a little patience. And once you do, you’ll want to keep a jar of these golden goodies in your fridge at all times.
Ingredients You’ll Need
Basic Ingredients List
To caramelize onions, you don’t need a lot. That’s the beauty of it—it’s all about coaxing out flavor from the simplest ingredients. Here’s what you’ll need:
- Onions (4-6 medium yellow or white onions)
- Olive oil or butter (about 2–3 tablespoons)
- Salt (a pinch, to help draw out moisture)
That’s it for the essentials. No fancy spices or secret sauces required—just time and heat.
Optional Add-ins for Flavor
While traditional caramelized onions are made with just oil or butter and onions, you can get creative. Here are a few extras to try:
- A splash of balsamic vinegar – Adds tang and depth.
- Brown sugar – Enhances sweetness, though it’s not necessary.
- Garlic – Toss in minced garlic near the end for extra punch.
- Fresh herbs like thyme or rosemary – Toss in a sprig to infuse flavor.
- Bay leaf – Gives a subtle, aromatic undertone.
These additions can add new dimensions to your caramelized onions, depending on how you plan to use them.
Choosing the Right Onions
Best Types of Onions for Caramelizing
Not all onions are created equal, especially when it comes to caramelizing. Some types naturally contain more sugar, making them ideal for this technique. The best options are:
- Yellow onions – These are your go-to choice. They balance sweetness and acidity perfectly and caramelize beautifully.
- Red onions – Sweeter than yellow onions, they also add a nice color to your dish, though their deep purple hue fades as they cook.
- White onions – These can work but tend to have a sharper flavor and less sweetness.
In short, yellow onions are usually the safest and most flavorful bet.
Yellow vs. White vs. Red Onions
- Yellow onions: Mild, sweet, and flavorful. They’re ideal for slow cooking and caramelizing because they become incredibly sweet and flavorful.
- White onions: More pungent and less sweet. They can be used but require more time to mellow out.
- Red onions: Naturally sweet but less commonly used due to their color and stronger raw taste. However, when caramelized, they offer a subtly different flavor profile that works great in salads or gourmet pizzas.
Tools and Equipment Needed
Must-Have Kitchen Tools
Caramelizing onions isn’t tool-heavy, but having the right gear makes the process smoother. Here’s what you’ll need:
- Sharp chef’s knife – You’ll be slicing a lot of onions, so a sharp knife makes a huge difference.
- Cutting board – Preferably a large one to handle multiple onions.
- Heavy-bottomed skillet or sauté pan – Cast iron or stainless steel pans are ideal as they distribute heat evenly.
Choosing the Right Pan
Choosing the correct pan can make or break your caramelizing session. Here’s why:
- Cast iron pans hold and distribute heat evenly, allowing onions to cook slowly and consistently.
- Stainless steel pans are also great, especially since they allow you to deglaze the pan easily for added flavor.
- Avoid non-stick pans if possible—they don’t allow for the same fond (the browned bits that build flavor) to form on the bottom.
You’ll also need a wooden spoon or silicone spatula for frequent stirring without scratching your pan.
Step-by-Step Instructions to Caramelize Onions
Step 1: Slice the Onions Thinly
Start by peeling and slicing your onions into thin, even slices. This helps them cook uniformly. Aim for slices about ⅛ to ¼ inch thick. Too thin and they’ll burn; too thick and they’ll take forever to soften. Uniform slices also ensure every piece caramelizes at the same rate.
Once you’ve sliced them, give them a quick toss with a little salt. This begins drawing out the moisture and kickstarts the caramelizing process.
Step 2: Preheat the Pan
Before adding anything to the pan, preheat it over medium heat for a couple of minutes. This ensures that your onions begin cooking evenly from the start. Use a wide skillet—preferably cast iron or stainless steel—because the more surface area, the better. Overcrowding the pan will lead to steaming rather than caramelizing, and that’s not what we want.
Once the pan is hot, add your oil or butter. If you’re using both, a mix of 1 tablespoon butter and 1 tablespoon olive oil works wonderfully, giving you the rich taste of butter and the high smoke point of oil. Swirl it around to coat the bottom evenly.
Step 3: Start the Cooking Process
Now it’s time to add your onions to the pan. Spread them out evenly and let them sit for a few minutes without stirring. This helps develop the first layer of caramelization. After a few minutes, stir gently and continue cooking.
At this point, patience is your best friend. The key is low and slow cooking. Set the heat to medium-low and let the onions break down gradually. You’ll start to notice them becoming translucent first, then slowly turning golden. This part of the process can take 30 to 45 minutes, sometimes even longer depending on the quantity and type of onions.
Don’t rush it. Cranking up the heat might get you browned onions, but not the deep, sweet flavor true caramelization delivers.
Step 4: Stir and Monitor
From this point forward, it’s all about babysitting. Stir the onions every few minutes to make sure they’re not sticking or burning. You want to scrape up any bits from the bottom of the pan—this is where the flavor builds. If the onions begin to dry out or stick too much, add a splash of water or broth to loosen them up.
This part of the process is meditative. Grab a drink, turn on some music, and keep an eye on the pan. Stirring not only prevents burning but redistributes the heat and oils so every slice of onion gets that golden-brown finish.
Remember, if the onions are browning too quickly or unevenly, your heat is likely too high. Turn it down, add a splash of liquid, and keep going.
Step 5: Deglaze the Pan
About halfway through, you’ll notice a dark glaze forming on the bottom of the pan. This is fond, and it’s full of flavor. To release it, deglaze the pan. Add a tablespoon of water, broth, or even wine, then scrape the bottom with your spoon to lift those flavorful bits back into the onions.
Deglazing not only enhances flavor but also prevents any burnt bits from sticking. This step can be repeated a few times during the cooking process to enrich the taste even more. For a more complex profile, try using balsamic vinegar or apple cider vinegar for deglazing—just a little splash goes a long way.
Deglazing is optional, but it truly elevates your caramelized onions to restaurant-quality levels.
Step 6: Achieve the Perfect Golden Color
You’re looking for a rich, deep golden-brown color—not just lightly browned or burnt. When done properly, caramelized onions should have a soft, jam-like texture and a flavor that’s sweet, earthy, and rich.
The process typically takes between 40 and 60 minutes depending on the volume and heat. Trust your eyes and nose—when the onions are glossy, dark golden, and smell irresistibly sweet, you’ve nailed it.
Taste them before turning off the heat. They should melt in your mouth and have no sharpness or raw flavor left. If they still taste a bit harsh, give them more time. They only get better.
Pro Tips for Perfect Caramelization
Avoiding Common Mistakes
Caramelizing onions isn’t hard, but there are a few pitfalls to avoid:
- Don’t rush it. Turning up the heat won’t help; it’ll only burn your onions.
- Don’t overcrowd the pan. Too many onions and they’ll steam instead of caramelize.
- Avoid metal spatulas. Stick to wooden or silicone tools to avoid damaging your pan and onions.
- Don’t skip deglazing. It’s the secret to building depth and flavor.
Enhancing Flavor Naturally
To amplify the natural sweetness and umami of your onions:
- Add a pinch of baking soda during cooking to speed up caramelization. Just be cautious—it can make onions mushy if overused.
- Toss in fresh thyme or a bay leaf while cooking for an herby touch.
- Finish with a small dab of butter or a splash of cream for richness.
Caramelized onions are simple, but these subtle tweaks can make them taste gourmet.
Creative Ways to Use Caramelized Onions
In Sandwiches and Burgers
If you’ve never added caramelized onions to a grilled cheese sandwich or a juicy burger, you’re missing out. They add a sweet-savory punch that balances out the richness of meat and cheese. Try them with melted brie or sharp cheddar for an irresistible combo.
As Pizza Toppings
Caramelized onions on pizza? Absolutely. Pair them with goat cheese, arugula, or prosciutto for a gourmet pie. Their sweetness offsets salty and creamy toppings perfectly.
In Soups and Pastas
They’re the star ingredient in French onion soup, of course. But they also work wonders stirred into creamy pasta sauces, mixed into risottos, or even added to mac and cheese.
Storing and Reheating Caramelized Onions
How to Store Them Properly
Caramelized onions are time-consuming to make, so it’s smart to make a big batch and store the extras. Once cooled, transfer them to an airtight container or glass jar. They’ll keep in the refrigerator for up to one week.
For longer storage, caramelized onions freeze beautifully. Portion them into small freezer-safe containers or even ice cube trays. Once frozen, transfer the cubes to a resealable freezer bag and label with the date. This way, you can grab just what you need for your next recipe.
Whether refrigerated or frozen, the flavor of caramelized onions remains rich and delicious—so go ahead and double your batch.
Best Reheating Methods
To reheat, the stovetop is your best bet. Place the onions in a skillet over low heat and stir until warmed through. You can add a teaspoon of water or broth to loosen them up if needed.
Microwaving works too, especially if you’re short on time. Just be sure to use a microwave-safe dish, cover it loosely, and stir halfway through to ensure even heating.
Avoid high heat, which can scorch or dry out the onions. Low and slow is still the name of the game—even for reheating.
Nutritional Benefits of Caramelized Onions
Calories and Nutrients
Caramelized onions aren’t just tasty—they bring some nutritional value to the table too. While the cooking process reduces their water content and concentrates the sugars, they remain relatively low in calories. A tablespoon of caramelized onions typically contains:
- Around 30–40 calories
- 0 grams of fat (unless cooked with oil or butter)
- Small amounts of fiber, vitamin C, B6, and folate
If you’re watching your calorie intake, be mindful of how much oil or butter you use during cooking. But overall, they’re a nutritious way to add big flavor without heavily processed ingredients.
Health Perks
Onions are packed with antioxidants—especially quercetin, known for its anti-inflammatory properties. They also support heart health by lowering cholesterol and blood pressure. The sulfur compounds in onions help detoxify the body and even boost the immune system.
Even after a long cooking process, many of these benefits remain. So while caramelized onions feel indulgent, they’re still a wholesome choice.
FAQs about Caramelized Onion Recipe
1. How long does it take to caramelize onions?
Caramelizing onions the right way takes 30 to 45 minutes on low heat. Patience is key—rushing the process will leave you with sautéed onions, not the rich, golden goodness you’re after.
2. Can I caramelize onions faster?
Technically yes, but it won’t taste the same. Adding a pinch of sugar or a splash of balsamic vinegar can speed things up, but you’ll sacrifice that deep, slow-cooked flavor. Good things take time—especially caramelized onions.
3. What kind of onions are best for caramelizing?
Yellow onions are the classic go-to, thanks to their natural sweetness. However, white or red onions also work well, each giving a unique twist to the flavor.
4. Can I store caramelized onions?
Absolutely! Store them in an airtight container in the fridge for up to a week or freeze them for up to three months. They reheat beautifully—just warm them in a pan before serving.
5. Why are my onions burning instead of caramelizing?
You’re likely using too much heat. Caramelization is a low-and-slow game. Stir frequently and add a bit of water if they start sticking or browning too quickly.
6. What can I use caramelized onions for?
So many things! They’re perfect on burgers, steaks, pizzas, pastas, grilled cheese, soups, or even just spread on toast. They make everything taste gourmet.
Conclusion
Caramelized onions are one of those kitchen miracles that transform the ordinary into the extraordinary. With just a few ingredients and a bit of time, you can create a flavor-packed component that adds richness, sweetness, and umami to almost any dish.
They’re versatile, easy to store, and endlessly useful. Whether you’re elevating a burger, enhancing a soup, or jazzing up a pizza, caramelized onions are your go-to secret weapon.
The process may be slow, but it’s incredibly rewarding. It’s cooking at its finest—simple ingredients, coaxed into greatness with a little love and patience.
So next time you see a pile of onions in your pantry, don’t just sauté them. Caramelize them. Trust me—you’ll never go back.


