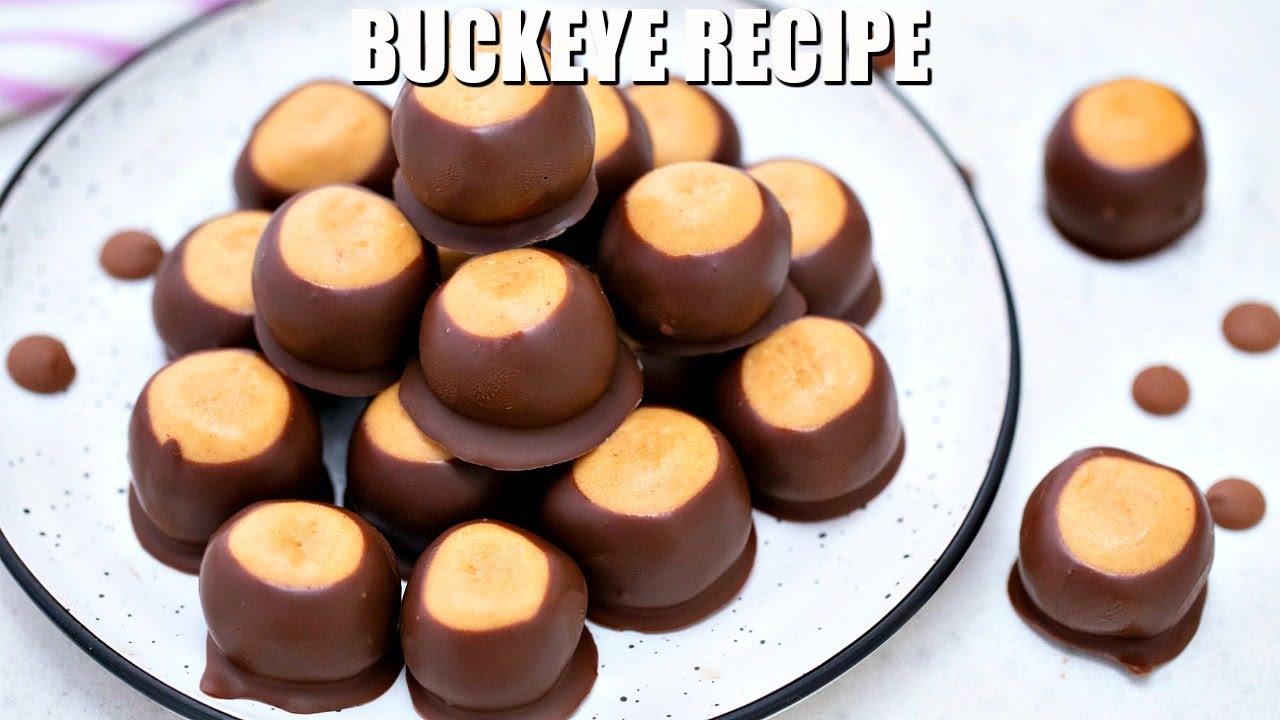
Buckeye Candy Recipe: Buckeye candies are a delightful no-bake dessert that perfectly blends rich peanut butter and smooth chocolate into bite-sized morsels of heaven. Shaped like the nut of the Ohio buckeye tree, these treats have a peanut butter center partially dipped in chocolate, leaving a small circle of the peanut butter visible on top. That iconic look gives them their name and irresistible appeal.
These candies are especially popular during the holidays, in cookie exchanges, and at parties. The creamy, sweet interior pairs beautifully with the slight bitterness of semi-sweet chocolate. Best of all? You don’t have to be a professional baker to make them. If you can mix, roll, and dip, you’re well on your way to becoming a Buckeye candy master.
Why They’re a Favorite Treat
There’s a reason Buckeye candies have become a staple in American dessert culture. First, they require no baking. That’s a big plus for anyone who wants a simple, stress-free recipe. Secondly, they hit the nostalgic sweet spot. Many people grew up enjoying these during the holidays, and making them is almost like recreating a cozy childhood memory.
These candies also store well, making them ideal for make-ahead treats. Whether you’re gifting them or hoarding them (no judgment!), Buckeyes keep their texture and flavor for days in the fridge or freezer. Plus, you can tweak the recipe to suit your taste – like adding sea salt, vanilla, or swapping the chocolate type.
So if you’re looking for a dessert that’s easy, delicious, and always a hit, Buckeye candies are your go-to. Let’s dive into what you’ll need to get started.
Ingredients You’ll Need
Core Ingredients
Making Buckeye candies only requires a few pantry staples. Here’s what you’ll need for the classic version:
- 1 ½ cups creamy peanut butter – Smooth, not chunky. Natural peanut butters may not work as well due to oil separation.
- ½ cup unsalted butter, softened – Soft butter helps everything mix smoothly.
- 1 teaspoon vanilla extract – Adds depth to the flavor.
- 3 ½ to 4 cups powdered sugar – Helps create the perfect dough texture.
- 12 oz semi-sweet chocolate chips – For that luscious coating.
- 2 tablespoons shortening or coconut oil – Makes the chocolate smoother and easier to dip.
Each ingredient plays a specific role. The peanut butter and butter create the creamy base. Vanilla brings a warm undertone. Powdered sugar firms everything up so the candies can hold their shape. Chocolate adds that iconic shell, and shortening helps it melt better without seizing.
Optional Add-Ins and Substitutes
Want to get creative? Here are a few ideas to put your own spin on the recipe:
- Crunchy peanut butter – For texture lovers.
- Almond butter or sunflower seed butter – For nut allergies or different flavor profiles.
- Dark chocolate or white chocolate chips – To vary the sweetness and taste.
- Sea salt flakes – Sprinkle on top for a sweet-and-salty kick.
- Cinnamon or espresso powder – Add a dash for complexity.
Whether you’re keeping it classic or going gourmet, having the right ingredients is key to success. Once you’ve gathered everything, it’s time to grab your tools and get mixing.
Tools and Equipment
Basic Kitchen Tools
You don’t need fancy equipment to make Buckeye candies, but a few essentials will make the process smoother:
- Large mixing bowl – For combining the peanut butter, butter, and sugar.
- Hand mixer or stand mixer – While mixing by hand is possible, a mixer saves time and effort.
- Measuring cups and spoons – Accuracy is important for balance in flavor and texture.
- Spatula – Ideal for scraping the sides of the bowl and ensuring a thorough mix.
Helpful Extras for Easier Prep
To make things even easier and more consistent, you might consider:
- Cookie scoop – Helps form uniform-sized balls quickly.
- Toothpicks – Used to dip the candies into chocolate while keeping that signature “Buckeye” look.
- Parchment paper or silicone baking mat – Keeps the Buckeyes from sticking during setting.
- Microwave-safe bowl or double boiler – For melting the chocolate smoothly and evenly.
Having the right tools on hand ensures that each Buckeye is shaped well, coated beautifully, and comes out picture-perfect. Once your kitchen is prepped and ready, it’s time to start making the dough.
Preparing the Peanut Butter Dough
Mixing the Ingredients
Start by placing the peanut butter and softened butter into a large mixing bowl. Using a hand or stand mixer, beat them together on medium speed until the mixture is smooth and fluffy – about 2 to 3 minutes. This step is crucial for creating a creamy, homogenous base.
Next, mix in the vanilla extract. Now comes the powdered sugar, and here’s where things get a bit messy (but fun!). Add the sugar one cup at a time, mixing slowly to avoid the “sugar cloud” effect. Once incorporated, the dough should be stiff and pliable but not crumbly. If it feels too sticky, add a bit more sugar; if it’s too dry, a tablespoon of peanut butter should fix it.
Don’t rush this part – good dough equals good Buckeyes. Once it feels firm enough to roll without sticking to your hands, you’re ready to shape the candies.
Tips for Perfect Consistency
- Use room temperature ingredients to help everything blend smoothly.
- Don’t skimp on sugar. It’s what helps the candies keep their shape.
- Chill the dough briefly if it becomes too soft while working.
- Taste-test – It’s peanut butter and sugar. You deserve a bite before you roll!
With your dough perfectly prepped, it’s time to shape and chill the Buckeyes.
Shaping and Chilling the Balls
How to Form Uniform Buckeyes
Using your hands or a small cookie scoop, scoop out about a tablespoon of dough and roll it between your palms to form a smooth ball. Place each one on a parchment-lined baking sheet.
Uniformity helps with even chilling and prettier presentation. If the dough is sticky, a quick roll with slightly damp hands or powdered sugar-dusted palms can help.
Chilling for Dipping Perfection
Place the tray in the refrigerator for at least 30 minutes or in the freezer for 15 minutes. Chilled dough is easier to dip and less likely to fall apart or melt in the chocolate. It also helps the chocolate shell set quickly and cleanly.
Once your Buckeyes are firm and chilled, get ready for the best part – dipping them in luscious melted chocolate.
Dipping the Buckeyes in Chocolate
Melting the Chocolate Perfectly
Now comes the step that takes Buckeyes from simple peanut butter balls to iconic candy status—dipping them in chocolate. To begin, melt the semi-sweet chocolate chips with the shortening or coconut oil. This can be done in two main ways:
- Microwave Method: Place the chocolate and shortening in a microwave-safe bowl. Heat in 30-second intervals, stirring in between, until fully melted and smooth.
- Double Boiler Method: Place a heatproof bowl over a pot of simmering water (not touching the water). Stir until the chocolate and shortening melt into a silky mix.
The addition of shortening helps thin out the chocolate, giving it a smooth texture perfect for dipping. If the chocolate is too thick, add a touch more shortening.
Make sure not to overheat the chocolate—it should be warm and glossy, not bubbling or scorched. Burnt chocolate is bitter and unusable, so take your time and stir frequently.
Dipping Technique and Tips
Using a toothpick, skewer one peanut butter ball and gently dip it into the melted chocolate. Only submerge about three-quarters of the ball, leaving a small circle of peanut butter showing on top—this gives it the “Buckeye” look.
Let any excess chocolate drip off, then place the dipped ball back onto the parchment-lined tray. Once all the balls are dipped, remove the toothpicks and use your finger or the back of a spoon to gently smooth over the tiny hole if you’d like a more polished look.
Here are a few pro tips:
- Work in batches—keep half the peanut butter balls in the fridge while you dip the others.
- Use a narrow bowl for dipping to conserve chocolate.
- If the chocolate begins to thicken, reheat it briefly to maintain the right consistency.
Once dipped, it’s time to let the chocolate set—and then, enjoy!
Letting the Candies Set
Room Temperature vs. Refrigeration
After all your Buckeyes are dipped, you can let them set at room temperature if your kitchen is cool. However, for quicker results and firmer chocolate, pop the tray into the refrigerator.
In the fridge, the chocolate will harden within about 15–20 minutes. You’ll know they’re ready when the coating is dry to the touch and no longer glossy.
If you’re planning to serve them right away, you can move on to plating. Otherwise, let’s talk about how to store them for later.
Storing and Serving Buckeyes
Storage Tips for Freshness
Buckeye candies store beautifully, which makes them great for gifts and holiday prep. Here’s how to keep them fresh and delicious:
- Refrigerator: Store in an airtight container for up to 2 weeks.
- Freezer: Freeze for up to 3 months. Place wax paper between layers to prevent sticking.
Let frozen Buckeyes thaw in the fridge overnight before serving. Avoid leaving them out too long on a hot day, as the chocolate can soften.
Serving Suggestions
Serve Buckeyes on a dessert tray alongside cookies and brownies, or package them in small tins or treat bags for a thoughtful homemade gift. You can also pair them with coffee or hot cocoa for a cozy winter treat.
Want to take it up a notch? Sprinkle a bit of sea salt on top before the chocolate sets or drizzle with white chocolate for a festive look.
Common Mistakes to Avoid
Troubleshooting Your Buckeyes
Even though Buckeye candies are simple to make, a few common pitfalls can trip up first-timers. Here’s what to watch out for:
- Dough too soft: If the dough isn’t holding its shape, add more powdered sugar. It should be firm and moldable.
- Chocolate too thick: Add a bit more shortening or reheat it slightly to loosen it up.
- Peanut butter balls falling apart in chocolate: Chill them longer before dipping.
- Chocolate seizing: Don’t let water come into contact with your chocolate. Even a tiny drop can turn it grainy.
Being mindful of these tips will help you make picture-perfect Buckeyes every time.
Customizing Your Buckeyes
Flavor Variations to Try
If you love the classic peanut butter and chocolate combo but want to mix it up, there are plenty of ways to give Buckeye candies a personal twist:
- Nut Butter Alternatives: Swap out peanut butter for almond butter, cashew butter, or even sunflower seed butter if you need a nut-free version. Just make sure they’re creamy and not too oily.
- Chocolate Choices: Instead of semi-sweet chocolate, try dark chocolate for a richer taste or milk chocolate for a creamier bite. White chocolate can also make for a sweet contrast and a stunning visual.
- Flavor Infusions: Add a pinch of cinnamon, a splash of maple extract, or a hint of espresso powder to the peanut butter mix for a unique flavor twist.
- Crispy Centers: Fold in a small handful of crushed pretzels or rice cereal into the peanut butter mixture for added crunch.
Experimenting with ingredients can be a fun way to make this recipe your own, especially for holidays or themed parties.
Decorative Touches
Who says Buckeyes can’t be fancy? Dress them up with a little flair:
- Drizzle: Use a piping bag or a fork to drizzle contrasting chocolate over the tops.
- Sprinkles: Add festive sprinkles before the chocolate sets for holiday-themed treats.
- Edible Glitter: Give them a sparkling finish for events or special occasions.
These small touches can elevate your homemade candies from casual to celebration-ready in no time.
Why Buckeyes Are Great for Gifting
Homemade with Love
There’s something extra special about giving homemade candy. Buckeyes are:
- Easy to package and transport.
- Loved by all ages.
- Budget-friendly, especially when making large batches.
Place them in small candy boxes, jars, or treat bags tied with ribbon, and you’ve got a thoughtful gift for friends, family, teachers, or coworkers. You can even make personalized gift tags with the recipe printed on the back.
Perfect for Any Occasion
Buckeyes aren’t just for the holidays. They’re perfect for:
- Birthday parties
- Baby showers
- Graduation celebrations
- Potlucks and bake sales
With a long shelf life and simple ingredients, they’re a reliable and impressive treat that can be made ahead and enjoyed anytime.
FAQs about Buckeye Candy Recipe
1. Why are they called Buckeyes?
They’re named after the nut of the Ohio buckeye tree because they look exactly like it—dark chocolate-dipped balls with a creamy peanut butter center peeking through.
2. Can I use crunchy peanut butter instead of creamy?
Yes, you can! Crunchy peanut butter adds a bit of texture, though traditional Buckeyes use smooth peanut butter for that classic melt-in-your-mouth feel.
3. Do Buckeye candies need to be refrigerated?
Yep! Store them in an airtight container in the fridge. They’ll keep for up to 2 weeks—and honestly, they taste amazing chilled.
4. Can I freeze Buckeye candies?
Absolutely. Lay them in a single layer, freeze until solid, then store in a freezer-safe bag or container. They’ll keep for up to 3 months.
5. My chocolate coating is too thick—what’s wrong?
It might be overheated or not thinned enough. Add a teaspoon of vegetable oil or shortening while melting to get a smoother dip.
6. How do I keep the peanut butter mixture from sticking to my hands?
Chill the dough slightly and grease your palms with a bit of butter or oil. Works like a charm.
7. What’s the best chocolate for dipping?
Semi-sweet or dark chocolate chips work best, but if you’re feeling fancy, use couverture chocolate for that glossy, pro-level finish.
Conclusion
Buckeye candies are the kind of treat that everyone remembers—and once you’ve made them yourself, you’ll understand why. With their creamy peanut butter centers and rich chocolate coating, they strike the perfect balance between indulgent and nostalgic.
What makes them truly special is how easy they are to make. No oven, no stress, just a few ingredients and a little love. Whether you’re whipping up a batch for a holiday cookie tray or making them with the kids on a lazy Sunday afternoon, Buckeyes always deliver.
So go ahead—gather your ingredients, roll up your sleeves, and dive into this simple yet satisfying candy recipe. Your taste buds (and your friends) will thank you!


