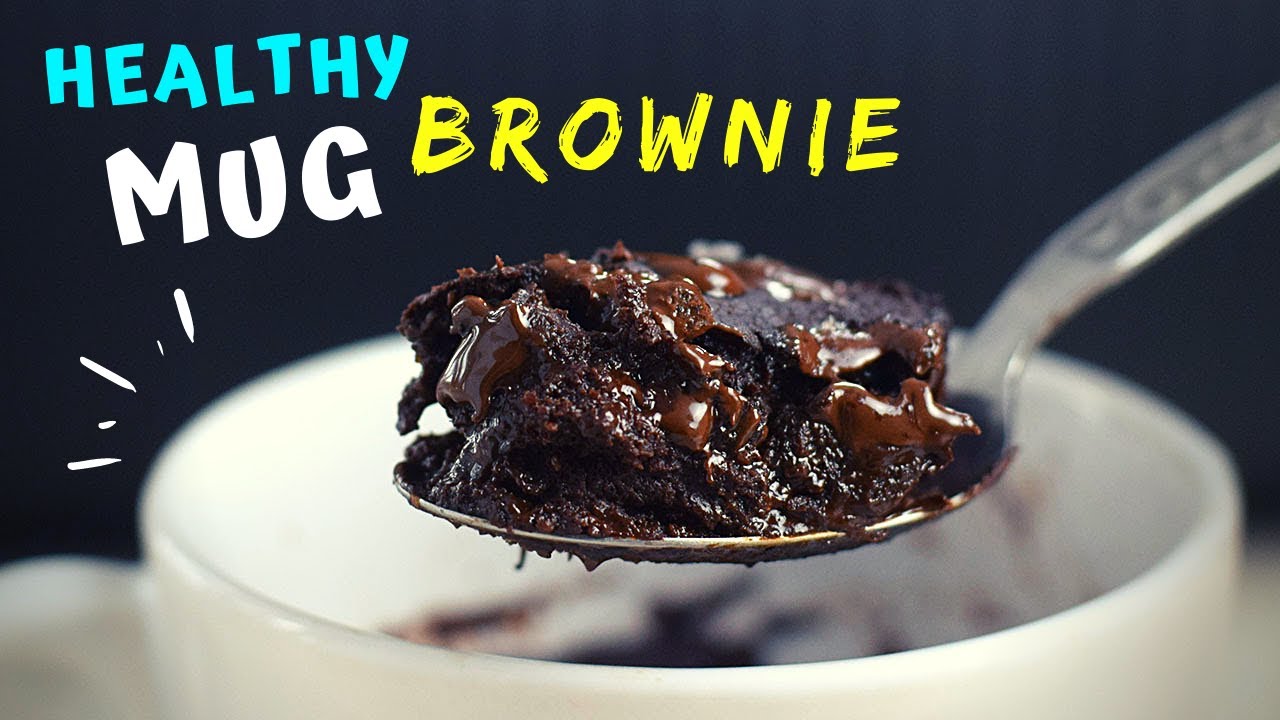
Brownie in a Mug Recipe: Ever find yourself craving a rich, gooey brownie but don’t want to deal with all the measuring, mixing bowls, and oven preheating? Enter the magical world of mug brownies—a single-serving treat that comes together in minutes using ingredients you probably already have. Whether you’re short on time or just don’t want the cleanup, this microwave dessert is about to become your new best friend.
This guide is your one-stop solution to making a delicious brownie in a mug, step-by-step. Perfect for a late-night snack, an easy dessert for one, or a quick fix for those intense chocolate cravings. No baking experience required, and trust me—you won’t even miss the oven!
Ingredients You’ll Need
Let’s start with the basics. The beauty of this recipe lies in its simplicity. You only need a handful of pantry staples to whip up this chocolatey delight.
Here’s what you’ll need:
- All-purpose flour – 4 tablespoons
- Granulated sugar – 2 to 3 tablespoons (adjust to taste)
- Unsweetened cocoa powder – 2 tablespoons
- A pinch of salt – Enhances the chocolate flavor
- Milk – 3 tablespoons (any kind will do)
- Vegetable oil or melted butter – 2 tablespoons
- Vanilla extract – 1/4 teaspoon
Want to take it up a notch? Here are some optional add-ins you can throw into the mix:
- Chocolate chips – For gooey centers
- Chopped nuts – Adds crunch
- Mini marshmallows – For a s’mores vibe
- A spoonful of peanut butter or Nutella – For richness
You can mix and match depending on your mood or what you have lying around. Just don’t go too wild on the quantities or it might overflow during microwaving.
Tools and Utensils
Before diving in, make sure you’ve got the right tools. While this is a no-fuss recipe, having the right kitchen gear can make things even easier.
- Microwave-safe mug – At least 12 oz to prevent overflow
- Spoon or fork – For mixing
- Measuring spoons – To keep things accurate
- Microwave – Obviously!
If you’re into kitchen gadgets, you can use a mini whisk for smoother mixing, but a regular fork works just fine. Just make sure the mug is microwave-safe—look for a label or test it by microwaving it empty with a cup of water next to it for one minute.
Step-by-Step Instructions
Alright, it’s go time! Follow these steps and in under 5 minutes, you’ll be digging into a warm, fudgy brownie straight from the mug.
Step 1: Preparing the Mug
Start by choosing a microwave-safe mug that’s large enough to hold your brownie without spilling over. A 12 oz or larger mug is perfect. Lightly grease the inside of the mug with oil or butter. This step is optional but helps prevent sticking.
Step 2: Mixing the Dry Ingredients
Add the flour, sugar, cocoa powder, and salt directly into the mug. Stir with a fork or spoon until everything is well combined and there are no cocoa lumps. Getting the dry ingredients evenly mixed ensures a consistent flavor in every bite.
Step 3: Adding the Wet Ingredients
Next, pour in the milk, oil or melted butter, and vanilla extract. Stir everything together until a thick batter forms. It might look a bit grainy at first—keep mixing until it becomes smooth and glossy. Don’t worry if it looks a little thicker than traditional brownie batter; that’s what gives it that fudgy texture.
Step 4: Mixing it All Together
Once your batter is mixed, now’s the time to throw in any add-ins you like—chocolate chips, nuts, or even a spoonful of peanut butter right in the center for a melty core. Gently fold them into the batter.
Smooth the top with the back of your spoon so it cooks evenly.
Step 5: Microwaving to Perfection
Microwave your mug on high for about 1 minute and 10 seconds to 1 minute and 30 seconds. All microwaves are a bit different, so you might need to experiment. You’ll know it’s done when the top looks set but still a little soft in the center. Overcooking is the enemy here—it’ll turn rubbery fast.
Let it cool for a minute (even though you’ll be tempted to dive right in), and enjoy your gooey masterpiece straight from the mug.
Tips for the Perfect Mug Brownie
Getting your mug brownie just right can be a little bit of a science and a lot of art. Here are some game-changing tips to make sure your brownie turns out delicious every single time.
Choosing the Right Mug
The mug you choose plays a huge role. Use a 12 to 16 oz microwave-safe mug. If it’s too small, your brownie might overflow while cooking. If it’s too wide, the brownie may dry out. Ceramic mugs are usually a good bet because they distribute heat evenly, but always double-check that it’s safe for microwave use.
Avoid metal mugs (big microwave no-no!) and anything with metallic paint or trim. A thick mug helps the brownie cook more evenly without turning dry or rubbery.
Microwave Power Adjustments
Every microwave is different. The standard power setting most recipes assume is 1000 watts. If yours is lower, you might need to cook for a little longer—start with 10-second increments. If it’s higher, go for a slightly shorter time to avoid overcooking.
A good sign that your brownie is perfectly cooked? The top should look firm, but the center should still be slightly moist. It will continue cooking for a few seconds even after it comes out of the microwave.
Common Mistakes to Avoid
Here’s what NOT to do:
- Overmixing the batter – Unlike cakes, overmixing can lead to toughness.
- Using too much flour – This can make your brownie dry and cakey.
- Overcooking – The number one killer of mug brownies. Keep an eye on the texture and remember that a gooey center is a good thing.
- Adding too many extras – While chocolate chips and nuts are great, too many will weigh down the batter and affect how it cooks.
Just stick to the basics and get creative once you’re comfortable with the method.
Customization Ideas
Now that you’ve nailed the base recipe, let’s talk upgrades. The beauty of mug brownies is how versatile they are. You can tweak the ingredients to suit your diet or mood in countless ways.
Nutty Delights
Throw in a tablespoon of chopped walnuts, pecans, or almonds for a bit of crunch. Roasting the nuts beforehand takes the flavor up a notch. If you’re a peanut butter fan, swirl in a spoonful right in the center of the batter for a gooey surprise.
Gooey Chocolate Centers
Want to mimic those gourmet molten lava cakes? Drop a square of chocolate or a spoon of Nutella in the middle of your batter before microwaving. It melts into a rich, warm core that oozes out when you dig in. Decadent and delicious!
Vegan and Gluten-Free Versions
Yes, mug brownies can easily go vegan or gluten-free:
- Vegan: Use almond milk or oat milk, swap the butter for coconut oil or plant-based margarine, and make sure your cocoa powder is dairy-free.
- Gluten-Free: Substitute the all-purpose flour with a 1:1 gluten-free baking flour blend.
You can also use oat flour or almond flour, though the texture might be slightly different—more cakey or moist depending on the flour.
Don’t be afraid to play around and make the brownie your own. With so many variations, this recipe never gets old!
Serving Suggestions
You’ve made your brownie—now let’s take it to the next level. Here’s how to turn your humble mug dessert into a plated masterpiece (even if it’s just for Instagram).
With Ice Cream or Whipped Cream
Top your warm brownie with a scoop of vanilla ice cream. The contrast between hot and cold is irresistible. No ice cream? A dollop of whipped cream does the trick just as well. You can also try:
- Caramel or chocolate syrup drizzle
- Fresh berries for a tart twist
- Dusting of powdered sugar for that fancy finish
Sprinkles and Syrups
If you’ve got kids (or a sweet tooth), a handful of colorful sprinkles makes everything more fun. Drizzle some maple syrup, chocolate sauce, or even honey to sweeten the deal.
Want to really impress? Serve your mug brownie in a fancy mug or glass and layer it with whipped cream and crushed cookies for a mug brownie parfait.
Storage and Reheating
Let’s be honest—most of us eat the whole brownie straight out of the mug. But if you’ve got leftovers (or you’re batching a few ahead), here’s how to store them.
- Room Temp: Let the brownie cool, cover the mug with plastic wrap or foil, and keep it at room temperature for up to 12 hours.
- Fridge: Store in the fridge for up to 2 days, though it may lose some moisture.
To reheat, just pop the mug back in the microwave for 15-20 seconds. Add a splash of milk before reheating to bring back the moisture.
Avoid reheating more than once—it gets dry and tough fast. Mug brownies are meant to be enjoyed fresh, so treat yourself while it’s warm and gooey.
FAQs about Brownie in a Mug Recipe
1. Can I make this brownie in a mug without eggs?
Yes, you can! Most mug brownie recipes are egg-free, which keeps things simple and still fudgy.
2. What type of mug should I use?
Use a microwave-safe mug that holds at least 12 oz to prevent overflow. Ceramic or glass works best.
3. Can I use cocoa powder instead of chocolate?
Absolutely. Unsweetened cocoa powder is ideal. No need to melt chocolate—this recipe is all about speed and ease.
4. How long should I microwave it?
Typically 60–90 seconds. Start with 60 seconds and check the center. Microwave wattages vary, so adjust as needed.
5. Why did my brownie turn out dry?
It was likely overcooked. Mug brownies cook fast—too long in the microwave and you’ll end up with cake instead of gooey brownie.
6. Can I add chocolate chips or nuts?
Heck yes! Toss in a tablespoon of chocolate chips, walnuts, or even peanut butter for that next-level upgrade.
7. Is this safe for kids to make?
Totally! With a little help using the microwave, it’s a fun and mess-free dessert kids can whip up on their own.
8. Can I make it vegan?
Yes! Use plant-based milk, vegan butter or oil, and ensure your cocoa powder is dairy-free.
Conclusion
There you have it—a full-proof, no-fuss guide to making the most delicious brownie in a mug. It’s quick, easy, and wildly satisfying. This recipe is the perfect answer to those moments when your sweet tooth hits hard and fast. No preheating, no dirty pans, no waiting. Just a few ingredients, a microwave, and five minutes stand between you and chocolatey bliss.
Whether you’re a busy student, a homebody craving a solo treat, or a parent needing a fast dessert for the kids, this mug brownie ticks all the boxes. Plus, the versatility means you can dress it up or keep it simple depending on your mood. Want it rich and fudgy? Add some chocolate chips. Feeling adventurous? Try a swirl of peanut butter or a sprinkle of sea salt on top.
So go ahead—grab your favorite mug, your cozy blanket, and dig into this personal-sized dessert masterpiece. Once you’ve tried it, you’ll wonder how you ever lived without it.