Best Beef Brisket Recipe: Beef brisket, a quintessential dish of American barbecue culture, is as flavorful as it is iconic. Cut from the breast section of the cow, brisket is known for its rich marbling and deep beefy taste. But it also requires patience and technique to cook it just right. This guide will take you through every step of making the best beef brisket at home—no pitmaster experience required.
Brisket isn’t just for summer cookouts. It’s a comfort food classic that’s perfect for weekend dinners, holidays, and anytime you’re craving something hearty and satisfying. The trick is slow cooking. Whether you use a smoker, oven, or slow cooker, the goal is to break down the connective tissues, transforming a tough cut into tender, juicy slices of perfection.
The best part? Brisket can be dressed up with your favorite rubs and sauces, served with a variety of sides, and repurposed into tacos, sandwiches, or hash the next day. It’s as versatile as it is delicious. Ready to become a brisket master? Let’s get started.
Choosing the Right Cut
When it comes to brisket, not all cuts are created equal. Your success begins with picking the right piece of meat. Brisket comes in two main parts: the flat cut and the point cut.
Flat Cut vs. Point Cut
- Flat Cut: This part is leaner, more uniform in shape, and ideal for slicing. It’s the choice for most home cooks.
- Point Cut: More marbled and flavorful, but also fattier. It’s often used in burnt ends or when you want extra juicy meat.
If you’re buying a whole brisket (also called a “packer”), you’ll get both sections. These can weigh anywhere from 8 to 20 pounds. For smaller meals, the flat cut is easier to manage and still delivers amazing results.
How to Select the Best Brisket
Look for a brisket that’s flexible when you bend it. This means the connective tissues are not too tight, which helps with tenderness after cooking. Also, choose meat with a good fat cap (a layer of fat on one side) and some marbling throughout for flavor.
Grass-fed brisket can be a bit leaner, while grain-fed usually has better marbling. Go with what suits your taste and budget.
Essential Ingredients for the Perfect Brisket
To make mouthwatering brisket, you don’t need a mile-long ingredient list. In fact, simplicity is key. Good quality meat paired with the right spices can work wonders.
Core Ingredients
- 1 whole brisket (8-10 lbs)
- Olive oil or mustard (as a binder)
- Coarse salt
- Black pepper
- Garlic powder
- Onion powder
- Paprika
- Brown sugar (optional for sweetness)
Recommended Rubs and Marinades
Want to amp up the flavor? Try these popular options:
- Texas-style rub: Just salt and pepper. Yes, that’s it. Let the meat shine!
- Sweet and smoky rub: Paprika, brown sugar, garlic, and cayenne.
- Liquid marinades: Worcestershire sauce, soy sauce, apple cider vinegar, or beer. Marinate overnight for deeper flavor.
Dry rubs stick better when applied with a binder like mustard or olive oil. They help form a flavorful crust (called bark) during cooking.
Preparing Your Brisket
This is where the magic starts. Prepping your brisket properly ensures it cooks evenly and tastes incredible. Don’t skip these steps!
Trimming the Fat
Using a sharp knife, trim the fat cap down to about ¼ inch thick. Too much fat prevents seasoning from penetrating the meat, while too little can cause it to dry out. Remove any large, hard chunks of fat (especially the thick seam between the flat and point cuts).
Be careful not to cut too deep. The goal is to balance fat for moisture without sacrificing seasoning coverage.
Marinating and Seasoning Tips
After trimming, it’s time to season. Apply your binder first, then generously rub the spice mix all over the brisket—don’t be shy! Press the rub in with your hands so it sticks well.
If you’re marinating, place the brisket in a resealable bag or wrap it in foil and refrigerate for at least 6 hours, ideally overnight. This allows the flavors to seep in.
Let the brisket come to room temperature before cooking. This ensures it cooks more evenly and helps prevent drying out during the long cook time.
Cooking Methods Explained
You’ve prepped your brisket—now it’s time to cook it. There are a few different ways to cook a brisket, and each one gives it a slightly different texture and flavor. The key across all methods? Low and slow is the name of the game.
Smoking the Brisket
This is the gold standard of brisket cooking, especially in Texas BBQ. Smoking adds a deep, smoky flavor and that signature bark (the crust that forms on the outside).
- Equipment: Use a wood smoker, pellet grill, or offset smoker.
- Wood Choice: Oak, hickory, or mesquite are ideal.
- Temperature: Maintain a steady 225°F (107°C).
- Time: Expect 1 to 1.5 hours per pound. A 10-pound brisket takes around 12-15 hours.
- Process:
- Preheat your smoker.
- Place the brisket fat side up.
- Insert a meat thermometer in the thickest part.
- Smoke until internal temperature hits 195–203°F (90–95°C).
- Wrap in foil or butcher paper after the stall (typically around 160°F/71°C) to retain moisture.
Oven-Baking Instructions
No smoker? No problem. You can still make delicious brisket in your oven.
- Preheat Oven: Set to 300°F (149°C).
- Prep Pan: Place the brisket in a roasting pan or Dutch oven.
- Cover Tightly: Use foil or a lid to lock in moisture.
- Cook Time: 1 hour per pound, or until tender.
- Optional: Broil for 5-10 minutes at the end to crisp the top.
Slow Cooker Method
Ideal for busy days or smaller briskets, the slow cooker produces ultra-tender results with minimal effort.
- Cut brisket to fit: Trim as needed.
- Add liquids: Beef broth, onions, garlic, and your favorite sauce.
- Cook Low & Slow: 8–10 hours on low or 5–6 on high.
- Bonus: The juices make a perfect gravy base!
Step-by-Step Brisket Recipe
Let’s bring it all together. Follow this foolproof step-by-step recipe to cook the ultimate beef brisket at home, no matter your experience level.
Step 1: Gather Your Ingredients
Before you even touch the meat, get everything ready. This includes:
- 1 brisket (8–10 lbs)
- 2 tbsp olive oil or mustard
- 2 tbsp kosher salt
- 1 tbsp ground black pepper
- 1 tbsp smoked paprika
- 1 tbsp garlic powder
- 1 tbsp onion powder
- 1 tbsp brown sugar (optional)
Optional: Worcestershire sauce, apple cider vinegar, or BBQ sauce
Step 2: Prepping the Meat
- Trim the brisket’s fat cap to about ¼ inch.
- Remove any tough silver skin or gristle.
- Apply the olive oil or mustard binder.
- Evenly coat with dry rub on all sides.
- Cover and refrigerate for at least 6 hours, preferably overnight.
Step 3: Applying the Rub
Use your hands to press the rub into every nook and cranny. Make sure the seasoning adheres well—it’s going to form a flavorful crust that locks in moisture.
Don’t skip the ends or sides. Every bite should be seasoned!
Step 4: Cooking the Brisket
Depending on your chosen method (smoker, oven, or slow cooker), follow these instructions:
- Smoker: Place brisket fat-side up. Maintain 225°F. Wrap in foil around 160°F to get through the stall. Finish at 203°F internal temp.
- Oven: Place brisket in a roasting pan with foil. Bake at 300°F until internal temp reaches 195–203°F.
- Slow Cooker: Add brisket with beef broth and onions. Cook on low for 8–10 hours.
Use a meat thermometer to monitor doneness. Trust the temp—not the clock.
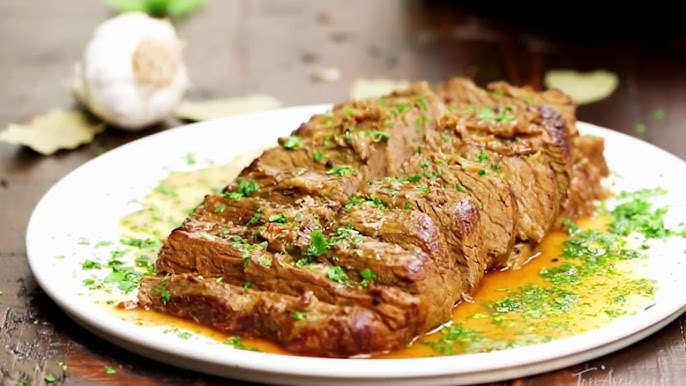
Step 5: Letting it Rest and Slicing
This step is often overlooked but absolutely crucial.
- Resting: Wrap your cooked brisket in foil or butcher paper, then place in a cooler or oven (turned off) for at least 1 hour. This helps the juices redistribute.
- Slicing: Cut against the grain in ¼-inch slices. For a whole brisket, you may need to rotate halfway through since the grain direction changes between the flat and point.
Tips for the Juiciest Brisket
If you want melt-in-your-mouth brisket, follow these expert tips:
Temperature Control
Always cook at a low, consistent temperature. Whether you’re smoking or baking, sudden temperature spikes can toughen the meat.
A digital meat thermometer is your best friend. Don’t rely solely on time—internal temp is the key.
Resting Time
Skipping the resting period is a rookie mistake. Resting allows the juices to soak back into the meat, giving you that moist, juicy bite every time. Aim for 1–2 hours of rest for large cuts.
Wrap it in foil or butcher paper and place it in a cooler lined with towels. It’ll stay hot and finish cooking gently during this time.
Slicing Against the Grain
This might seem minor, but it makes a huge difference. Slicing against the grain shortens the muscle fibers, making each bite tender and easy to chew.
Not sure where the grain runs? Look at the direction of the meat fibers before you cook. After cooking, slice perpendicular to those lines.
Common Mistakes to Avoid
Even seasoned cooks can mess up brisket. To get it just right, steer clear of these all-too-common pitfalls:
Overcooking or Undercooking
Brisket needs to hit that magic internal temperature of 195–203°F (90–95°C) to break down the connective tissues. Undercooking leaves it tough and chewy, while overcooking dries it out beyond repair.
Pro tip: Use a leave-in thermometer and keep monitoring after the stall. Don’t guess—go by the numbers.
Skipping the Resting Period
We’ve mentioned this before, but it’s worth repeating. If you cut into the brisket right after cooking, the juices will run out onto your cutting board instead of staying in the meat. You’ll end up with dry slices and wasted flavor.
Fix: Let it rest wrapped in foil or butcher paper, in a warm space like a cooler or turned-off oven for at least 1 hour.
Not Trimming Properly
Too much fat can lead to greasy bites, while not enough fat will dry out the meat. Proper trimming also helps the rub stick better and promotes even cooking.
Don’t forget: Always slice against the grain, or even the juiciest brisket will taste tough.
Serving Suggestions
A good brisket deserves great company on the plate. Whether you’re going traditional or giving it a twist, here are some top ways to serve it up:
Side Dishes to Pair
- Classic BBQ sides: Baked beans, coleslaw, potato salad, and cornbread.
- Southern favorites: Mac and cheese, collard greens, hush puppies.
- Healthy options: Roasted veggies, grilled asparagus, or a crisp garden salad.
Want a party vibe? Serve it on a wooden platter surrounded by pickles, onions, and bread.
Brisket Sandwiches, Tacos, and More
- Sandwiches: Pile brisket slices high on a brioche bun, top with pickles, onions, and a drizzle of BBQ sauce.
- Tacos: Shred brisket, stuff into corn tortillas, and top with avocado, lime, and fresh cilantro.
- Bowls: Serve brisket over rice, mashed potatoes, or polenta with gravy or chimichurri.
Leftovers? You’re just one hash skillet or brisket chili away from another amazing meal.
Storage and Reheating Tips
Proper storage and reheating can mean the difference between a brisket that tastes freshly made or one that’s dry and rubbery.
How to Store Leftovers
- Refrigerator: Store slices in an airtight container with some juices for up to 4 days.
- Freezer: Wrap tightly in foil, then place in a freezer-safe bag. Label with the date. Good for up to 3 months.
Pro tip: Store it in slices rather than as a whole—it’s easier to reheat evenly.
Best Ways to Reheat Brisket
- Oven Method: Preheat to 300°F (149°C), place brisket in a covered dish with a bit of broth or leftover juices. Heat until warm (about 30 minutes).
- Sous Vide: Best for even heating without overcooking. Set to 165°F (74°C) and warm for 1–2 hours.
- Microwave: Least preferred but okay in a pinch. Use low power and cover with a damp paper towel to retain moisture.
Avoid reheating brisket dry—always add some liquid to keep it tender and juicy.
Brisket Variations to Try
Once you’ve mastered the basics, it’s time to experiment! These variations can give your brisket a whole new flavor profile.
Spicy BBQ Brisket
Kick it up a notch by adding cayenne pepper, chipotle powder, or chili flakes to your rub. Top it with a spicy BBQ sauce or serve with jalapeño slaw for extra heat.
- Perfect for tacos and nachos.
- Great with sweet sides like cornbread or honey-glazed carrots.
Texas-Style Brisket
This purist version is all about the meat. It’s seasoned simply with salt and pepper and cooked low and slow over oak wood.
- No sauce necessary.
- Let the bark and smoke ring shine.
- Slice and serve with pickles, white bread, and onions.
This style is ideal for showing off your brisket skills without masking flavors.
Nutritional Information
While brisket is rich and hearty, it also packs a solid protein punch and contains essential nutrients. Here’s a rough breakdown per 6-ounce serving:
| Nutrient | Amount |
|---|---|
| Calories | 320–400 |
| Protein | 30–35g |
| Fat | 20–25g |
| Saturated Fat | 8–10g |
| Carbohydrates | 0g |
| Fiber | 0g |
| Sugar | 0g |
| Iron | 15–20% DV |
| Zinc | 30% DV |
| Vitamin B12 | 100%+ DV |
Brisket is keto-friendly, gluten-free, and high in iron and B12—just watch the portions if you’re watching fat intake. Leaner cuts and healthy sides can help balance the meal.
FAQs about Best Beef Brisket Recipe
Q1: What cut of meat is best for brisket?
The best cut is a whole packer brisket, which includes both the point and the flat. It’s well-marbled and perfect for slow cooking.
Q2: Should I marinate or dry rub brisket?
Both work, but dry rubs are more popular for brisket. They help form a flavorful bark during slow cooking or smoking.
Q3: How long does it take to cook beef brisket?
On average, brisket takes 1 to 1.5 hours per pound at 225°F when smoked or roasted low and slow. Always use a meat thermometer for accuracy.
Q4: What internal temperature is brisket done?
Brisket is done when it hits 195–205°F internally. That’s the sweet spot where the collagen breaks down and the meat becomes ultra tender.
Q5: How do I keep brisket moist?
Wrap the brisket in foil or butcher paper during cooking (Texas Crutch) and let it rest for at least an hour after cooking. This locks in the juices.
Q6: Can I make brisket in the oven?
Absolutely! Oven-baked brisket can be just as juicy and tender—just use low heat and allow plenty of time to slow roast it.
Q7: How do I store leftover brisket?
Wrap tightly and store in an airtight container in the fridge for up to 4 days, or freeze for up to 3 months. Reheat slowly for best results.
Conclusion
Cooking brisket can feel like an intimidating task at first, but it’s truly a labor of love. Once you’ve nailed the basics—choosing the right cut, seasoning generously, cooking low and slow, and letting it rest—you’ll be amazed at how delicious it turns out. Whether you’re cooking for a weekend BBQ or just want to master a new culinary skill, this brisket recipe is sure to impress.
Remember: the best brisket isn’t rushed. It’s a slow dance of heat, smoke, spice, and patience. Trust the process, and you’ll be rewarded with one of the most flavorful and satisfying meats you’ve ever cooked.


