Banoffee Pie Recipe:Ah, Banoffee Pie! Just saying the name can make your mouth water, right? This British classic dessert has won hearts across the globe, and for good reason. It’s a decadent combo of buttery biscuit base, rich toffee, sliced bananas, and fluffy whipped cream. If you’re someone who swoons over caramel and bananas, this dessert is your match made in heaven.
Banoffee Pie, a portmanteau of “banana” and “toffee,” is a delightfully sweet, creamy treat that packs both flavor and texture into every bite. It’s luxurious yet incredibly simple to make. The balance between the crunch of the crust, the softness of bananas, and the creaminess of the toffee and whipped cream is simply divine.
First created in the 1970s in East Sussex, England, this dessert quickly rose to fame. The combination was so addictive that it became a staple at many restaurants and homes alike. What started as a playful experiment by chefs has now become a must-try recipe for dessert lovers around the world.
Whether you’re hosting a dinner party or simply craving a homemade dessert, Banoffee Pie is a showstopper that’s sure to impress. Plus, it doesn’t require any baking — a huge bonus for beginner bakers or those without an oven.
Ingredients You’ll Need
Let’s start with the essentials. To make the ultimate Banoffee Pie, you don’t need any fancy or rare ingredients. Everything you need is probably already in your pantry or just a short trip to the grocery store away.
For the Crust:
- 250g digestive biscuits (or graham crackers)
- 100g unsalted butter (melted)
For the Filling:
- 400g can of sweetened condensed milk (to make dulce de leche)
- 3 ripe bananas (medium to large)
- 300ml heavy or double cream
- 2 tbsp icing sugar (optional)
- 1 tsp vanilla extract
For the Toppings (Optional):
- Grated chocolate or cocoa powder
- Chocolate curls
- Crushed nuts (walnuts or pecans)
- A drizzle of chocolate or caramel sauce
Optional Flavor Boosts:
- A pinch of sea salt for salted caramel
- Coffee powder for a mocha twist
Using fresh bananas and good quality cream is key. Make sure your bananas are ripe — yellow with a few brown spots. Overripe bananas might make your pie too mushy, while underripe ones won’t deliver that signature banana sweetness.
Tools and Equipment Required
Before we jump into the cooking part, let’s make sure you’ve got all the tools lined up. While this pie doesn’t require any baking, a few essential kitchen tools will help ensure the process is smooth and mess-free.
Kitchen Tools Checklist:
- 9-inch tart or pie tin (preferably with a loose bottom)
- Food processor or rolling pin (for crushing biscuits)
- Mixing bowls
- Spoon or spatula
- Whisk or electric mixer
- Saucepan (for boiling the condensed milk or preparing dulce de leche)
- Cutting board and knife
- Measuring cups and spoons
- Grater (for chocolate shavings, if using)
Optional but helpful: A piping bag for neat whipped cream topping. If you want it to look bakery-perfect, piping that cream will take it up a notch.
Step-by-Step Preparation
Let’s get to the fun part! Making Banoffee Pie is surprisingly easy and therapeutic. Follow this step-by-step guide, and you’ll have a drool-worthy dessert ready in no time.
Step 1: Preparing the Base
Start by making the biscuit base, which forms the foundation of your pie. Think of it as the crispy canvas for all the creamy goodness to come.
- Crush the Biscuits: Toss the digestive biscuits into a food processor and blitz until they become fine crumbs. No processor? No problem. Put them in a zip-lock bag and crush with a rolling pin.
- Add Melted Butter: Pour the melted butter over the crumbs and mix until well combined. The mixture should resemble wet sand — firm enough to mold, but not greasy.
- Press into Tin: Spoon the mixture into your tart tin. Use the back of a spoon to press it down firmly and evenly across the base and up the sides. This helps prevent crumbling later.
- Chill: Place the crust in the fridge for at least 20–30 minutes to set. This is crucial for a solid base that won’t fall apart when sliced.
Want to make it more indulgent? Add a spoonful of cocoa powder to the crumb mix for a chocolatey touch.
Step 2: Making the Toffee (Dulce de Leche)
There are a few ways to make this delicious caramel filling, but the traditional method using sweetened condensed milk is foolproof — and absolutely delicious.
Classic Method:
- Place a sealed can of condensed milk in a large saucepan.
- Cover completely with water.
- Bring to a boil, then lower the heat and simmer for 2 to 2.5 hours.
- Check occasionally and top up with water so the can remains fully submerged.
- Once done, cool before opening — hot caramel can burn!
Quick Method: Use store-bought dulce de leche or caramel sauce. Just make sure it’s thick and not too runny.
The result? A thick, golden, creamy toffee that you’ll want to eat with a spoon. (Don’t say I didn’t warn you!)
Step 3: Slicing the Bananas
With your base chilling and the toffee ready, it’s banana time — and not just any banana moment. This step is more crucial than you might think. The bananas bring the fruity freshness that balances the sweetness of the toffee and cream.
Here’s how to do it right:
- Choose the Right Bananas: Ripe bananas with a yellow peel and light brown specks are ideal. They’re sweet, soft, and flavorful without being too mushy.
- Slice with Precision: Use a sharp knife and slice the bananas into even, medium-thin rounds — not too thick, not too thin. Around ½ cm thick is perfect.
- Optional Step – Lemon Juice: If you’re not serving the pie immediately, drizzle the slices lightly with lemon juice to prevent browning. Don’t worry — a tiny amount won’t affect the taste.
- Layer Strategically: Arrange the banana slices evenly over the cooled toffee layer. Cover as much surface as possible for a consistent bite every time.
Remember, bananas are the heart of a Banoffee Pie. Their creamy texture complements the toffee so perfectly, it’s basically a flavor love story.
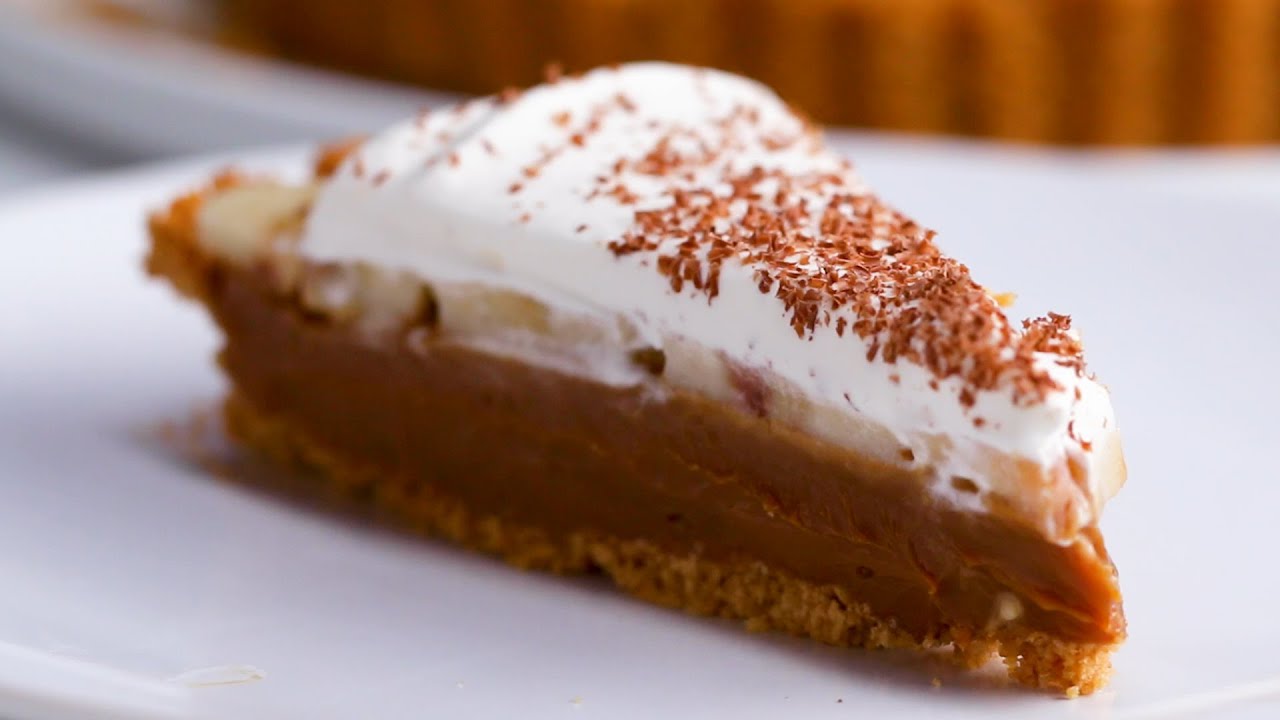
Step 4: Assembling the Pie
Now for the most satisfying part — putting all your delicious layers together. It’s like building a dream house, one creamy, sweet layer at a time.
- Start with the Base: Ensure your biscuit base is firm and cold from the fridge.
- Add the Toffee: Spoon the thick, golden toffee over the crust. Spread evenly using a spatula or the back of a spoon.
- Layer the Bananas: Neatly place the banana slices on top of the toffee. Overlap them slightly for full coverage.
- Add the Cream: Whip your cream with a splash of vanilla extract and, if desired, a bit of icing sugar. Beat until soft peaks form.
- Top the Pie: Spread or pipe the whipped cream over the banana layer. You can go rustic with swirls or use a piping bag for a clean, bakery-style finish.
- Final Touches: Sprinkle grated chocolate, cocoa powder, or drizzle a bit of caramel or chocolate sauce. Want texture? Add chopped nuts or cookie crumbs.
Chill the assembled pie for at least 30 minutes to an hour before serving — it helps the layers meld together beautifully.
Step 5: Whipping the Cream
The whipped cream is the grand finale of your Banoffee Pie, adding airiness and balance to the rich layers below. Getting it just right makes a huge difference.
- Use Cold Cream: Always start with chilled heavy or double cream (35–40% fat content is best).
- Optional Sweetener: Add 1–2 tablespoons of icing sugar if you prefer sweetened cream. A few drops of vanilla extract also elevate the flavor.
- Whip to Soft Peaks: Use an electric mixer for ease. Beat until the cream holds its shape but is still soft and fluffy. Avoid overbeating — you don’t want butter!
- Pipe or Spread: Choose your style. Spoon it over for a casual look, or use a piping bag for a bakery-style finish.
Tip: For extra stability (especially in warm climates), add a teaspoon of powdered gelatin dissolved in water or use stabilizing cream.
This topping isn’t just decorative — it’s essential for balancing the richness of the toffee and bananas with a light, airy texture that keeps you coming back for seconds.
Tips and Tricks for the Perfect Banoffee Pie
Want to elevate your Banoffee Pie from good to unforgettable? These pro tips will help you avoid rookie mistakes and give your dessert that wow factor.
1. Chill at Every Stage:
Every layer benefits from some chill time. It helps firm up the base, sets the toffee, and makes slicing cleaner.
2. Slice Bananas Just Before Use:
Bananas can brown quickly. Slice them last and consider brushing with lemon juice if you’re making the pie ahead.
3. Don’t Skimp on Cream Quality:
Use high-fat cream for the fluffiest, most luxurious whipped topping. It holds better and tastes richer.
4. Want Crispier Crust?
Bake the biscuit base for 8–10 minutes at 180°C (350°F) before chilling. It’s optional but adds a firmer bite.
5. Use a Springform or Loose-Bottom Tin:
This makes serving so much easier and gives your pie that professional edge.
6. Customize Your Toppings:
Don’t stop at chocolate! Try shaved coconut, cinnamon dust, or even crushed pretzels for a salty crunch.
7. Prepare in Advance:
Make the toffee and crust a day before. Assemble the final pie a few hours before serving for the best results.
Variations You Can Try
Banoffee Pie is versatile and can be tweaked to fit different tastes and dietary needs without losing its charm.
1. Vegan Banoffee Pie:
- Use coconut cream or plant-based whipped topping.
- Replace butter with vegan margarine.
- Opt for dairy-free caramel or make your own with coconut milk and sugar.
2. Gluten-Free Version:
- Use gluten-free biscuits for the crust.
- Ensure your toppings and caramel are gluten-free certified.
3. Chocolate Lover’s Dream:
- Add a chocolate ganache layer between the crust and the toffee.
- Mix cocoa powder into the crust or cream.
4. Nutty Delight:
- Add crushed hazelnuts or pecans to the crust or on top.
- Try peanut butter drizzle for a sweet and salty twist.
5. Boozy Banoffee:
- Add a splash of coffee liqueur or rum to the whipped cream.
- Adults will appreciate the extra depth of flavor.
Banoffee Pie doesn’t have to be traditional. Feel free to get creative — it’s a dessert that loves a personal touch.
Storage and Serving Suggestions
Once you’ve poured your heart (and cream) into crafting the perfect Banoffee Pie, the next important step is knowing how to store and serve it for the best experience. Luckily, Banoffee Pie is a low-maintenance dessert when it comes to storage — but there are still some golden rules to follow.
Storing the Pie:
- Refrigeration is Key: Always keep your Banoffee Pie chilled. Because of the cream and banana, it’s best stored in the fridge in an airtight container or covered tightly with plastic wrap or foil.
- Consume Within 2–3 Days: The bananas may start to brown slightly after a couple of days, but the taste remains delicious. The cream can also start to lose its shape after this window.
- Avoid Freezing the Whole Pie: While you might be tempted to freeze Banoffee Pie, the fresh bananas and whipped cream don’t hold up well in the freezer. They can become watery and mushy when thawed.
- Make-Ahead Tip: Prepare and store the crust and toffee up to 2 days in advance. Add bananas and cream the day you plan to serve it for the freshest result.
Serving Tips:
- Slice with a Warm Knife: Run a knife under warm water before slicing to get neat, clean cuts.
- Garnish Before Serving: Add final toppings like grated chocolate or nuts just before serving for freshness and crunch.
- Pair with Coffee or Espresso: The sweetness of the pie pairs beautifully with a bold coffee — think of it like a dessert version of a caramel macchiato.
Banoffee Pie is best enjoyed chilled and in generous slices. Serve it as the star of a dinner party or treat yourself after a long day — it’s a dessert that fits every occasion.
Common Mistakes to Avoid
Even though Banoffee Pie is relatively simple to make, there are a few pitfalls that can sabotage your dessert if you’re not careful. Knowing these in advance can save your pie (and your pride) from disaster.
1. Undercooked or Overcooked Toffee:
If you’re boiling a can of condensed milk, keep a close eye on the water level. Too little water can lead to the can bursting — dangerous and messy! Also, boiling too long can make the toffee too thick and grainy.
2. Overwhipping the Cream:
This is one of the most common errors. Overwhipped cream can separate and become butter-like. Stop when you reach soft peaks — it should be light and airy.
3. Mushy or Overripe Bananas:
Bananas that are too ripe can break down and make the pie soggy. Choose firm, ripe bananas with minimal brown spots.
4. Crumbly or Loose Base:
Not pressing the biscuit base down firmly enough or not chilling it long enough can cause the crust to fall apart when slicing. Firm pressure and proper chilling are key.
5. Assembling Too Early:
If you’re not serving the pie right away, wait to add the bananas and whipped cream. The bananas will brown and the cream may collapse, especially in warm conditions.
6. Not Letting Toffee Cool:
Adding hot toffee to the crust or topping it immediately with bananas and cream can make your layers runny and ruin the pie structure. Always cool the toffee first.
Avoid these simple mistakes and your Banoffee Pie will turn out as good as — or better than — any restaurant dessert.
FAQs about Banoffee Pie Recipe
1. What is Banoffee Pie made of?
Banoffee Pie is a no-bake dessert made with a buttery biscuit crust, layers of dulce de leche (toffee), sliced bananas, and whipped cream. It’s rich, creamy, and absolutely indulgent.
2. Can I use condensed milk instead of dulce de leche?
Yes, you can. To make homemade dulce de leche, simmer a can of sweetened condensed milk for 2–3 hours until it thickens and turns golden brown. Always make sure the can is fully submerged in water.
3. How long does Banoffee Pie last in the fridge?
Banoffee Pie can be stored in the refrigerator for up to 3 days. Cover it tightly with plastic wrap or store it in an airtight container to keep it fresh.
4. Can Banoffee Pie be frozen?
It’s not recommended to freeze Banoffee Pie because the bananas and whipped cream may change texture. For best results, make it fresh and store it chilled.
5. What type of crust works best for Banoffee Pie?
A digestive biscuit or graham cracker crust is traditional and works beautifully. Just mix crushed biscuits with melted butter and press into a tart pan.
6. Is Banoffee Pie gluten-free?
Banoffee Pie can be made gluten-free by using gluten-free biscuits for the crust. Be sure to check that all ingredients, especially the biscuits and toffee, are certified gluten-free.
7. Can I make Banoffee Pie ahead of time?
Yes, you can prepare the crust and toffee layer a day ahead. Add the banana slices and whipped cream just before serving to keep everything fresh.
Conclusion
Banoffee Pie is more than just a dessert — it’s a celebration of textures and flavors that come together in perfect harmony. From the crumbly biscuit base to the rich toffee, sweet bananas, and fluffy whipped cream, every layer adds its own magic. The best part? You don’t need to be a seasoned chef to make it. With a handful of ingredients and a little patience, you can whip up a show-stopping dessert that’ll have everyone asking for seconds (and the recipe).
Whether you’re making it for a special occasion or just to satisfy a sweet craving, Banoffee Pie never disappoints. It’s the kind of dessert that brings people together, makes memories, and — most importantly — satisfies your sweet tooth like nothing else.
So go ahead, bookmark this recipe, give it a try, and enjoy the delicious, caramel-banana goodness that is Banoffee Pie.