Rock Candy Recipe: Who doesn’t love a sweet, sparkling treat that not only satisfies your sugar craving but also looks like a science experiment? Rock candy is more than just a tasty delight—it’s a fun, hands-on experience that you can make right in your kitchen. Whether you’re planning a party, teaching kids about crystal formation, or just want to relive a bit of childhood magic, this step-by-step rock candy recipe guide has got you covered.
What is Rock Candy?
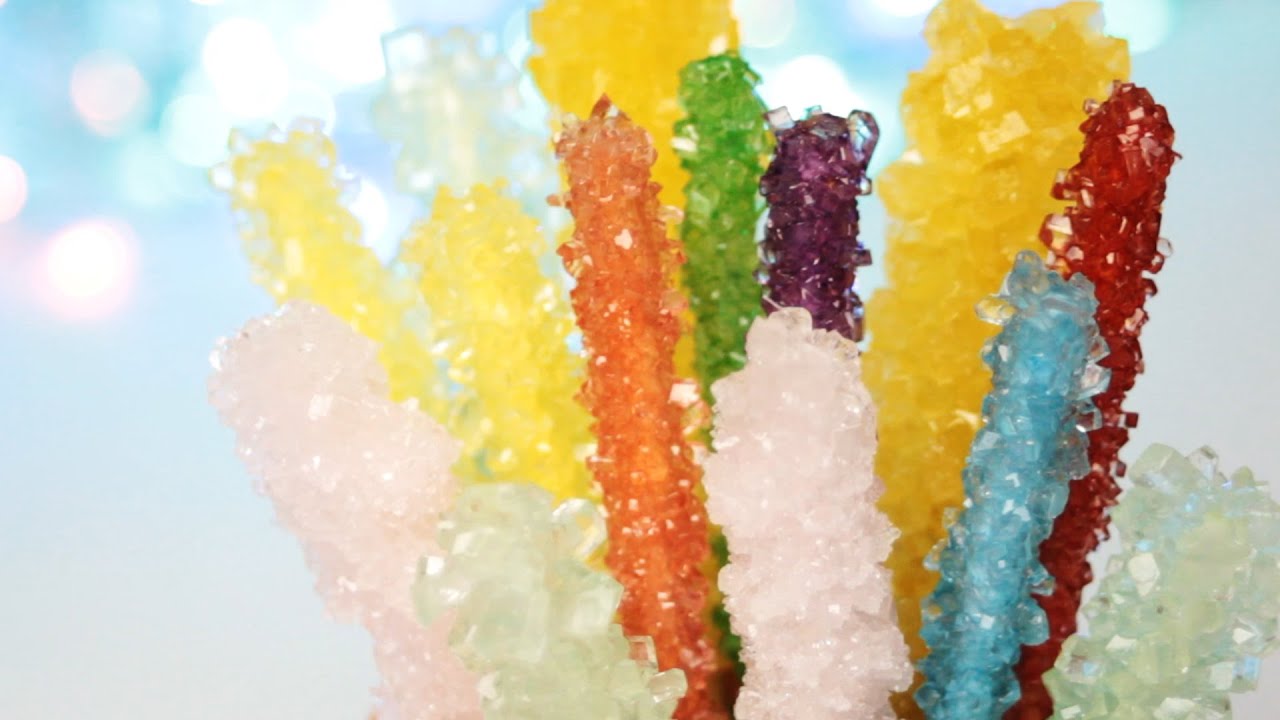
Rock candy, also known as sugar candy or crystal candy, is a type of confection composed of large sugar crystals. These glittery chunks form when a supersaturated sugar solution cools and begins to crystallize over time. The result? A beautiful, crunchy candy that looks like it came straight out of a crystal cave. It’s both science and dessert rolled into one.
The appeal of rock candy lies in its simplicity and visual charm. You’ve probably seen it used as party favors, cocktail stirrers, or even as a homemade gift. It’s a treat for the eyes and the taste buds. While you can buy rock candy in stores, making it at home lets you customize the colors, flavors, and even shapes, adding a personal touch you just can’t get from store-bought versions.
Why Make Rock Candy at Home?
You might wonder, “Why go through the trouble of making rock candy when I can buy it?” Great question. The answer is simple: homemade rock candy is a rewarding experience.
Here are some solid reasons to give it a try:
- Educational Value: It’s a fun science experiment to do with kids. You can teach them about solutions, saturation, and crystallization in the sweetest way possible.
- Customization: Choose your favorite colors, flavors, and even shapes. Want grape-flavored purple crystals? Go for it!
- Gift-Worthy: Homemade rock candy makes fantastic gifts. Just pop them into a mason jar with a cute ribbon.
- Cost-Effective: Sugar is cheap, and the rest is mostly patience. Why not make a batch for the whole neighborhood?
Plus, there’s a certain magic in watching the crystals grow day by day. It’s the kind of project that invites you to slow down, watch, and enjoy the process.
Ingredients and Tools Needed
Basic Ingredients for Rock Candy
The beauty of this recipe lies in its simplicity. You only need a handful of ingredients—most of which are probably already in your kitchen.
Here’s what you’ll need:
- 2 cups of water
- 4 cups of granulated white sugar (plus extra for coating sticks)
- Food coloring (optional)
- Flavor extracts like vanilla, peppermint, or cherry (optional)
You can scale this recipe up or down depending on how much candy you want to make. The key is to maintain the correct sugar-to-water ratio to achieve a supersaturated solution.
Tools You’ll Need for the Process
Having the right tools makes the process smoother and helps you avoid messes or mistakes. Here’s a list of essential items:
- A medium saucepan – for boiling the sugar solution.
- Clean glass jars – one per candy stick or string.
- Skewers or string – for the sugar crystals to grow on.
- Clothespins or clips – to suspend the skewers or string.
- Measuring cups – for precision.
- Spoons – for stirring.
- A funnel (optional) – to pour the hot liquid into jars without spilling.
Before starting, make sure everything is clean and dry. Any impurities can interfere with crystal formation.
Preparing the Sugar Solution
Step-by-Step Process of Making the Saturated Sugar Solution
Making the sugar solution is where the chemistry magic begins. You’re aiming for a supersaturated solution, which means dissolving more sugar in water than it would normally hold at room temperature—achieved by heating the water.
Here’s how to do it:
- Heat the water: Pour 2 cups of water into a saucepan and bring it to a gentle boil over medium heat.
- Add the sugar gradually: Slowly add 4 cups of sugar to the boiling water, one cup at a time, stirring constantly. It’s important not to dump it all in at once—this ensures each batch of sugar fully dissolves before more is added.
- Dissolve completely: Continue stirring and heating until the mixture becomes clear and no granules remain. This might take 5–10 minutes.
- Let it cool slightly: Once all the sugar is dissolved, remove the saucepan from heat and let it sit for 10–15 minutes to cool down slightly. It should still be warm but not hot enough to shatter glass when poured.
Tips to Avoid Crystallization Too Early
Nothing ruins rock candy faster than premature crystallization. Here are a few insider tips:
- Use clean jars and tools. Any dust or debris can act as a “seed” for crystals to form too early.
- Avoid stirring after removing from heat. Let the mixture sit quietly to prevent crystal formation in the pan.
- Pre-wet and sugar-coat your skewers or strings. Dip them in water, roll them in granulated sugar, and let them dry. This helps kickstart crystal formation on the stick rather than in the solution.
By now, you’ve created the perfect sugar bath—thick, sweet, and just waiting to become rock candy.
Coloring and Flavoring Your Rock Candy
Adding Food Coloring and Flavor Extracts
Here’s where the fun starts—customizing your candy! Want blue raspberry? Maybe red cinnamon? You’re the artist.
Follow these steps:
- Add food coloring: After your sugar solution cools a bit, stir in a few drops of food coloring. The more you add, the bolder the color. You can even mix colors for cool effects—think turquoise or lavender.
- Add flavor extract: Now’s the time to add about 1–2 teaspoons of flavoring extract. Popular options include vanilla, peppermint, cherry, orange, and even root beer.
Stir everything gently to mix, then you’re ready to move to the crystal-growing stage.
Creative Ideas for Color and Flavor Combinations
Want your rock candy to stand out? Try these fun pairings:
- Blue + Raspberry extract – Classic blue raspberry flavor
- Red + Cinnamon extract – A fiery, spicy-sweet treat
- Green + Lime extract – Refreshing and tangy
- Purple + Grape extract – Candy shop vibes all the way
- Yellow + Lemon extract – Bright and zesty
For an extra wow factor, you can make layered colors in separate jars or twist multi-colored rock candy sticks together once they’re dry.
Setting Up the Crystal Growth
Preparing the Jar and String or Stick
Now that you have your colorful, flavored sugar solution ready, it’s time to set the stage for the crystals to grow. This part of the process is where patience really pays off.
Here’s how to prep everything:
- Choose your container wisely: Glass jars work best because they let you see the magic happening. Make sure they are completely clean and dry. Mason jars or recycled glass jars from jams or sauces are perfect.
- Set up your skewers or string: If you’re using skewers or wooden sticks, pre-wet them slightly and roll them in granulated sugar. Let them dry fully—this gives the crystals something to cling to.
- Suspend your sticks: Once dry, tie each stick to a clothespin or balance it across the top of the jar so that the stick dangles straight down into the solution without touching the sides or bottom. If it touches the glass, the crystals may not form properly.
- Pour the sugar solution into the jars: Carefully use a funnel or ladle to pour the warm sugar solution into your jars. Fill them almost to the top, leaving a small gap so the stick doesn’t hit the bottom.
Important tip: If you see sugar crystals forming on the top surface or sides of the jar within the first few hours, don’t panic. You can gently remove them with a spoon, but try not to disturb the stick or the solution.
Letting the Crystals Grow: How Long It Takes
Once everything is set up, it’s time to play the waiting game. Rock candy crystals don’t grow overnight—but watching them slowly appear is all part of the fun.
Here’s what to expect:
- First signs (Day 1-2): Within the first 24–48 hours, you should begin to see small crystals forming along the string or stick.
- Crystals expand (Day 3-5): These small crystals will begin to grow larger as more sugar from the solution clings to them.
- Full growth (Day 5-7): By the end of a week, you should have well-formed, chunky sugar crystals that look like real rock candy.
To grow even larger crystals, you can leave them longer—but don’t go beyond 10 days, or they may become brittle or begin to break off.
Tips for better growth:
- Avoid moving the jars. Keep them in a stable place at room temperature, away from vibrations.
- Cover the jars. Use paper towels or coffee filters with holes to keep dust out while letting air circulate.
- Monitor the progress. You can peek each day, but resist the urge to move or shake the jars.
Once you’re happy with the size of your crystals, it’s time to remove the sticks and let them dry. Hold them over the jar for a few seconds to let excess solution drip off, then lay them on wax paper or hang them upright to dry for a few hours.
Now, you’ve got your very own homemade rock candy—ready to eat, display, or share.
Drying and Storing Your Rock Candy
How to Properly Dry the Rock Candy
Once your crystals have reached the desired size, it’s crucial to dry them properly. This final step ensures your rock candy won’t be sticky or attract moisture, which can cause it to melt or become mushy over time.
Here’s how to do it:
- Gently remove the candy sticks: Carefully lift them out of the jar and let any excess liquid drip back into the container. Try not to knock off any of the crystals.
- Let them dry on wax paper: Lay the sticks on a sheet of wax paper or parchment paper, spaced apart. Let them air-dry for at least 2–3 hours at room temperature.
- Hang them to dry (optional): For a cleaner finish, you can suspend the sticks over a baking tray so they don’t touch any surfaces at all.
Avoid placing them in the refrigerator or in humid environments, as this can cause the sugar to absorb moisture and ruin your hard-earned crystals.
Best Ways to Store Rock Candy
To keep your candy tasting and looking great:
- Use airtight containers: Mason jars, ziplock bags, or plastic candy containers with lids work well.
- Keep them dry: Store in a cool, dry place away from direct sunlight and humidity.
- Avoid freezing: Freezing rock candy can damage the crystal structure and make it brittle.
Properly stored, your rock candy can last for several months without any issues—making it perfect for long-term treats or gifts.
Fun Variations and Presentation Ideas
Creative Shapes and Designs
Want to take your rock candy to the next level? With a bit of creativity, you can go beyond the basic stick.
Try these ideas:
- String designs: Shape the string into spirals or initials before drying. Just secure the shape with wire or twist ties before dipping into the sugar solution.
- Molded jars: Use jars with unique shapes or patterns to influence the final look of your rock candy.
- Mini pops: Use lollipop sticks for smaller, bite-sized pieces that kids can enjoy more easily.
Decorative Packaging and Gift Ideas
Homemade rock candy makes for impressive, thoughtful gifts. Here are a few fun packaging tips:
- Color-coded favors: Match the candy color to the event theme—blue for baby showers, red for Valentine’s Day, etc.
- Mason jar sets: Place several sticks in a jar, add a ribbon and a personalized tag.
- Candy bouquets: Wrap the sticks like flowers in decorative paper and tie them with a bow.
You can even turn this into a small business opportunity—customized rock candy for weddings, birthday parties, or corporate events.
Troubleshooting Common Rock Candy Problems
Why Didn’t My Crystals Grow?
Sometimes, even when you follow all the steps, the crystals don’t cooperate. Here’s why that might happen:
- Not enough sugar: If your solution isn’t saturated enough, crystals won’t form.
- Temperature too low: Sugar dissolves better in hot water. If the mixture wasn’t hot enough, it may not have reached saturation.
- Impurities in the jar or stick: Any dirt or oil can prevent crystals from forming properly.
- Movement or vibrations: If your jar was bumped or shaken, crystals might not grow or could fall off.
Fixes and Prevention Tips
If your first attempt doesn’t work, don’t give up. Try again with these tips:
- Use a candy thermometer to make sure your sugar solution is hot enough.
- Make sure your sticks are sugar-coated and dry before dipping.
- Let your solution cool just slightly before pouring into jars—if it’s too hot, it might dissolve any seed crystals.
- Keep your jars in a quiet, stable spot—like the back of a pantry or cupboard.
Making rock candy is part recipe, part science project. Every attempt teaches you something new!
Health and Safety Tips
Is Rock Candy Safe for Kids?
Yes! Rock candy is generally safe for children to eat, but there are a few things to keep in mind:
- Choking hazard: Because of its size and hardness, it’s best suited for kids over the age of 4.
- Supervise during the making: Boiling sugar water can cause burns, so always handle that step yourself and keep kids at a safe distance.
- Allergy awareness: Make sure any added flavors or colors are safe for those who will eat them.
Homemade treats are always best enjoyed with a side of supervision.
FAQs about Rock Candy Recipe
Q1: How long does it take to make rock candy?
It typically takes 5 to 7 days for the sugar crystals to fully form on the stick or string. Patience is key to get the best crystal growth.
Q2: Can I use food coloring in my rock candy?
Yes! Food coloring is a great way to make your rock candy more fun and visually appealing. Just add a few drops to the sugar solution before pouring it into jars.
Q3: Why aren’t crystals forming on my stick or string?
Crystals may not form if the sugar solution isn’t super saturated. Make sure you’ve added enough sugar, and let the solution cool slightly before inserting your prepared stick or string.
Q4: What kind of sugar works best for rock candy?
Use granulated white sugar for best results. It dissolves easily and forms clear, beautiful crystals.
Q5: Is it safe for kids to make rock candy?
Yes, but adult supervision is important, especially when handling hot sugar syrup. It’s a fun science and kitchen experiment for kids when done safely.
Q6: Can I flavor rock candy?
Absolutely! Add flavor extracts like vanilla, mint, or lemon to customize your rock candy taste. Add flavor after removing the sugar solution from heat.
Q7: How should I store rock candy?
Once dry, store your rock candy in an airtight container to keep it fresh and prevent moisture from ruining the crystals.
Conclusion
Making rock candy at home is one of those rare activities that is both educational and delicious. It’s a fascinating blend of kitchen science and sugary indulgence that people of all ages can enjoy. Whether you’re crafting a batch for a child’s birthday party, giving a colorful gift, or simply treating yourself to a nostalgic snack, this step-by-step guide will ensure your success. With just sugar, water, and a bit of creativity, you can grow your very own edible crystals and wow everyone around you.
Ready to start growing your own sweet little science experiment? Grab those jars, and let the magic begin!