Huli Huli Chicken Recipe: Imagine the smoky aroma of sweet, savory, and slightly tangy chicken sizzling on a grill. That’s the magic of Huli Huli Chicken—a Hawaiian classic that has taken the world by storm. If you love juicy, flavorful grilled chicken with a tropical twist, you’re in for a treat. This guide will walk you through everything you need to know to recreate this island favorite right at home.
What Makes Huli Huli Chicken Special?
Huli Huli Chicken isn’t just another grilled chicken recipe—it’s an experience. What sets it apart is its unique marinade, made from a harmonious blend of soy sauce, brown sugar, ginger, and pineapple juice. These ingredients come together to create an irresistible glaze that caramelizes beautifully over an open flame, locking in moisture and flavor.
Another special aspect? The traditional cooking method involves constantly flipping the chicken—”huli” means “to turn” in Hawaiian—giving it an even char and smoky goodness on both sides. It’s a true labor of love that rewards you with tender, flavor-packed meat.
Huli Huli Chicken is often associated with community gatherings, fundraisers, and festive occasions in Hawaii. It’s not just food; it’s a celebration!
A Brief History of Huli Huli Chicken
The story of Huli Huli Chicken dates back to the 1950s when Ernest Morgado, a businessman and chicken farmer, first introduced it during a barbecue for local farmers. It became so popular that Morgado trademarked the name “Huli Huli” and started selling the sauce commercially.
Originally, whole chickens were skewered between two grills and rotated by hand over mesquite wood fires. Today, while commercial versions still thrive, home cooks and chefs alike have adapted the recipe for grills and even ovens. Despite the modernization, the essence of Huli Huli Chicken—sweet, smoky, and soul-satisfying—remains unchanged.
Essential Ingredients for Authentic Huli Huli Chicken
Before you fire up the grill, you need to gather the right ingredients. Authentic Huli Huli Chicken isn’t complicated, but the balance of flavors is key.
Key Components for the Marinade
Here’s what you’ll need:
- Soy Sauce: The salty base that ties all the flavors together.
- Brown Sugar: Adds that characteristic sweetness and helps with caramelization.
- Pineapple Juice: Provides a tropical tang and tenderizes the meat.
- Ketchup: Adds richness and a hint of acidity.
- Fresh Ginger: Gives a zesty, slightly spicy kick.
- Garlic: Essential for that savory depth.
- Rice Vinegar or Apple Cider Vinegar: Adds brightness to cut through the sweetness.
- Sesame Oil: Just a dash for a nutty aroma.
Optional but highly recommended:
- Sriracha or Chili Flakes: If you like a bit of heat.
- Green Onions: For garnishing at the end.
Choosing fresh, high-quality ingredients will make a noticeable difference in your final dish. Trust me, your tastebuds will thank you.
Optional Add-ons to Customize Your Flavor
Want to make the dish truly your own? Here are some optional twists:
- Honey: For an even richer sweetness.
- Lime Juice: To enhance the tropical flair.
- Teriyaki Sauce: For an extra umami boost.
- Mustard: A touch for those who like a slight tangy bite.
Mix and match according to your preferences, but always keep the core ingredients intact to preserve the spirit of traditional Huli Huli Chicken.
Step-by-Step Guide to Making Huli Huli Chicken
Alright, it’s go time! Let’s break down the entire process into simple, manageable steps.
Step 1: Preparing the Marinade
In a large mixing bowl, combine:
- 1 cup soy sauce
- 1/2 cup brown sugar
- 1/2 cup pineapple juice
- 1/4 cup ketchup
- 1 tablespoon fresh grated ginger
- 2 cloves minced garlic
- 2 tablespoons rice vinegar
- 1 tablespoon sesame oil
Whisk everything together until the sugar is dissolved and the mixture looks glossy and uniform. Taste your marinade—you should get a sweet, tangy, slightly salty, and aromatic flavor. Adjust the balance if needed (add more pineapple juice for tanginess or brown sugar for sweetness).
Set aside a small portion of the marinade for basting during grilling. This step is crucial to avoid contamination with raw chicken juices.
Step 2: Marinating the Chicken Properly
Choose bone-in, skin-on chicken thighs, drumsticks, or even a whole spatchcocked chicken for maximum flavor.
- Place the chicken in a large zip-top bag or shallow dish.
- Pour the marinade over the chicken, ensuring every piece is well-coated.
- Seal and refrigerate for at least 6 hours, preferably overnight.
The longer you marinate, the more intense and deep the flavors will be. Don’t rush this step!
Massage the chicken occasionally if possible—this helps the marinade penetrate deeper into the meat.
Step 3: Setting Up Your Grill
A crucial part of making authentic Huli Huli Chicken is using a grill to achieve that smoky, slightly charred flavor. Whether you’re working with a charcoal grill, gas grill, or even a smoker, the setup matters.
Here’s how to set it up properly:
- Preheat the Grill: Aim for a medium heat, about 350°F to 400°F.
- Create Two Zones: One side for direct heat (hot) and the other for indirect heat (cooler). This allows you to sear the chicken and then move it to cook more slowly without burning.
- Oil the Grates: Before placing the chicken, brush the grill grates with oil to prevent sticking.
- Prepare a Basting Station: Have your reserved marinade and a brush ready for action.
If you’re using charcoal, adding a few wood chips (like mesquite or hickory) can amplify that traditional smoky flavor even more.
Grilling is all about managing heat and patience. Don’t rush; good things come to those who wait!
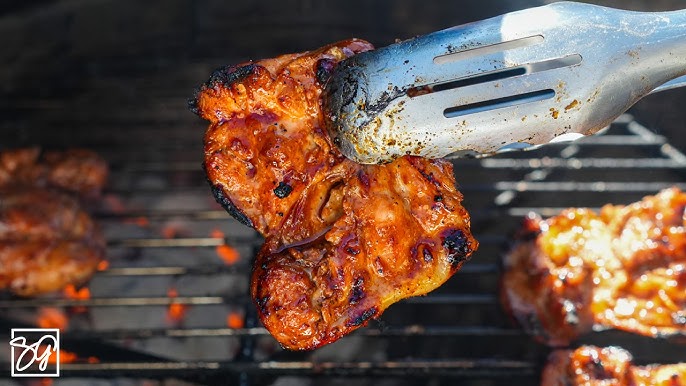
Step 4: Grilling the Chicken to Perfection
Now comes the fun (and delicious) part—grilling the chicken! Here’s the method:
- Sear First: Start by placing the chicken skin-side down over direct heat. Let it sear for about 3-4 minutes until you see nice grill marks.
- Flip Carefully: Remember, “huli” means to turn! Flip the chicken using tongs and sear the other side.
- Move to Indirect Heat: Once you have a good sear on both sides, move the chicken to the indirect heat side of the grill.
- Cover and Cook: Close the lid and let the chicken cook slowly. This allows the inside to cook thoroughly without burning the outside.
Internal temperature is key. Always use a meat thermometer and aim for 165°F in the thickest part of the chicken.
Rotate and “huli” (flip) the chicken every 5-7 minutes. This ensures even cooking and helps develop that beautiful caramelized exterior without charring it too much.
Step 5: Basting for Extra Flavor
Basting is where the real Huli Huli magic happens.
Every time you flip the chicken, brush on a generous amount of the reserved marinade. This layers the flavors beautifully and creates that sticky, glossy finish that Huli Huli Chicken is famous for.
Tips for basting:
- Don’t Rush It: Let the marinade sizzle and slightly caramelize before adding more.
- Be Generous: Don’t skimp on the sauce; it’s the soul of the dish.
- Final Baste: During the last few minutes of grilling, give one last heavy baste and let it glaze up nicely.
Once the chicken is cooked through and has a gorgeous deep amber color, remove it from the grill and let it rest for 5-10 minutes. This allows the juices to redistribute, making every bite incredibly juicy.
Tips and Tricks for Perfect Huli Huli Chicken
Want to level up your Huli Huli game? These tips can make a world of difference:
Common Mistakes to Avoid
- Skipping the Marination Time: Less than 6 hours of marination won’t do justice to the flavors.
- High Heat Only: Cooking over only high heat will burn the sugars before the chicken cooks through. Always use a two-zone heat setup.
- Using All the Marinade for Basting: Always reserve a portion beforehand to avoid contamination.
- Overbasting: While basting is important, drowning the chicken every minute can cause flare-ups and char too much.
Mastering these basics can transform your Huli Huli Chicken from good to unforgettable!
How to Get the Signature Smoky Flavor
If you want that authentic island flavor, here’s the trick:
- Use Wood Chips: Soak mesquite or hickory chips in water for 30 minutes, then toss them over the coals or place them in a smoker box for a gas grill.
- Charcoal Over Gas: Charcoal grilling naturally gives a better smoky flavor than gas.
- Don’t Overcrowd the Grill: Allow room around each piece of chicken for the smoke to circulate.
The result? That drool-worthy, lip-smacking flavor that transports you straight to a Hawaiian luau.
Serving Suggestions
You’ve made the ultimate Huli Huli Chicken. Now, let’s plate it like a pro!
Best Side Dishes to Pair With Huli Huli Chicken
Here are some killer sides that complement the chicken perfectly:
- Steamed White Rice or Coconut Rice: A simple, classic choice.
- Grilled Pineapple Slices: Sweet, caramelized, and tropical.
- Macaroni Salad: A traditional Hawaiian plate lunch staple.
- Coleslaw: Adds a fresh, crunchy contrast.
- Sweet Potato Fries: A little sweet, a little savory—total perfection.
Balance is key: the sweet and savory chicken pairs best with sides that are either refreshing, creamy, or lightly sweet.
How to Plate Like a Pro
- Create Height: Stack the chicken slightly instead of laying it flat.
- Use Fresh Herbs: A sprinkle of cilantro or green onions makes the dish pop visually.
- Color Balance: Add colorful sides like coleslaw or grilled veggies for an Instagram-worthy plate.
FAQs about Huli Huli Chicken Recipe
What is Huli Huli Chicken?
Huli Huli Chicken is a famous Hawaiian grilled chicken dish known for its sweet, tangy, and smoky flavor. It’s typically marinated in a mixture of pineapple juice, soy sauce, brown sugar, ginger, and garlic, then grilled to juicy perfection.
Why is it called “Huli Huli” Chicken?
The name “Huli Huli” comes from the Hawaiian word “huli,” which means “to turn.” Traditionally, the chicken was cooked on a spit and turned constantly over the fire to achieve even cooking and a delicious caramelized glaze.
What cut of chicken is best for Huli Huli Chicken?
While you can use any cut, bone-in, skin-on chicken thighs and drumsticks are the most popular choices. They stay juicy and absorb the marinade beautifully during grilling.
How long should I marinate the chicken?
For the best flavor, marinate the chicken for at least 4 hours, but overnight is even better. The longer the chicken soaks, the deeper the flavor.
Can I make Huli Huli Chicken without a grill?
Yes! If you don’t have a grill, you can cook Huli Huli Chicken in a grill pan on the stovetop or even bake it in the oven. Broiling at the end will give it a nice charred finish.
Is Huli Huli Chicken spicy?
Not traditionally. Huli Huli Chicken is more sweet and savory. However, you can add a little hot sauce or red pepper flakes to the marinade if you like a spicy kick.
What side dishes go well with Huli Huli Chicken?
Classic sides include steamed white rice, Hawaiian macaroni salad, grilled pineapple, or a fresh green salad. These sides balance the rich, smoky flavor of the chicken.
Can I freeze Huli Huli Chicken?
Absolutely! You can freeze the marinated chicken raw for up to 2 months. Thaw it overnight in the fridge before grilling. Cooked Huli Huli Chicken can also be frozen for quick meals later.
How do I prevent the chicken from burning on the grill?
Because the marinade contains sugar, it can burn easily. Grill the chicken over medium heat and turn it often. Also, baste towards the end of grilling, not at the beginning.
Can I use the marinade as a sauce?
For safety, if you want to use the marinade as a sauce, boil it for at least 5 minutes to kill any bacteria from the raw chicken. Alternatively, set aside some fresh marinade before adding the raw chicken.
Conclusion
There you have it—your complete, step-by-step guide to making mouthwatering Huli Huli Chicken at home! From the flavorful marinade to the careful grilling and generous basting, every step brings you closer to that authentic Hawaiian taste. It’s not just about grilling chicken; it’s about creating an experience, a memory, and a dish that your family and friends will beg you to make again and again.
Huli Huli Chicken is proof that with simple ingredients and a little patience, you can recreate island magic right in your backyard. Whether you’re planning a summer cookout, a family dinner, or just craving something deliciously different, this recipe delivers every single time.
So what are you waiting for? Fire up that grill, grab your marinade, and start “huli-ing” your way to chicken paradise.


