Fish Batter Recipe: If you’ve ever bitten into a golden, crunchy piece of battered fish and thought, “How do they get it this good?” — you’re in the right place. The batter is the soul of fried fish, and nailing it can transform your seafood game. It’s not just a coating; it’s a flavor-packed, crispy shell that makes fish irresistible.
Why a Good Batter Matters
The batter isn’t just there to make your fish look good—it locks in moisture, boosts flavor, and gives you that iconic crunch. A well-made batter can take an average fish fillet and turn it into something spectacular. It acts like a little blanket that seals in all the juices while crisping up beautifully on the outside.
Imagine biting into a dry, soggy crust. Gross, right? That’s exactly what happens when your batter is too thick, too runny, or improperly fried. A balanced batter complements the fish without overwhelming it. You want it airy, crunchy, and flavorful.
Common Mistakes to Avoid When Making Batter
- Overmixing the batter: This activates the gluten in the flour and makes the batter heavy.
- Using warm liquids: Cold beer or sparkling water makes the batter lighter and crispier.
- Battering wet fish: Moisture ruins batter adhesion. Always pat fish dry.
- Skipping resting time: Letting batter sit briefly helps the flour hydrate and results in a smoother texture.
- Wrong oil temperature: Too hot, and the outside burns. Too cool, and it absorbs too much oil.
These little mistakes might seem minor, but they can make or break your fish-frying experience. Don’t worry—we’ll walk you through each step so you can avoid them all.
Ingredients for Classic Fish Batter
Now let’s talk about what goes into making the perfect batter. You don’t need a fancy pantry—just a few everyday items, some optional flavor boosters, and the right technique.
Essential Ingredients You’ll Need
Here’s your basic lineup:
- All-purpose flour (1 cup) – This is your base. It forms the body of the batter.
- Cornstarch (1/4 cup) – For added crispiness.
- Baking powder (1 tsp) – Gives the batter lift and lightness.
- Salt (1/2 tsp) – Enhances flavor.
- Cold sparkling water or beer (3/4 to 1 cup) – Adds bubbles, making the batter airy and crisp.
- Egg (1) – Optional but helps bind the batter and adds richness.
Using beer? Great choice. The yeast and carbonation in beer help create a beautiful texture. Light lagers or pilsners work best because they don’t overpower the fish’s flavor.
Optional Add-Ins for Extra Flavor
If you want to take your batter to the next level, consider tossing in:
- Garlic powder
- Paprika or smoked paprika
- Cayenne pepper (if you like heat)
- Chopped herbs like parsley or dill
- Lemon zest for brightness
These aren’t required, but they can elevate your fish from great to gourmet.
Preparing Your Fish Before Battering
Batter is only half the equation. The fish itself needs proper prep so it can shine beneath that crispy coat.
Choosing the Right Fish
Go for white, flaky fish that holds up well to frying. Some popular choices include:
- Cod
- Haddock
- Pollock
- Tilapia
- Halibut
These types of fish have mild flavors and soft textures that pair beautifully with crispy batter.
Proper Cleaning and Drying Techniques
Before you start coating, make sure your fillets are:
- Deboned: Check for any tiny pin bones.
- Even-sized: Cut larger fillets so they cook evenly.
- Thoroughly dried: Use paper towels to pat down the fish. Moisture is your enemy—it stops batter from sticking and can cause splattering during frying.
Once your fish is prepped and dried, place it in the fridge while you prepare your batter. Cold fish also helps the batter stick better!
Step-by-Step Fish Batter Recipe
Let’s roll up our sleeves. Here’s your foolproof process to batter and fry your fish like a pro.
Mixing the Batter
- In a large bowl, whisk together the flour, cornstarch, salt, baking powder, and any optional dry seasonings.
- Slowly pour in the cold sparkling water or beer. Whisk gently until just combined—lumps are okay!
- If using an egg, beat it in at this stage.
- Let the batter sit for 5–10 minutes while your oil heats.
Consistency tip: Your batter should coat the back of a spoon without being too thick. If it’s gloopy, thin it with a splash more beer or water.
Coating the Fish Properly
- Lightly dredge the dried fish fillets in flour before dipping them in the batter—this helps the batter cling better.
- Dip each fillet into the batter, letting excess drip off.
- Carefully lower the battered fillet into hot oil (350–375°F / 175–190°C).
Frying the Fish to Golden Perfection
- Fry in small batches to avoid lowering the oil temperature.
- Cook each fillet for 4–6 minutes, turning once, until golden brown and crispy.
- Remove and place on a paper towel-lined plate or wire rack to drain.
Don’t forget to season with a pinch of salt right after frying—this helps it stick to the hot crust!
Tips for Crispy, Flavorful Batter
The devil is in the details when it comes to crispy batter. Getting that crunch just right isn’t magic—it’s all about knowing the tricks of the trade.
Temperature Control
Oil temperature is your best friend—or your worst enemy. Here’s why:
- Too hot? The batter burns before the fish cooks.
- Too cold? The fish absorbs too much oil and turns greasy.
The sweet spot? 350–375°F (175–190°C). Use a thermometer if you can. Don’t guess—oil heats quickly and cools fast when you drop in cold fish.
Want a little hack? Throw a small drop of batter into the oil. If it sizzles and floats right away, your oil is good to go. If it sinks and sits there—hold up. Wait for it to heat up a little more.
Also, avoid overcrowding your pan. It lowers the temperature too fast and ruins the crisp.
Timing and Frying Techniques
Here are some more pro tips:
- Fry in small batches: Two or three pieces at a time. More than that, and you’ll drop the oil temp.
- Don’t touch the fish too much: Let it be. Flip once, and don’t poke or prod.
- Use the right tools: A spider strainer or slotted spoon works better than tongs.
- Drain properly: Place fried fish on a wire rack, not paper towels. Paper can trap steam and make your batter soggy.
And remember, freshly fried fish is best eaten right away. That crisp outer layer? It doesn’t stay magical forever. So serve it hot and fresh for the ultimate experience.
Serving Suggestions
Now that you’ve got your crispy, golden fish ready, what should you serve it with? The right sides and sauces can take your meal to the next level.
Classic Sides That Pair Well
You can’t go wrong with the classics. Here are some mouthwatering sides that complement fried fish perfectly:
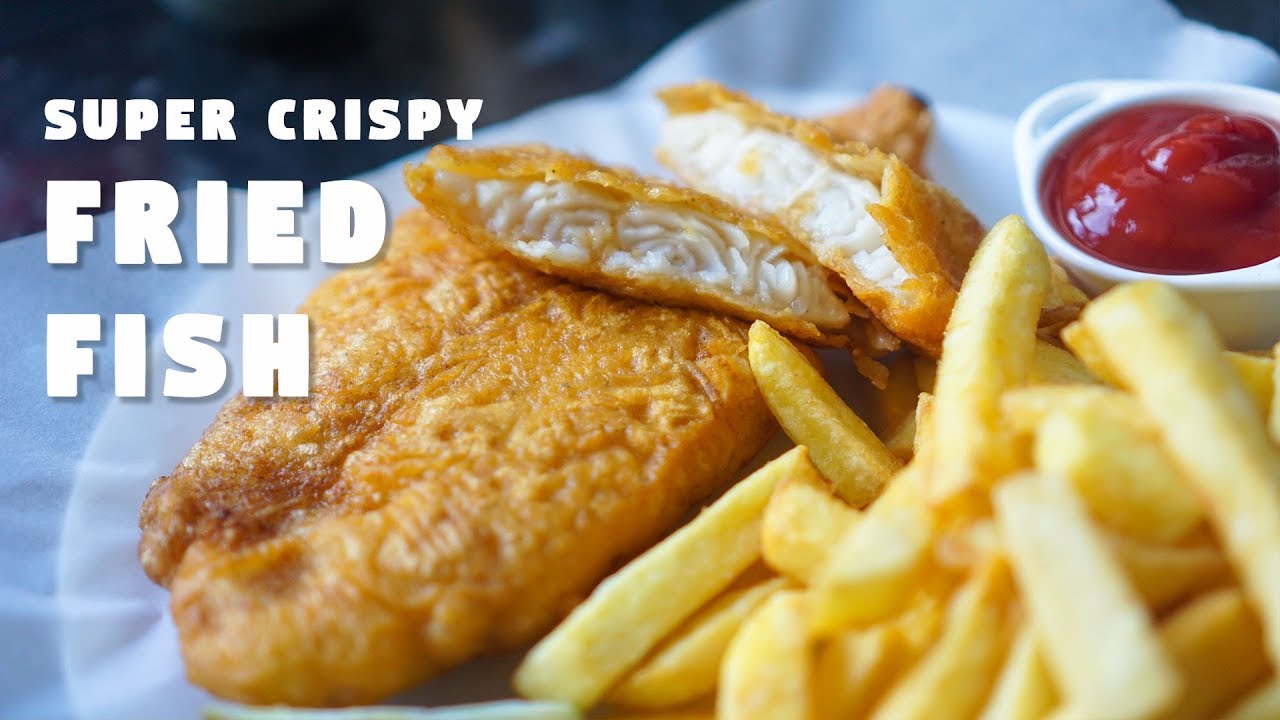
- Thick-cut fries (aka chips): Classic combo. Crisp on the outside, fluffy inside.
- Coleslaw: The creamy crunch balances the richness of fried fish.
- Tartar sauce: A must-have. Creamy, tangy, and the perfect contrast.
- Lemon wedges: A splash of citrus brightens everything up.
- Mushy peas: A UK staple with battered fish.
- Cornbread or hush puppies: Great for Southern-style fish fries.
Want to go healthier? Try:
- Roasted veggies
- A light green salad with vinaigrette
- Grilled corn on the cob
You’ve already mastered the art of the batter—why not treat your plate like a canvas and create a full-on flavor masterpiece?
Dipping Sauces to Enhance the Taste
Beyond tartar sauce, there’s a whole world of dips waiting to be explored:
- Spicy sriracha mayo
- Honey mustard
- Garlic aioli
- Yogurt dill sauce
- Sweet chili sauce
Each sauce brings its own vibe, from creamy and cool to spicy and bold. You can even mix and match to keep things interesting.
FAQs about Fish Batter Recipe
Q1: What is the best flour to use for fish batter?
All-purpose flour is the most common and versatile choice. It creates a light, crispy coating that complements the fish without overpowering its flavor. For extra crispiness, you can mix it with cornflour or rice flour.
Q2: Can I use baking powder in fish batter?
Yes! Baking powder is often added to fish batter to give it an airy, fluffy texture. It helps create bubbles in the batter, making it crispier when fried.
Q3: Should I use cold water or beer in the batter?
Cold water or cold beer is ideal. The cold temperature prevents gluten from developing too much, keeping the batter light. Beer also adds flavor and helps make the batter extra crispy thanks to its carbonation.
Q4: How do I stop the batter from falling off the fish?
Make sure your fish is dry before dipping it in the batter. Also, coat it lightly in flour first—this helps the batter stick better and stay intact while frying.
Q5: Can I make fish batter ahead of time?
It’s best to use the batter fresh, right after mixing, especially if it includes baking powder or beer. These ingredients lose their effectiveness over time, resulting in a flatter, less crispy coating.
Q6: Is fish batter gluten-free?
Traditional fish batter contains wheat flour, which is not gluten-free. However, you can substitute with gluten-free flours like rice flour, chickpea flour, or a gluten-free all-purpose blend.
Q7: What oil is best for frying battered fish?
Neutral oils with high smoke points—like vegetable oil, canola oil, or sunflower oil—are ideal. They don’t affect the flavor and can withstand the high heat needed for deep-frying.
Q8: Can I bake fish instead of frying it with batter?
Batter is designed for deep frying. Baking won’t give the same crisp texture. For oven cooking, try breading the fish instead of using a wet batter.
Conclusion
Making the perfect fish batter at home isn’t just possible—it’s actually pretty fun once you get the hang of it. Whether you’re planning a cozy dinner or feeding a hungry crowd, this recipe delivers that pub-style crunch and golden goodness every time.
Just remember the keys: start with good fish, dry it well, keep your batter cold and your oil hot, and don’t rush it. With a little care and a few tried-and-true techniques, your fish fry nights will never be the same.
Now go ahead—crack open a cold drink, fire up that fryer, and get ready to impress!


