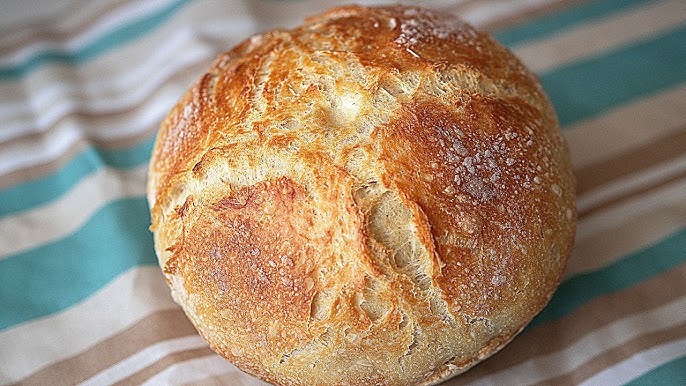
Easy Homemade Bread Recipe: There’s nothing quite like the aroma of fresh bread baking in your kitchen. It’s comforting, nostalgic, and downright delicious. Homemade bread might seem like a task for seasoned bakers, but with the right guidance, anyone can do it—even if you’ve never touched a rolling pin before. Making bread at home is not just about satisfying your hunger; it’s about the joy of creating something wholesome with your own hands.
Whether you’re baking for your family, looking to save money, or just want to try something new, this easy homemade bread recipe will be your go-to guide. This step-by-step method breaks everything down in a simple, approachable way.
Ready to get your hands a little floury?
Ingredients You’ll Need
The beauty of homemade bread lies in its simplicity. You only need a few basic ingredients to get started, and chances are, you already have most of them in your pantry.
Here’s what you’ll need:
- 3 ½ cups all-purpose flour (you can use bread flour for a chewier texture)
- 1 ½ cups warm water (about 110°F/45°C)
- 2 ¼ teaspoons active dry yeast (one packet)
- 2 tablespoons sugar (to feed the yeast)
- 1 ½ teaspoons salt
- 2 tablespoons vegetable oil or melted butter
Every ingredient plays a vital role here. The flour gives the bread its structure. Water activates the yeast. Sugar helps the yeast grow. Salt brings out the flavor, and oil keeps the bread soft and moist.
Make sure your yeast is fresh! Expired yeast won’t rise, and that means flat, sad bread. A good rule of thumb is to store yeast in the fridge or freezer if you don’t use it often.
Tools and Equipment
You don’t need a professional kitchen to bake great bread. In fact, you can pull this off with just a few tools:
Must-Haves:
- Large mixing bowl
- Measuring cups and spoons
- Wooden spoon or silicone spatula
- Clean towel or plastic wrap
- Oven
Nice-to-Haves (but not required):
- Stand mixer with dough hook
- Kitchen thermometer
- Loaf pan (or baking sheet if going rustic)
- Dough scraper
Having the right tools can make the process smoother, especially if you’re baking regularly. But don’t stress—your hands are your best tools here!
Step-by-Step Instructions
Now for the fun part! Follow these steps carefully and you’ll have a warm, golden loaf ready to slice and serve.
Step 1: Activate the Yeast
Start by pouring the warm water into a large mixing bowl. Add the sugar and stir to dissolve. Sprinkle the yeast on top and let it sit for 5–10 minutes. If it gets foamy and bubbly, congrats—you’ve got active yeast! If not, your yeast may be dead and you’ll need to start over.
Step 2: Mix the Dough
Once the yeast is active, add the flour, salt, and oil. Stir everything together until a shaggy dough forms. It’ll be sticky—that’s okay!
Step 3: Knead the Dough
Transfer the dough onto a floured surface and knead it for 8–10 minutes. You’re looking for a smooth, elastic texture. If you’re using a stand mixer, use the dough hook on medium speed for about 5 minutes. Don’t skip this step—kneading develops gluten, which gives your bread structure.
Step 4: Let It Rise
Place the kneaded dough into a lightly oiled bowl, cover it with a towel or plastic wrap, and set it somewhere warm. Let it rise until it doubles in size, about 1–1.5 hours. A good trick is to put it in a turned-off oven with the light on.
Step 5: Shape and Second Rise
Punch down the dough to release air bubbles, then shape it into a loaf or roll it into a log for your pan. Place it into a greased loaf pan or onto a baking sheet. Let it rise again for 30–45 minutes until it puffs up.
Step 6: Bake the Bread
Preheat your oven to 375°F (190°C). Bake the bread for 30–35 minutes, or until it’s golden brown and sounds hollow when tapped on the bottom. You can also check with a thermometer—the inside should be 190°F (88°C). Let it cool on a rack before slicing.
Tips for Perfect Homemade Bread
Making bread is as much an art as it is a science. While the recipe is straightforward, a few small tweaks and tips can elevate your loaf from good to bakery-worthy.
1. Mind Your Water Temperature
Yeast is a living organism, and it’s picky about its environment. Water that’s too hot will kill it, while water that’s too cold won’t activate it properly. Aim for water between 105°F and 115°F. If you don’t have a thermometer, it should feel warm—not hot—to the touch.
2. Don’t Rush the Rising Time
Letting the dough rise slowly gives the yeast time to work its magic, resulting in better flavor and texture. If your kitchen is cold, place the bowl near a warm stove or inside the oven with just the light on. Never rush this process or try to speed it up in a hot oven—bread dough needs patience.
3. Know When to Stop Kneading
Undermixed dough won’t have enough gluten, but overmixing can make it tough. You’ll know it’s ready when the dough is smooth and springs back when pressed. A simple “windowpane test” (stretching a small piece of dough between your fingers until it’s thin and translucent without tearing) can help.
4. Score the Dough Before Baking
Use a sharp knife or razor to make a small slash across the top before baking. This helps control where the bread expands in the oven, preventing random cracks and adding that rustic bakery look.
5. Steam = Crusty Bread
Want a crispy crust? Place a small pan of hot water on the bottom rack of your oven while baking. The steam helps create that golden, crackly crust you see in artisan loaves.
6. Let It Cool Before Slicing
It’s hard to wait, but slicing too early releases steam, making the bread gummy inside. Give it at least 20–30 minutes to cool on a rack before cutting in.
By mastering these small yet powerful techniques, you’ll consistently turn out loaves that make you wonder why you ever bought bread from the store.
Storing and Freezing Bread
You’ve put in the effort, and now you want to keep your bread fresh as long as possible. Here’s how to do it right.
Short-Term Storage
For bread that you’ll eat within a couple of days, store it in a paper bag or wrapped in a clean kitchen towel on the counter. Avoid plastic bags if you want to keep the crust crispy—they trap moisture and make the bread soggy.
If you prefer a soft crust, go ahead and use a plastic bag or bread box to retain moisture. Just be aware it might lose a bit of its crispness.
Long-Term Storage
Homemade bread freezes beautifully. Once the loaf has cooled completely:
- Slice it (optional but convenient)
- Wrap it tightly in plastic wrap or foil
- Place it in a freezer-safe zip-top bag
- Label with the date
It’ll stay fresh in the freezer for up to 3 months. When you’re ready to eat it, thaw it on the counter or pop individual slices in the toaster or oven.
Avoid Refrigerating Bread
Contrary to popular belief, the fridge actually speeds up staling. Unless you’re dealing with very humid conditions or a bread with perishable add-ins (like cheese or eggs), avoid refrigerating homemade bread.
Flavor Variations
Once you’ve mastered the basic loaf, it’s time to have some fun. Bread is incredibly versatile, and you can customize it in endless ways.
Savory Twists
- Garlic & Herb: Add minced garlic and mixed herbs (rosemary, thyme, oregano) to the dough.
- Cheddar Jalapeño: Mix in shredded cheddar cheese and sliced jalapeños for a spicy kick.
- Olive & Sun-dried Tomato: A Mediterranean favorite—chopped olives and sun-dried tomatoes folded into the dough.
Sweet Additions
- Cinnamon Swirl: Roll out the dough, spread a cinnamon-sugar mixture, roll it up, and bake.
- Raisin & Honey: Add raisins and a tablespoon of honey for a sweet, wholesome loaf.
- Banana Bread-style: Add mashed banana and a bit of brown sugar for a softer, cake-like bread.
Toppings and Mix-ins
- Sprinkle sesame seeds, poppy seeds, oats, or flax seeds on top before baking for extra crunch and flavor.
- Mix in nuts, dried fruits, or grated veggies for unique textures and tastes.
The best part? You’re in full control. Experiment with flavors you love and create signature loaves that match your taste perfectly.
Serving Suggestions
Once your homemade bread is out of the oven, the possibilities are endless. This versatile staple can go with just about anything, but here are a few creative and classic ways to enjoy it:
1. Straight-Up with Butter
Let’s be real—nothing beats warm bread slathered with butter. For an extra flavor boost, try it with:
- Herb butter
- Honey butter
- Garlic butter
2. Make a Sandwich Masterpiece
Your homemade bread makes the perfect foundation for epic sandwiches. Whether it’s a hearty ham and cheese, a turkey avocado club, or a plant-based veggie delight, fresh bread levels up any sandwich.
3. Toast It Up
Slice your loaf thick, toast it golden brown, and top it with:
- Avocado and poached egg
- Peanut butter and banana
- Cream cheese and smoked salmon
- Hummus and roasted veggies
4. French Toast or Bread Pudding
Got some day-old bread? Don’t toss it! Use it to make indulgent French toast or a cozy bread pudding. The firm texture of older bread absorbs the custard beautifully.
5. Croutons or Bread Crumbs
Cube it, season it, and bake it for crunchy croutons that’ll take your salads or soups to the next level. Or pulse stale bread in a food processor for homemade bread crumbs.
No matter how you serve it, homemade bread makes everything taste better. It’s the blank canvas for both humble meals and gourmet creations.
Health Benefits of Homemade Bread
There’s more than just taste driving people to bake their own bread. Making it from scratch means you know exactly what’s going into your food. Here’s why that matters:
1. No Preservatives or Additives
Store-bought bread often contains preservatives to extend shelf life, dough conditioners, added sugar, and artificial flavors. When you bake at home, you can keep things clean, natural, and wholesome.
2. Nutritional Control
You decide what goes in. Want to cut back on salt? Use whole wheat flour? Add flax seeds or chia for a fiber boost? Go for it! Homemade bread lets you tailor the recipe to fit your health needs or dietary preferences.
3. Better Digestion
Some people find homemade bread easier to digest, especially when made with natural fermentation (like sourdough). You also have the option to use unbleached flour, organic ingredients, and even sprouted grains.
4. Supports Mindful Eating
When you put the time and effort into baking bread, you tend to appreciate and savor it more. It connects you with your food on a deeper level and encourages more intentional eating.
5. Budget-Friendly
Let’s not forget the savings. A loaf of quality bread from the store can cost $4–$6, especially if it’s organic or artisan-style. Making it at home? You’re spending cents on the dollar for a better result.
Homemade bread isn’t just a treat—it’s a healthier, smarter lifestyle choice.
FAQs about Easy Homemade Bread Recipe
Q1. What ingredients do I need for homemade bread?
You’ll typically need flour, water, yeast, sugar, salt, and oil or butter. These basic ingredients create a soft and flavorful loaf.
Q2. Can I use all-purpose flour instead of bread flour?
Yes, all-purpose flour works fine. Bread flour gives a chewier texture, but both produce great results.
Q3. Do I need a stand mixer to make bread?
Not at all! You can knead the dough by hand. It may take a bit more effort, but the results are just as tasty.
Q4. How long should I let the dough rise?
Usually, the dough needs to rise for 1 to 2 hours until it doubles in size. Warmer environments help it rise faster.
Q5. Can I freeze homemade bread?
Absolutely! Let the bread cool completely, then wrap it tightly in plastic wrap and freeze for up to 3 months.
Q6. Why didn’t my bread rise properly?
This could be due to expired yeast, cold environment, or not enough kneading. Make sure your yeast is active and your dough is elastic.
Q7. How can I make my crust crispy?
Try brushing the dough with water before baking or placing a pan of hot water in the oven to create steam.
Q8. Is homemade bread healthier than store-bought?
Yes! You control the ingredients, avoid preservatives, and reduce sugar and salt based on your preferences.
Q9. How long does homemade bread stay fresh?
Homemade bread stays fresh for 3–4 days at room temperature when stored in an airtight container.
Q10. Can I add other ingredients like herbs or cheese?
Definitely! You can customize your bread by mixing in herbs, cheese, garlic, or even nuts for extra flavor.
Conclusion & Final Thoughts
Baking bread at home is more than just mixing flour and water. It’s a deeply satisfying experience that reconnects you with the rhythm of real food. It’s about slowing down, getting your hands a little dirty, and enjoying the incredible reward of warm, homemade bread fresh from the oven.
Whether you’re a first-timer or a seasoned baker, this easy homemade bread recipe proves that anyone can make bakery-worthy bread at home with just a little time and love. From crusty classics to sweet swirls, the variations are endless—and so is the joy of baking.
So preheat that oven, grab your mixing bowl, and get ready to make something amazing. You’ll never look at store-bought bread the same way again.


