Classic Coleslaw Recipe: If there’s one side dish that screams summer and comfort in equal measure, it’s the classic coleslaw. That crisp, creamy, tangy goodness has been a staple at barbecues, picnics, and family gatherings for decades. But while coleslaw is incredibly popular, getting the balance just right can be a bit of an art. The right mix of cabbage, carrots, and a perfectly creamy dressing can take this humble dish from meh to mouthwatering.
So, whether you’re planning a backyard cookout or just craving a fresh, crunchy salad to go with dinner, this guide is here to help. We’ll walk you through every step of crafting the perfect coleslaw from scratch—no pre-made dressing, no soggy cabbage, just fresh, vibrant flavors in every bite.
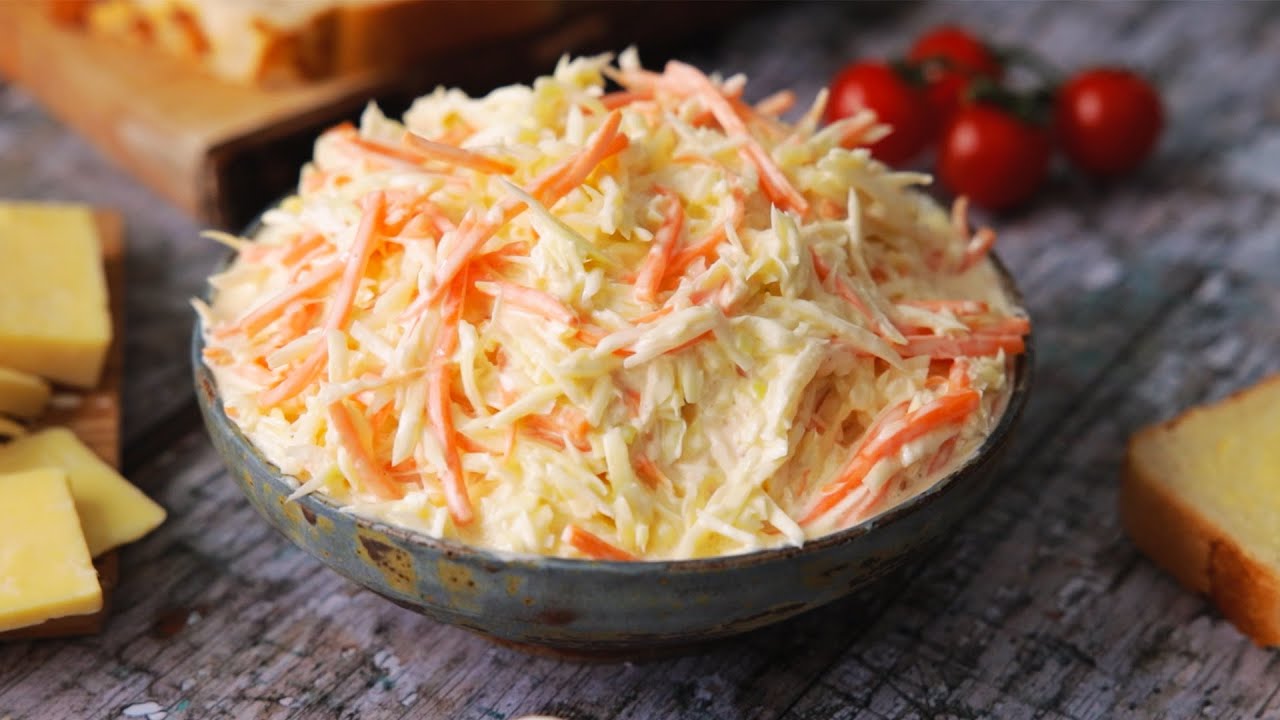
What Makes a Coleslaw “Classic”?
A classic coleslaw keeps things simple but delicious. The star of the show? Shredded cabbage, usually a mix of green and red for color and crunch. Add in a handful of shredded carrots, and you’ve got the base. The magic happens in the dressing—a creamy blend of mayonnaise, vinegar, sugar, and a few spices that tie everything together.
Unlike modern variations that toss in everything from jalapeños to Greek yogurt, the traditional coleslaw sticks to its roots. It’s tangy, slightly sweet, and irresistibly creamy. It’s not just a salad; it’s a cooling, crunchy complement to rich, savory mains like pulled pork or fried chicken.
Ingredients for the Perfect Coleslaw
Creating the perfect coleslaw starts with the right ingredients. Here’s a breakdown of what you’ll need:
Main Vegetables
- Green Cabbage – The bulk of your slaw. It’s crisp, affordable, and soaks up the dressing beautifully.
- Red Cabbage – Adds a pop of color and a slightly peppery flavor.
- Carrots – Naturally sweet, they bring balance and brightness.
These three form the classic base. Keep them finely shredded for the best texture—too chunky, and it won’t mix well.
Dressing Essentials
- Mayonnaise – The creamy foundation of your dressing.
- Apple Cider Vinegar – Adds tang and helps cut through the richness of the mayo.
- Granulated Sugar – A touch of sweetness is key to a balanced slaw.
- Dijon Mustard – Optional, but it adds depth and a gentle bite.
- Salt and Pepper – Seasoning is everything.
You want a dressing that’s smooth, a little zesty, and just sweet enough to balance the veggies’ earthiness.
Optional Add-ins
While the classic version is all about simplicity, you can personalize your slaw with these extras:
- Celery seeds – Add a slightly bitter, earthy note.
- Red onions or green onions – For a mild onion flavor.
- Fresh herbs (like parsley or dill) – Add freshness.
Keep these to a minimum if you’re going for that “classic” vibe, but don’t be afraid to experiment!
Tools You’ll Need
Before you get started, gather these tools to make the process smooth:
- Cutting board and sharp knife – For chopping your vegetables.
- Box grater or food processor – Makes shredding a breeze.
- Large mixing bowl – You’ll need plenty of space to mix without spillage.
- Whisk – For blending the dressing ingredients evenly.
- Measuring cups and spoons – To keep your ratios on point.
Having the right tools on hand will save time and help you achieve that pro-level slaw texture.
Step-by-Step Guide to Making Classic Coleslaw
Let’s get into the real deal—actually making this coleslaw from scratch. Follow these steps and you’ll be a slaw master in no time.
Step 1: Preparing the Vegetables
Start with the cabbage. Cut it into quarters, remove the core, and slice it into thin strips. You’re aiming for a fine shred—not so thin that it turns to mush, but not too thick either. Use a sharp knife or a mandoline for uniformity. Do the same with the red cabbage.
Next, peel and grate your carrots. Again, go for thin, consistent shreds.
Toss all the shredded veggies into your large mixing bowl. Give it a light toss to combine. The key here is to keep the texture light and airy, not dense or overpacked.
Pro tip: If you want an extra crisp texture, soak the shredded cabbage in cold water for about 10 minutes, then drain thoroughly and pat dry before mixing with the dressing.
Step 2: Making the Dressing
In a smaller bowl, combine your dressing ingredients:
- 1 cup of mayonnaise
- 2 tablespoons of apple cider vinegar
- 1 tablespoon of sugar
- 1 teaspoon of Dijon mustard
- Salt and black pepper to taste
Whisk everything together until smooth and creamy. Taste and adjust the sweetness or tanginess depending on your preference.
If the dressing seems too thick, you can add a splash of milk or more vinegar to thin it out slightly.
Step 3: Mixing It All Together
Pour the dressing over your cabbage and carrots. Using a large spoon or spatula, fold the mixture gently until every shred of cabbage is coated in that creamy goodness.
Let it sit for at least 30 minutes in the fridge before serving. This helps the flavors meld and gives the cabbage time to soften slightly without losing its crunch.
You’ve now got yourself a bowl of delicious, classic coleslaw!
Tips for the Best Coleslaw Texture and Flavor
Making a standout coleslaw isn’t just about following the steps—it’s about nailing the little details that elevate the dish. The difference between a soggy, bland slaw and a crisp, flavorful one often comes down to a few pro tips that are easy to implement.
1. Use fresh, quality vegetables: It sounds obvious, but the crunch and flavor of fresh cabbage and carrots can’t be beat. Avoid pre-shredded bag mixes—they’re often dry or rubbery and don’t absorb the dressing as well.
2. Salt the cabbage in advance (optional): Want even more crunch? Sprinkle a bit of salt over the shredded cabbage and let it sit in a colander for 10-15 minutes. Then, rinse and pat dry. This draws out excess moisture and helps keep the slaw from becoming watery once dressed.
3. Chill before serving: Coleslaw tastes best when cold. Letting it sit in the fridge for at least 30 minutes (or up to a few hours) allows the dressing to penetrate and mellow out the raw edge of the cabbage.
4. Balance your flavors: Taste your dressing before mixing it in. Too tangy? Add a pinch more sugar. Too sweet? A splash of vinegar will cut through. Finding the right harmony between creamy, tangy, and sweet is key.
5. Don’t overdress: It’s tempting to dump in all the dressing, but start with about two-thirds and mix. Add more if needed. This helps avoid a soupy coleslaw, especially if you’re prepping ahead of time.
These little adjustments make a world of difference. Trust me, your guests will taste the love you put in with every crunchy bite.
How to Store and Serve Coleslaw
Once you’ve made your coleslaw masterpiece, you’ll want to keep it fresh and tasty for as long as possible. Here’s how to store it properly and serve it like a pro.
Storage Tips:
- Refrigeration is key. Always store coleslaw in an airtight container in the fridge. It should stay fresh for 3 to 5 days.
- Avoid freezing. The dressing will separate and the vegetables will become mushy once thawed, so freezing isn’t a good option.
- Stir before serving. If it’s been sitting for a while, the dressing may separate slightly. Just give it a good stir to bring it back to life.
Serving Suggestions:
- On the side: Serve as a classic side with BBQ ribs, fried chicken, burgers, or sandwiches.
- As a topping: It’s perfect on pulled pork sandwiches, hot dogs, or even fish tacos.
- In a bowl: Want to make it the star? Serve coleslaw in chilled bowls for individual servings at picnics or potlucks.
Coleslaw is incredibly versatile and crowd-pleasing. It adds a cool, crisp bite to rich or spicy dishes, making it a perfect pairing for so many meals.
Variations on the Classic Recipe
While the classic version is unbeatable in its simplicity, sometimes it’s fun to switch things up. Here are some popular and delicious variations to try:
1. Vinegar-Based Slaw: Skip the mayo and go with an oil-and-vinegar dressing for a lighter, tangier version. Great for pairing with smoked meats.
2. Southern-Style Coleslaw: Add a bit of buttermilk or use sweet pickle juice in your dressing. This version is a bit sweeter and often served with fried catfish or hush puppies.
3. Spicy Slaw: Add a chopped jalapeño, sriracha, or crushed red pepper flakes to the dressing for a slaw with a kick.
4. Asian-Inspired Slaw: Use rice vinegar, sesame oil, a touch of soy sauce, and toasted sesame seeds. Swap in Napa cabbage and add shredded daikon or bell peppers.
5. Apple Slaw: Thinly sliced apples bring sweetness and a fruity crunch—perfect for fall gatherings or serving alongside pork.
Each variation keeps the heart of the dish intact but brings something unique to the table. Don’t be afraid to experiment based on your meal or mood.
Common Mistakes to Avoid
Even with such a simple dish, a few missteps can throw off your coleslaw game. Here are some common mistakes and how to dodge them:
1. Overdressing the slaw: It might seem like more dressing equals more flavor, but it can drown out the veggies and make your slaw soggy.
2. Not letting it sit: While it’s edible right away, coleslaw really benefits from a little chill time. Letting it rest allows the flavors to meld and the cabbage to soften slightly.
3. Using low-quality mayo: Since it’s the base of your dressing, the flavor of the mayo really matters. Use a quality brand or make your own if you’re feeling adventurous.
4. Skipping the seasoning: Taste as you go! A pinch of salt and pepper can be the difference between bland and brilliant.
5. Shredding inconsistently: Uniformity in your cabbage and carrot shreds ensures an even texture and better dressing distribution.
Avoid these pitfalls, and you’re on your way to becoming the coleslaw legend in your circle.
Why Homemade Coleslaw Beats Store-Bought
Let’s be real—store-bought coleslaw is convenient, but it rarely hits the mark when it comes to flavor or freshness. Making it at home gives you complete control over ingredients, flavor, and texture.
- Customizable flavors: Like it sweeter? More tangy? You get to call the shots.
- Fresher ingredients: Homemade slaw isn’t sitting on a shelf for days.
- No preservatives: Skip the additives and weird aftertaste you often get in pre-packaged versions.
- Saves money: Especially if you’re feeding a crowd, homemade is way more cost-effective.
And hey, there’s a certain satisfaction in hearing people say, “You made this?!” when they take their first bite. Homemade always wins.
Nutritional Information
Understanding what’s in your coleslaw is important, especially if you’re watching calories or following a specific diet. The nutritional value of classic coleslaw can vary depending on the ingredients used, especially the dressing. Here’s a breakdown of what you can expect per one-cup serving of traditional homemade coleslaw:
| Nutrient | Amount (Approx.) |
|---|---|
| Calories | 200–250 kcal |
| Fat | 18–22g |
| Saturated Fat | 2–3g |
| Carbohydrates | 10–14g |
| Sugar | 8–10g |
| Fiber | 2–3g |
| Protein | 1–2g |
| Sodium | 150–250mg |
| Vitamin A | 70–80% DV |
| Vitamin C | 50–60% DV |
Keep in mind: If you want a healthier version, you can substitute Greek yogurt for some or all of the mayo, reduce the sugar, or use low-fat versions of ingredients. The beauty of homemade coleslaw is the ability to tweak it to fit your dietary goals.
Perfect Dishes to Pair With Coleslaw
Coleslaw isn’t just a side dish—it’s a meal enhancer that pairs perfectly with a wide range of dishes. Here are some of the best pairings to bring out the full potential of your slaw:
BBQ Favorites
- Pulled pork sandwiches
- BBQ ribs or brisket
- Grilled chicken
Coleslaw adds that cool, crunchy contrast to rich, smoky meats.
Fried Foods
- Fried chicken
- Fish and chips
- Fried catfish or shrimp
The creamy tang of coleslaw cuts through the oil and balances out deep-fried dishes.
Burgers and Hot Dogs
- Slap some slaw on your burger or hot dog for an instant flavor upgrade. It brings freshness and crunch in one go.
Tacos and Wraps
- Especially fish or shrimp tacos—coleslaw provides the perfect bite of texture and acidity.
Picnic Plates
- Potato salad, baked beans, and deviled eggs all welcome a scoop of crisp coleslaw alongside them.
Coleslaw is incredibly adaptable—it belongs on your summer spread, your weekday dinner table, and even in your lunchbox.
FAQs about Classic Coleslaw Recipe
What is the best cabbage for coleslaw?
Green cabbage is the classic choice for coleslaw, but feel free to mix in some red cabbage for color and crunch.
Can I make coleslaw ahead of time?
Yes, coleslaw is actually better when it sits for a few hours. Just keep it chilled and toss it again before serving.
How long does homemade coleslaw last in the fridge?
Properly stored in an airtight container, it stays fresh for up to 3–5 days.
Is coleslaw healthy?
It can be! Traditional versions are mayo-heavy, but you can lighten it up with Greek yogurt or a vinegar-based dressing.
Can I use pre-shredded cabbage?
Absolutely. It saves time and still tastes great—perfect for when you’re in a rush.
What goes well with classic coleslaw?
Coleslaw pairs well with BBQ, grilled meats, fried chicken, fish tacos, or even on top of sandwiches and burgers.
Why is my coleslaw watery?
Cabbage releases water after it’s chopped. To avoid sogginess, salt it lightly and drain before mixing with dressing.
Can I freeze coleslaw?
Not recommended. The dressing separates, and the cabbage loses its crunch—it’s best enjoyed fresh.
Conclusion
There’s a reason coleslaw has stood the test of time—it’s simple, satisfying, and downright delicious. From its crisp veggie base to its creamy, tangy dressing, every bite is a reminder that sometimes the best recipes are the ones that stay true to their roots.
Whether you’re serving it at a backyard BBQ or using it to top a pulled pork sandwich, coleslaw brings the flavor and freshness that completes the plate. And the best part? Once you master the classic version, you’ve got a foundation for endless tasty variations.
So go on—grab that cabbage, mix up that dressing, and whip up a batch of homemade coleslaw that’ll have everyone asking for seconds.


