Cinnabon Cinnamon Roll Recipe: Ever walked by a Cinnabon store in the mall and felt your senses hijacked by the sweet, spicy aroma of cinnamon and butter? Yep, same here. There’s something truly irresistible about those gooey, melt-in-your-mouth cinnamon rolls. But what if I told you that you could recreate that same magic right at home? That’s right—this step-by-step guide will walk you through making your own Cinnabon-style cinnamon rolls from scratch. And trust me, once you try these, you’ll never want store-bought again.
These aren’t your average cinnamon rolls. Cinnabon has crafted the ultimate indulgence—soft, fluffy dough, buttery cinnamon-sugar filling, and a rich, creamy frosting that’s just the right amount of sweet. The good news? With a little time and love, you can bring that same indulgence to your own kitchen. Let’s get rolling!
Ingredients Needed
Before we start mixing and kneading, let’s get everything in place. Having all your ingredients prepped and measured is the key to a smooth baking experience.
For the Dough
Here’s what you’ll need for that perfect pillowy base:
- 1 cup warm milk (about 110°F)
- 2 ¼ teaspoons (one packet) active dry yeast
- ½ cup granulated sugar
- ⅓ cup softened unsalted butter
- 2 large eggs
- 4 cups all-purpose flour (plus extra for kneading)
- 1 teaspoon salt
The dough is the heart of this recipe. Warm milk helps activate the yeast, giving rise to that light and airy texture we love. Eggs and butter add richness, while sugar balances the flavors.
For the Filling
This is where the magic happens—sweet, buttery, and loaded with cinnamon.
- 1 cup packed brown sugar (light or dark)
- 2 ½ tablespoons ground cinnamon
- ⅓ cup unsalted butter, softened
Brown sugar gives it that caramel-like depth, and cinnamon? Well, it’s the star of the show. Don’t be shy!
For the Cream Cheese Frosting
No Cinnabon experience is complete without a thick layer of frosting.
- 4 oz cream cheese, softened
- ¼ cup unsalted butter, softened
- 1 ½ cups powdered sugar
- ½ teaspoon vanilla extract
- 1-2 tablespoons milk (for consistency)
This creamy, slightly tangy frosting is what takes these rolls from great to unforgettable.
Equipment You’ll Need
You don’t need a bakery setup for this, but a few kitchen essentials will make your life easier:
- Large mixing bowl or stand mixer
- Rolling pin
- Measuring cups and spoons
- Sharp knife or dental floss (for slicing rolls)
- 9×13 inch baking dish
- Clean kitchen towel or plastic wrap (for covering dough)
- Spatula or hand mixer (for the frosting)
If you have a stand mixer with a dough hook, that’s fantastic—it makes kneading a breeze. But good old-fashioned elbow grease works just as well!
How to Make Cinnabon Cinnamon Roll – Step-by-Step Instructions
Let’s dive into the process. This isn’t complicated, but it does take some time and patience. Stick with me, and you’ll be rewarded with bakery-quality cinnamon rolls that’ll make your whole house smell divine.
Step 1 – Preparing the Dough
First things first, activate your yeast. In a mixing bowl, pour the warm milk and sprinkle the yeast over it. Let it sit for 5-10 minutes until it becomes foamy—this means your yeast is alive and kicking.
Next, add the sugar, softened butter, and eggs. Mix well until everything is incorporated. Slowly add the flour and salt. If you’re using a stand mixer, use the dough hook on medium speed for about 5-7 minutes until the dough pulls away from the sides and becomes smooth and elastic. If mixing by hand, knead the dough on a floured surface for about 10 minutes.
Once kneaded, place the dough in a lightly greased bowl. Cover it with a kitchen towel or plastic wrap and let it rise in a warm, draft-free place until it doubles in size—about 1 to 1.5 hours. A tip? Let it rise in your oven (turned off, with just the oven light on). It creates the perfect environment.
Step 2 – Letting the Dough Rise
This stage might seem like downtime, but it’s actually when the magic begins. As the dough rises, the yeast gets to work, creating tiny air pockets that give your cinnamon rolls that soft, airy texture. If your kitchen is a little chilly, no worries—just pop the bowl into the oven with the light on or near a warm spot like a sunny window or atop a preheating stove.
Patience here pays off big time. Don’t rush it. Wait until the dough doubles in size. That usually takes around 1 to 1.5 hours depending on the room temperature. You’ll know it’s ready when you press a finger into it and the indentation remains.
Step 3 – Making the Cinnamon Filling
While your dough is rising, you’ve got the perfect opportunity to prepare the irresistible filling. In a small mixing bowl, combine the brown sugar and cinnamon. Stir them together until evenly mixed.
Next, soften your butter if you haven’t already. It needs to be spreadable, not melted. This helps it cling to the dough better and keeps the filling from leaking out during baking.
Pro tip: Don’t skimp on the cinnamon. It’s the core flavor that gives the rolls their signature aroma and taste. And that brown sugar? It caramelizes while baking, adding richness and depth.
Step 4 – Rolling Out and Filling the Dough
Once your dough has doubled in size, punch it down gently to release the built-up gases. Then turn it out onto a lightly floured surface. Use a rolling pin to shape the dough into a large rectangle, roughly 16×21 inches. Don’t worry about being exact, just get it close.
Now for the fun part—spread the softened butter all over the surface of the dough, leaving a small border around the edges. Evenly sprinkle the cinnamon-sugar mixture on top, pressing it lightly into the buttered dough.
Start rolling the dough tightly from the long edge, creating a big log. Roll gently but firmly, making sure it’s evenly shaped from end to end.
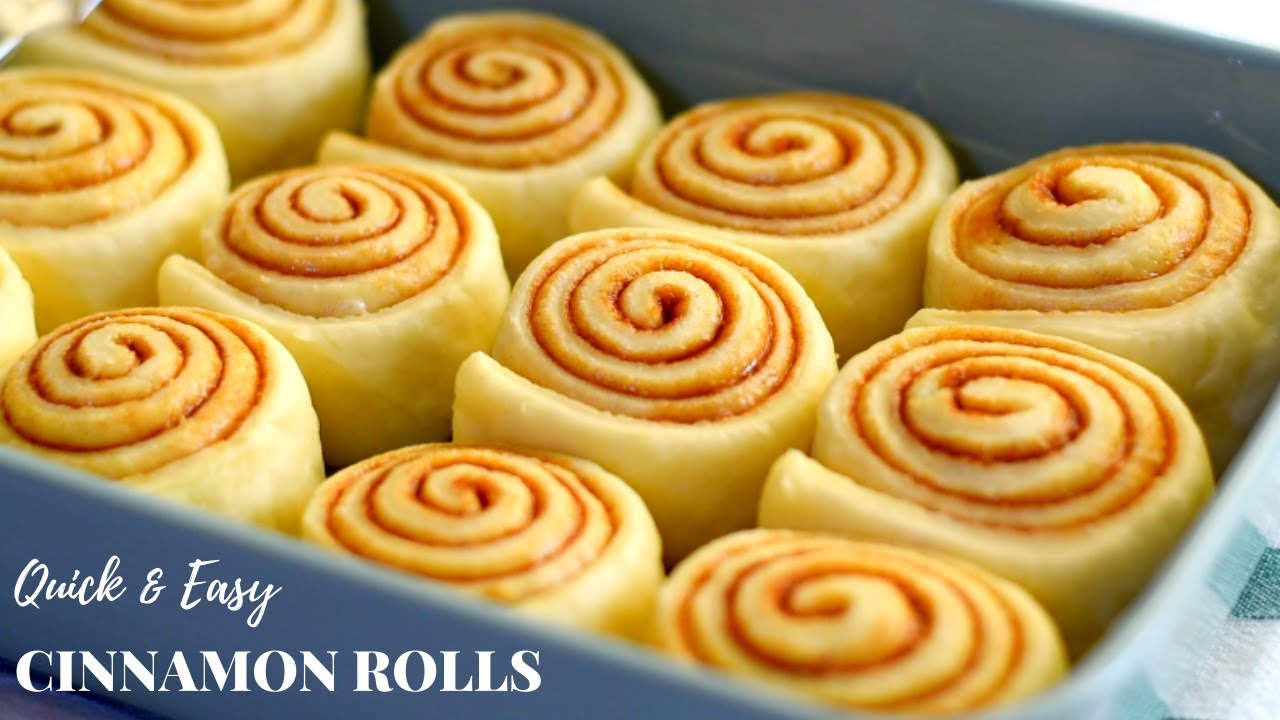
Step 5 – Cutting and Arranging the Rolls
Time to transform that cinnamon log into rolls! Using a sharp knife or unflavored dental floss (yes, floss—it’s great for clean cuts), slice the dough into 12 even pieces.
Grease a 9×13-inch baking dish and place the rolls inside, cut side up. Make sure there’s a little space between each roll—they’ll expand as they rise and bake.
Once arranged, loosely cover the dish with plastic wrap or a damp towel and let the rolls rise again for 30-45 minutes, or until puffy and touching each other. This second rise gives them that pillowy, pull-apart texture.
Step 6 – Second Rise
This rise is shorter but just as important. During this stage, the rolls are getting ready to bake by puffing up and settling into their final shape. Set your pan in a warm place and be patient—this rise helps them turn out super soft and fluffy.
You’ll know they’re ready for the oven when they’ve doubled in size and are starting to press against each other in the pan. At this point, preheat your oven to 350°F (175°C). The rolls are about to become golden perfection.
Step 7 – Baking the Rolls
Now for the moment you’ve been building up to—baking these golden beauties. Once your oven is preheated to 350°F (175°C), slide in the pan and bake the rolls for about 20 to 25 minutes. You’re looking for a beautiful light golden-brown color. Keep an eye on them during the last few minutes to avoid overbaking.
You want them soft and slightly gooey in the middle—that’s part of what makes Cinnabon rolls so iconic. If the tops are browning too quickly, you can tent the pan loosely with foil for the last few minutes.
When they’re done, take them out and set them aside to cool for about 5-10 minutes while you make the frosting. They should still be warm when you frost them—that’s key.
Step 8 – Making the Cream Cheese Frosting
While the rolls are cooling slightly, let’s whip up that luscious cream cheese frosting. In a medium bowl, beat the softened cream cheese and butter together until the mixture is light and fluffy. Use a hand mixer if you have one—it makes things easier and fluffier.
Add in the powdered sugar a little at a time, mixing until smooth. Stir in the vanilla extract, then thin it out with 1-2 tablespoons of milk until you get your desired consistency. Some people like it thick and spreadable, while others prefer it thinner so it melts into the rolls. Your choice!
The tang of the cream cheese balances the sweetness of the rolls perfectly—it’s a match made in heaven.
Step 9 – Frosting While Warm
This is where everything comes together. Spread that creamy frosting generously over the warm rolls. The heat from the rolls will slightly melt the frosting, letting it seep into every swirl and crevice. That’s what gives Cinnabon rolls their signature gooey top layer.
Don’t skimp—cover every inch. The frosting not only adds flavor but also keeps the rolls soft and moist. It’s the final touch that turns these from homemade cinnamon rolls into true Cinnabon copycats.
And there you have it—homemade cinnamon rolls that look and taste like they came straight from a mall kiosk. But even better, because you made them yourself.
Tips for the Perfect Cinnabon-Style Roll
If you’re chasing perfection (and why not?), here are a few pro tips:
- Use fresh yeast. If your yeast doesn’t foam up during activation, it’s no good—start over with a fresh packet.
- Don’t over-flour your dough. Too much flour makes the rolls dense and dry. The dough should be soft, slightly sticky, but still workable.
- Room temperature ingredients. Make sure your eggs and butter are at room temp for better blending and rise.
- Tightly roll your dough. A snug roll gives you defined swirls and prevents gaps.
- Use dental floss to cut. It gives clean cuts without squishing the dough.
- Don’t skip the second rise. It helps with texture and fluffiness.
- Frost while warm. Always frost when the rolls are fresh from the oven—it makes a huge difference.
These tips might seem small, but trust me, they elevate your cinnamon rolls from good to bakery-level.
Variations You Can Try
Want to shake things up a bit? Here are a few tasty twists on the classic:
- Pecan Cinnamon Rolls: Add chopped pecans to the filling for a crunchy surprise.
- Apple Pie Rolls: Layer thinly sliced apples over the filling before rolling up.
- Pumpkin Spice Rolls: Swap the cinnamon for pumpkin spice and add a bit of canned pumpkin to the dough.
- Nutella Rolls: Spread Nutella instead of butter before sprinkling cinnamon sugar.
- Orange Cream Cheese Frosting: Add orange zest and a splash of orange juice to the frosting for a citrus twist.
Get creative! Once you’ve nailed the base recipe, the possibilities are endless.
Storage and Reheating Tips
Let’s face it—these rolls are best fresh. But if you happen to have leftovers (lucky you), here’s how to keep them tasting great:
- Storage: Store unfrosted rolls in an airtight container at room temperature for up to 2 days. If they’re frosted, refrigerate them to keep the cream cheese safe.
- Freezing: You can freeze the unbaked, sliced rolls or the fully baked rolls. For unbaked, freeze them in the pan before the second rise. When ready to bake, thaw overnight in the fridge, let them rise, and bake. For baked rolls, wrap tightly and freeze for up to 2 months.
- Reheating: Microwave individual rolls for about 15-20 seconds to bring back the softness. You can also reheat a whole pan in the oven at 300°F for about 10 minutes.
FAQs about Cinnabon Cinnamon Roll Recipe
Q1: What makes Cinnabon cinnamon rolls different from regular cinnamon rolls?
Cinnabon cinnamon rolls are known for their extra soft, gooey texture and rich, aromatic flavor. The secret lies in the special Makara cinnamon, brown sugar filling, and a generous layer of smooth cream cheese frosting.
Q2: Can I make Cinnabon-style cinnamon rolls without a stand mixer?
Yes, absolutely! While a stand mixer makes kneading easier, you can knead the dough by hand for about 10–12 minutes until it becomes smooth and elastic.
Q3: How long does it take to make homemade Cinnabon cinnamon rolls?
From start to finish, it takes around 2.5 to 3 hours. This includes time for prepping, rising, baking, and frosting.
Q4: Can I prepare the rolls ahead of time?
Yes, you can prepare the rolls the night before. Just cover and refrigerate the unbaked rolls, then bring them to room temperature and bake in the morning.
Q5: Can I freeze cinnamon rolls?
Definitely. Freeze the baked (and unfrosted) rolls for up to 2 months. Thaw and warm them up before adding the frosting for the best taste.
Q6: What kind of cinnamon should I use?
Try to use high-quality cinnamon like Ceylon or Saigon, but for a true Cinnabon flavor, Makara cinnamon is ideal if available.
Q7: How do I store leftover cinnamon rolls?
Store them in an airtight container at room temperature for up to 2 days or refrigerate for up to a week. Warm them slightly before serving for that fresh-out-of-the-oven feel.
Q8: Can I use a different frosting instead of cream cheese?
Yes, you can use vanilla glaze or buttercream, but cream cheese frosting gives the signature Cinnabon flavor that fans love.
Q9: How do I make my rolls extra gooey?
Add a little heavy cream over the rolls before baking. It helps keep the rolls moist and gooey in the center.
Q10: Can I make a gluten-free version of this recipe?
Yes, substitute with a 1:1 gluten-free flour blend and follow the same instructions. The texture might vary slightly, but it’s still delicious.
Conclusion
Making Cinnabon-style cinnamon rolls at home is more than just baking—it’s a full-on experience. From mixing and kneading the dough to spreading that rich frosting over warm rolls, it’s a labor of love that totally pays off. The aroma, the gooey centers, the creamy frosting—it all comes together in the most delicious way.
Sure, it takes a little time and effort, but the reward? Pure bliss. And the best part? You don’t have to wait until your next trip to the mall to enjoy that iconic Cinnabon flavor. Now, you can whip up a batch anytime that cinnamon craving hits.


