Chicken Milanese Recipe: Chicken Milanese is the ultimate comfort food – crispy, golden chicken cutlets that are pan-fried to perfection. This classic Italian dish features thinly pounded chicken breasts, coated in seasoned breadcrumbs, and fried until irresistibly crunchy. It’s simple yet indulgent, making it a go-to meal for busy weeknights or cozy Sunday dinners. Think of it as the Italian cousin of the schnitzel – but with that unmistakable Mediterranean flair.
This dish is all about contrast: the tender, juicy chicken inside and the crispy, golden crust outside. The real magic lies in its simplicity. There’s no need for fancy ingredients – just good technique and a few pantry staples. It pairs beautifully with everything from fresh arugula salad to creamy mashed potatoes. Whether you’re new to cooking or a seasoned home chef, mastering Chicken Milanese is a rite of passage in Italian cuisine.
Origins and Popularity
Hailing from Milan, Italy, Chicken Milanese (or Cotoletta alla Milanese) was traditionally made using veal. However, over time – and especially in American kitchens – chicken took the spotlight. The beauty of this dish is how it blends Italian tradition with universal appeal. Today, it’s found in restaurants and homes worldwide, from family dinner tables in New York to trattorias in Rome.
What makes Chicken Milanese so loved? It’s quick, affordable, and crowd-pleasing. Plus, it’s incredibly versatile. You can dress it up with a lemon butter sauce or keep it simple with just a squeeze of lemon and a side of greens.
Ingredients Needed for Chicken Milanese
Core Ingredients
To whip up authentic Chicken Milanese, you only need a few basic ingredients, most of which you likely already have in your kitchen:
- Chicken Breasts (2 large) – Skinless and boneless, sliced in half horizontally.
- Eggs (2 large) – For helping the breadcrumbs stick.
- Breadcrumbs (1 cup) – Preferably Italian seasoned for extra flavor.
- All-purpose Flour (½ cup) – The first coating to help everything adhere.
- Parmesan Cheese (¼ cup, grated) – Adds a nutty, savory touch to the breading.
- Salt and Pepper – For basic seasoning.
- Garlic Powder and Paprika (optional) – For added depth of flavor.
- Vegetable or Olive Oil – For frying.
- Lemon Wedges – For serving.
Each ingredient has its role. The flour helps bind the egg, the egg helps bind the breadcrumbs, and the breadcrumbs give that signature crunch.
Optional Add-ons for Flavor Variations
Want to get a little creative with your Chicken Milanese? Here are some extras to consider:
- Fresh herbs like parsley or basil in the breadcrumb mix.
- Chili flakes for a bit of heat.
- Mozzarella slices on top for a gooey finish.
- Panko breadcrumbs for an extra crispy crust.
The beauty of Chicken Milanese is that it’s like a blank canvas – you can customize it to match your flavor preferences or what’s in your pantry.
Tools and Equipment Required
Kitchen Essentials for This Recipe
Before you start cooking, make sure you have the right tools on hand:
- Cutting board and sharp knife – For slicing the chicken evenly.
- Meat mallet or rolling pin – To pound the chicken thin.
- Three shallow bowls – For the flour, egg wash, and breadcrumbs.
- Large skillet or frying pan – Preferably non-stick or cast iron for even frying.
- Tongs or spatula – For flipping the chicken without breaking the crust.
- Paper towels and cooling rack – To drain the excess oil and keep it crispy.
Having the right equipment can make the process smooth and enjoyable. There’s nothing worse than realizing mid-recipe that you’re missing a crucial tool!
How to Prepare Chicken Milanese – Step-by-Step Instructions
Step 1: Flattening the Chicken
Start by slicing your chicken breasts horizontally to create thinner cutlets. This not only helps them cook evenly but also gives them that restaurant-style look. Once sliced, place the cutlets between two sheets of plastic wrap or wax paper and gently pound them with a meat mallet or rolling pin until they’re about ¼ inch thick.
This step is crucial. Thinner cutlets cook faster and more evenly, which means you get juicy chicken on the inside and crispy coating on the outside – every single time.
Step 2: Seasoning the Cutlets
Seasoning is where flavor begins. Lay your pounded chicken cutlets flat on a cutting board or tray, and generously season both sides with salt and pepper. For an extra kick, you can add garlic powder, paprika, or a dash of chili flakes. These spices aren’t traditional, but they elevate the dish with just a hint of boldness.
Don’t underestimate this part—good seasoning is the difference between bland and mouthwatering. Make sure the flavors penetrate the meat before it ever touches a breadcrumb.
Let the seasoned chicken sit for 5-10 minutes while you prep your breading station. This quick rest allows the salt to start working its magic, tenderizing the meat and drawing out a bit of surface moisture that helps the flour stick better.
Step 3: Breading Process
This is the fun part—and where the signature crunch of Chicken Milanese is born. You’ll need three shallow dishes: one for flour, one for beaten eggs, and one for breadcrumbs (mixed with grated Parmesan, if you’re going the extra mile).
Here’s how to do it like a pro:
- Dredge the chicken in flour, shaking off any excess.
- Dip it in the beaten eggs, making sure it’s fully coated.
- Press it into the breadcrumb mixture, pressing down firmly so the crumbs stick well.
Take your time with this step. A well-coated cutlet ensures even browning and a crispy texture that stays intact when frying. Lay each breaded piece on a clean plate and let them sit for 5 minutes before cooking. This helps the coating adhere better and prevents it from falling off in the pan.
Step 4: Frying to Perfection
Now it’s time to bring the heat—literally.
Pour about ½ inch of oil into a large skillet and heat it over medium-high. You’ll know it’s ready when you drop in a breadcrumb and it sizzles immediately. Carefully lay each cutlet into the hot oil, being cautious not to overcrowd the pan.
Cook the chicken for about 3 to 4 minutes per side, or until each piece is golden brown and cooked through. Use tongs to flip them gently—don’t pierce the coating! The key is patience: if you flip too early, the crust can tear. Let it do its thing and get that golden, crispy finish.
Once fried, transfer the cutlets to a plate lined with paper towels to drain excess oil. For even better results, place them on a wire rack—this keeps the underside from getting soggy and ensures a crisp crust all around.
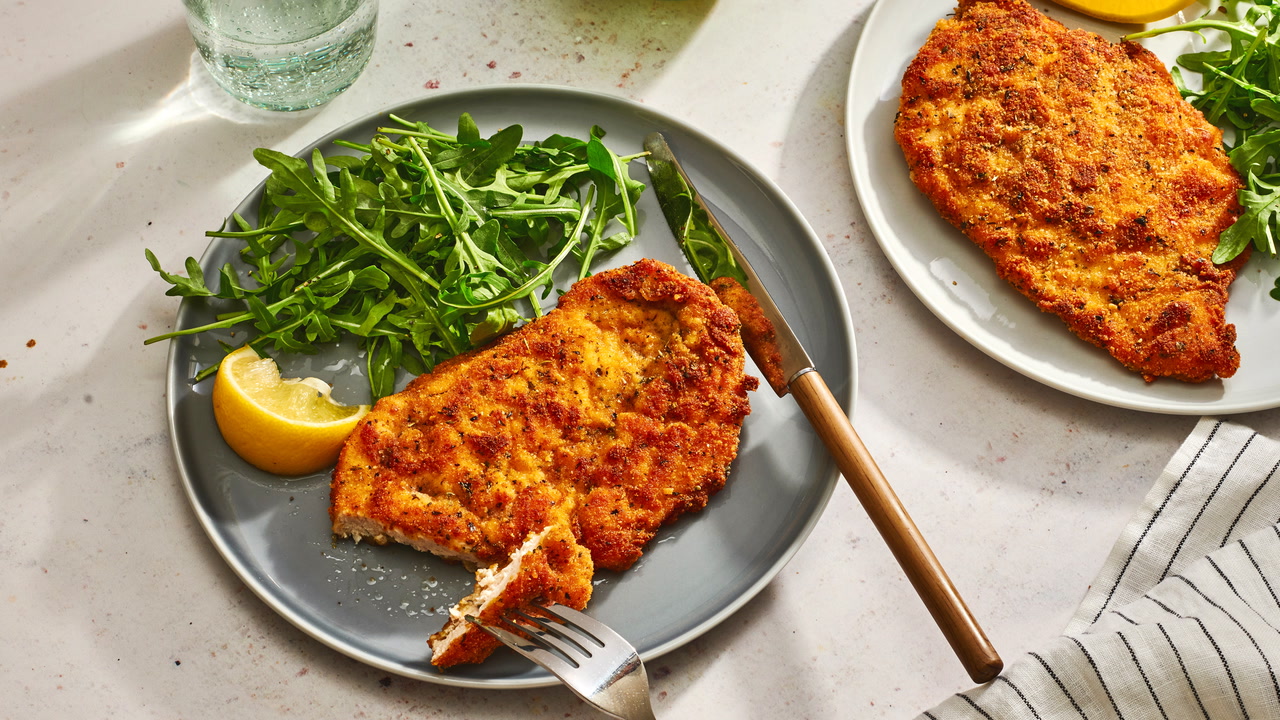
Serve immediately with lemon wedges on the side. A light squeeze of lemon juice adds just the right amount of zing and cuts through the richness beautifully.
Tips for the Perfect Chicken Milanese
Common Mistakes to Avoid
Even though Chicken Milanese is straightforward, there are a few easy mistakes that can mess it up:
- Skipping the pounding step – If your chicken is too thick, it won’t cook evenly and might be raw inside.
- Overcrowding the pan – This drops the oil temperature, leading to soggy, oily chicken.
- Using cold chicken – Always let the meat sit at room temperature for 15 minutes before frying to avoid uneven cooking.
- Frying with too little oil – You need enough oil to submerge the cutlets halfway so they crisp up properly.
- Not seasoning every layer – From the chicken itself to the flour, egg, and breadcrumb layers—each one should be seasoned for best flavor.
Chef’s Secret Tips
Want to make your Chicken Milanese restaurant-worthy? Here are some insider tricks:
- Add a tablespoon of Dijon mustard to the eggs for a subtle tang and flavor boost.
- Use a mix of regular breadcrumbs and panko for an unbeatable crunch.
- Always rest the breaded cutlets for a few minutes before frying—this makes the coating stick better.
- Use a thermometer to maintain oil at 350°F (175°C). This keeps the coating crisp and prevents it from absorbing too much oil.
- Finish with a sprinkle of flaky sea salt and fresh herbs once it’s out of the pan to elevate the flavor.
These little steps make a big difference and are what separate a good Chicken Milanese from a great one.
Serving Suggestions
Side Dishes That Complement Chicken Milanese
Chicken Milanese is super versatile, so it pairs well with a wide variety of sides. Whether you’re aiming for something light or indulgent, here are some tasty ideas:
- Arugula Salad with cherry tomatoes, shaved Parmesan, and lemon vinaigrette for a refreshing balance.
- Mashed Potatoes or garlic butter roasted potatoes for something hearty and satisfying.
- Pasta aglio e olio (garlic and oil) or a light pesto pasta can work wonders too.
- Caprese salad for a fresh, tomato-mozzarella flavor boost.
Want to keep it super classic? Serve it simply with lemon wedges and a drizzle of olive oil over greens. Sometimes less really is more.
Plating and Presentation
Presentation makes the experience more enjoyable. Try slicing the cutlet into strips and fanning them over a bed of arugula or mashed potatoes. Drizzle a touch of olive oil, add a sprinkle of Parmesan, and finish with a lemon wedge on the side.
If you’re serving guests, this elegant plating makes it look gourmet—even if it only took 30 minutes to pull together.
Healthier Alternatives
Baked Chicken Milanese
If you’re looking to lighten things up without sacrificing flavor, baked Chicken Milanese is a fantastic option. You still get that golden crust and juicy interior, just with a bit less oil and fewer calories. Here’s how to do it:
Instead of pan-frying, preheat your oven to 425°F (220°C). Line a baking sheet with parchment paper and lightly coat it with nonstick spray or olive oil. After breading the chicken as usual, arrange the cutlets on the sheet in a single layer. Lightly spray the tops with olive oil to encourage browning.
Bake for 20-25 minutes, flipping halfway through to ensure even crisping. The result? A crispy, golden cutlet that’s healthier but still incredibly satisfying. The breadcrumbs get beautifully toasted in the oven, and the Parmesan adds a nice richness without needing the extra oil from frying.
This method is also great for batch cooking or meal prepping since it’s mess-free and more hands-off than pan-frying. Just pop them in the oven and go about your business while they bake to crispy perfection.
Gluten-Free and Dairy-Free Variants
Got dietary restrictions? No worries—Chicken Milanese is easy to adapt. For a gluten-free version, swap out regular flour and breadcrumbs for gluten-free alternatives. Almond flour works wonderfully in place of all-purpose, and you can find gluten-free breadcrumbs in most grocery stores. They often come pre-seasoned too!
Dairy-free? Just skip the Parmesan cheese in the breadcrumb mix. You can substitute with nutritional yeast to add that umami, cheesy flavor without any dairy.
Another trick? Use egg alternatives like aquafaba (the liquid from canned chickpeas) or a flaxseed egg to help the coating stick. These swaps still deliver great flavor and texture, making Chicken Milanese accessible to almost everyone, regardless of dietary needs.
Storing and Reheating Tips
How to Store Leftovers
Got some leftover Chicken Milanese? Lucky you—it reheats beautifully if stored right. First, let the cooked cutlets cool completely. This prevents condensation, which can make the breading soggy. Once cool, place them in an airtight container with paper towels between each layer to absorb any residual moisture.
Stored this way, your leftovers will stay fresh in the refrigerator for up to 3 days. If you want to keep them longer, Chicken Milanese also freezes well for up to 2 months. Just wrap each cutlet in plastic wrap and place them in a freezer-safe bag or container. Be sure to label with the date!
Best Way to Reheat Without Losing Crispiness
Reheating fried foods can be tricky—no one wants a soggy cutlet. To keep that crispy texture, skip the microwave and go for the oven or an air fryer.
- Oven method: Preheat your oven to 375°F (190°C). Place the cutlets on a wire rack over a baking sheet and heat for 10-15 minutes. This allows the air to circulate and the breading to re-crisp.
- Air fryer method: Set your air fryer to 350°F (175°C) and cook for 5-7 minutes. It’s quick and gives you that fresh-out-of-the-pan crunch.
Avoid microwaving unless you’re in a serious time crunch—it’ll make the crust rubbery and sad. And after all that effort, your Chicken Milanese deserves better.
FAQs about Chicken Milanese Recipe
1. What is Chicken Milanese?
Chicken Milanese is a classic Italian dish made with thin, breaded, and pan-fried chicken cutlets. It’s known for its crispy exterior and juicy, tender interior, often served with lemon wedges or a fresh salad.
2. What’s the difference between Chicken Milanese and Chicken Parmesan?
Chicken Milanese is simply breaded and fried, while Chicken Parmesan includes a layer of tomato sauce and melted cheese, then baked until bubbly.
3. Can I use chicken thighs instead of breasts?
Yes, boneless, skinless chicken thighs can be used, but they may require slightly longer cooking due to their thickness and texture.
4. Do I have to pound the chicken thin?
Yes, pounding the chicken to an even, thin thickness helps it cook quickly and evenly, giving that signature crispy finish.
5. What oil is best for frying Chicken Milanese?
Use a neutral oil with a high smoke point like vegetable oil, canola oil, or light olive oil for best results.
6. Can I bake Chicken Milanese instead of frying?
Yes, for a lighter version, you can bake it in the oven at 400°F (200°C) until golden and crispy, about 20–25 minutes, flipping halfway.
7. How do I keep the breading from falling off?
Make sure to pat the chicken dry, dredge in flour first, and press the breadcrumbs firmly onto the meat. Chill the breaded chicken for 10–15 minutes before frying to help the coating adhere better.
8. What can I serve with Chicken Milanese?
Popular sides include arugula salad, lemon wedges, mashed potatoes, pasta, or sautéed vegetables for a complete meal.
9. Is Chicken Milanese freezer-friendly?
Yes, you can freeze it after breading (before cooking) or after it’s been cooked and cooled. Reheat in the oven for best crispiness.
10. How long does leftover Chicken Milanese last?
Stored in an airtight container in the fridge, leftovers will stay fresh for up to 3 days. Reheat in the oven or air fryer to maintain crispiness.
Conclusion
Chicken Milanese is more than just a simple breaded cutlet—it’s a timeless dish that brings together bold flavor, crispy texture, and comforting nostalgia. Whether you fry it traditionally or opt for a healthier baked version, this Italian classic never disappoints.
With just a handful of ingredients and a few easy steps, you can whip up a restaurant-quality meal in your own kitchen. Customize it with your favorite spices, serve it with a vibrant salad or a rich pasta, and you’ve got a dinner that’s as elegant as it is effortless.
Now that you’ve got the full step-by-step breakdown, it’s time to grab your skillet, tie on that apron, and get cooking. Chicken Milanese is calling your name—and trust me, once you make it, it’ll be a regular in your dinner rotation.


