Baked Eggs Recipe: Baked eggs—also known as “shirred eggs”—are one of those underrated gems in the breakfast world. They’re simple to prepare, packed with protein, and look incredibly elegant when served. Whether you’re whipping up a hearty brunch for friends or just looking for something different to start your day, baked eggs bring both taste and style to the table.
What sets baked eggs apart is their texture. Unlike scrambled or fried eggs, baking gives the whites a tender yet set consistency, while keeping the yolks perfectly runny—if that’s your thing. It’s a dish that requires minimal effort but offers a gourmet payoff. Pop them in the oven while you brew your coffee, and voila—breakfast is ready without much fuss.
They also work for lunch or dinner. Add a salad or toast, and you’ve got yourself a complete meal. It’s this all-day flexibility that makes baked eggs a favorite among busy food lovers.
Versatility and Health Benefits
Another reason to fall in love with baked eggs? Their versatility. You can flavor them with herbs, vegetables, cheese, or meats—whatever’s lying around in your fridge can probably be baked into your eggs. From Mediterranean-inspired versions with spinach and feta to spicy Mexican takes with salsa and beans, the combinations are endless.
Nutritionally, eggs are a powerhouse. One large egg contains about 6 grams of protein, healthy fats, and a variety of vitamins and minerals including B12, vitamin D, and choline. Baked eggs retain all these nutrients without the added oil or butter often used in other cooking methods, making them a healthier choice, especially for those watching their fat intake.
And let’s not forget the convenience—no constant flipping, stirring, or babysitting like with other egg recipes. Once you master the basic method, baked eggs can become your go-to for quick, healthy, and delicious meals.
Essential Ingredients for Baked Eggs
Choosing the Right Eggs
Not all eggs are created equal. When it comes to baked eggs, freshness is key. Fresher eggs have whites that hold together better, which results in a neater presentation and a more pleasant texture. If possible, go for pasture-raised or organic eggs—they tend to have richer yolks and better nutritional profiles.
Size matters, too. Most recipes are calibrated for large eggs, so keep that in mind. If you use extra-large or medium eggs, your baking time might need adjusting.
Don’t forget about the taste factor. Farm-fresh eggs often have a more robust flavor compared to mass-produced ones. So if you’re looking to really impress your taste buds—or your guests—splurge a little on good quality eggs.
Supporting Ingredients to Enhance Flavor
Now comes the fun part—adding layers of flavor. While baked eggs can be served plain with just a sprinkle of salt and pepper, they truly shine when paired with complementary ingredients. Here are a few classics:
- Dairy: Think heavy cream, milk, or cheese. Adding a splash of cream around the eggs helps keep them moist and adds richness. Grated cheese (like cheddar, gruyère, or parmesan) sprinkled on top or underneath the eggs takes things up a notch.
- Veggies: Mushrooms, spinach, tomatoes, and bell peppers are all excellent additions. Sauté them beforehand to enhance their flavor and reduce excess moisture.
- Proteins: Bacon bits, ham, sausage, or smoked salmon bring savory depth. Cook them before adding them to your dish.
- Herbs and Spices: Fresh chives, parsley, dill, or thyme make baked eggs fragrant and colorful. For spices, a pinch of paprika, cayenne, or even curry powder can give your eggs a unique twist.
A quick pro tip: keep it balanced. You don’t want to overwhelm the delicate eggs with too many strong flavors. Think in terms of harmony rather than overload.
Equipment You’ll Need
Best Baking Dishes and Tools
You don’t need a kitchen full of fancy gadgets to make baked eggs, but having the right tools can make the process smoother. Here’s what works best:
- Ramekins or Small Oven-Safe Dishes: These are ideal for individual servings. You can also use a small cast iron skillet for a rustic presentation.
- Baking Tray: If you’re baking multiple ramekins at once, placing them on a baking tray makes it easier to move them in and out of the oven.
- Whisk or Fork: Useful if you’re mixing your eggs or adding other ingredients.
- Measuring Spoons: For cream, spices, or other small additions.
- Oven Mitts: Always a must when dealing with hot dishes.
If you don’t have ramekins, don’t worry. A muffin tin can serve as a quick alternative, although the eggs might cook a bit faster due to the thinner metal and smaller compartments.
Oven Settings and Preparation Tips
Prepping your oven correctly is key to nailing baked eggs. Start by preheating it to 375°F (190°C). Some recipes go up to 400°F, but this depends on your oven’s consistency and how runny or firm you want your yolks.
Also, consider using a water bath if you want perfectly tender eggs. Place your ramekins in a larger baking dish and fill it with hot water until it reaches halfway up the sides of the ramekins. This method distributes heat evenly and prevents the eggs from overcooking at the edges.
Before pouring in the eggs, always grease your baking dish lightly with butter or non-stick spray. This prevents sticking and makes cleanup much easier.
Step-by-Step Guide to Making Baked Eggs
Step 1: Preheat the Oven
The very first step—and one you should never skip—is preheating your oven. Set it to 375°F (190°C). This ensures that the eggs cook evenly from the moment they go in. Skipping this step or putting the eggs into a cold oven can result in uneven cooking—yolks that are too firm or whites that are rubbery.
While the oven is heating up, this is a great time to get the rest of your ingredients and equipment ready. Whether you’re using ramekins, a muffin tin, or a small casserole dish, it should all be prepared before the eggs go in. Once your oven reaches temperature, you’ll be ready to go, and the baking time will be much more reliable.
If you’re cooking for a crowd or making several servings, using a convection setting (if your oven has one) can help cook everything more evenly, especially if you’re baking on multiple racks. Just reduce the temperature by about 25 degrees if you do this.
Step 2: Prepare the Baking Dish
Next, grab your ramekins or chosen oven-safe dish and grease them well with butter or cooking spray. This step is crucial—not just to keep the eggs from sticking, but also to add a slight richness and golden color to the edges.
If you’re planning to add cheese, veggies, or other fillings underneath the eggs, now’s the time to layer them in. Try placing sautéed mushrooms or spinach at the bottom of the dish, followed by a small sprinkling of cheese. This gives a base of flavor before you add the eggs on top.
This is also where the water bath setup comes in, especially if you’re going for a delicate, custard-like finish. Place your greased ramekins in a larger pan and have your hot water ready to pour in once the eggs are added.
Step 3: Add Supporting Ingredients (Optional)
This is the part where creativity shines. You can keep it simple with salt, pepper, and a touch of cream, or dress it up with a rainbow of ingredients.
Here are some popular combinations to try:
- Mediterranean Style: Cherry tomatoes, kalamata olives, crumbled feta, and oregano.
- Western Flair: Diced ham, bell peppers, cheddar, and green onions.
- Spicy Kick: Jalapeños, salsa, black beans, and Monterey Jack cheese.
Just remember—less is more. You want the eggs to be the star, so don’t overload the ramekin. Stick to 1-2 tablespoons of fillings per egg to maintain the right balance.
Also, make sure your ingredients are cooked (if needed) and drained. Adding raw onions or watery veggies like tomatoes without sautéing can lead to excess moisture, which may cause the eggs to bake unevenly or turn watery.
Step 4: Crack the Eggs into the Dish
Time to get the main event going! Crack one egg into each prepared ramekin. If you’re nervous about shell fragments or breaking the yolk, crack the egg into a small bowl first, then pour it gently into the ramekin.
This step might seem straightforward, but presentation counts—especially if you’re serving guests. Keep the yolk intact and centered in the dish for that beautiful Instagram-worthy look. If you’re adding two eggs to a dish, be sure there’s enough room and the whites don’t spill over the edge.
Want to mix the egg slightly before baking? That’s totally okay too—just give it a gentle whisk to blend the yolk and white for a more uniform texture. This method resembles mini frittatas and works great when you’ve got fillings that you want distributed evenly throughout.
Step 5: Season to Taste
Now comes the seasoning—a small touch that makes a big impact. A simple sprinkle of salt and freshly ground black pepper is often enough. But you can also play with other seasonings like:
- Paprika for smokiness
- Cayenne or chili flakes for heat
- Garlic powder or onion powder for a subtle kick
- Dried herbs like thyme, basil, or rosemary
For cheese lovers, a final dusting of parmesan or a few crumbles of blue cheese on top adds a gourmet flair. Just be cautious with salt if your added ingredients (like cheese or cured meats) are already salty.
Now that your eggs are seasoned and settled, it’s time to bake!
Step 6: Bake to Perfection
Now that everything is prepped and in place, gently slide your baking dish into the preheated oven. If you’re using a water bath, be extra careful not to spill the hot water as you move the tray—slow and steady wins the race.
Baking time can vary slightly depending on your oven, the size of your eggs, and how runny or set you want the yolks. Here’s a general guide:
- For runny yolks: Bake for 12–14 minutes
- For medium-set yolks: Bake for 15–17 minutes
- For fully set yolks: Bake for 18–20 minutes
Keep an eye on the eggs after the 12-minute mark. You’ll know they’re ready when the whites are just set but the yolks still jiggle slightly in the center. They’ll continue to cook a bit from residual heat after you take them out, so don’t overbake unless you prefer firmer yolks.
If you like a bubbly top or a light golden color, you can turn on the broiler for the last 1–2 minutes—but be super careful, as eggs can go from perfect to overcooked in seconds under a broiler.
Step 7: Serve and Enjoy
Once your baked eggs are out of the oven, let them sit for 1–2 minutes to cool slightly and settle. The ramekins or baking dishes will be hot, so use caution when handling them.
Now it’s time to plate and enjoy! You can serve baked eggs directly in their ramekins with a spoon, or slide them onto toast for a more traditional presentation. They also go perfectly with:
- Buttered toast or crusty bread
- Avocado slices or guacamole
- A fresh salad with vinaigrette
- Crispy bacon or sausage links
- Sautéed greens or grilled veggies
To take it up a notch, drizzle a bit of olive oil or truffle oil on top, or sprinkle with microgreens for a fancy finish. Whether you’re enjoying a cozy breakfast alone or entertaining guests, baked eggs are a satisfying, classy dish that fits any occasion.
Tips and Variations
How to Customize Your Baked Eggs
One of the best things about baked eggs is how easily customizable they are. Whether you’re craving something spicy, savory, or even sweet (yep, people experiment!), the base recipe adapts to suit your taste.
Here are some creative twists:
- French Style: Add cream, gruyère, and thyme.
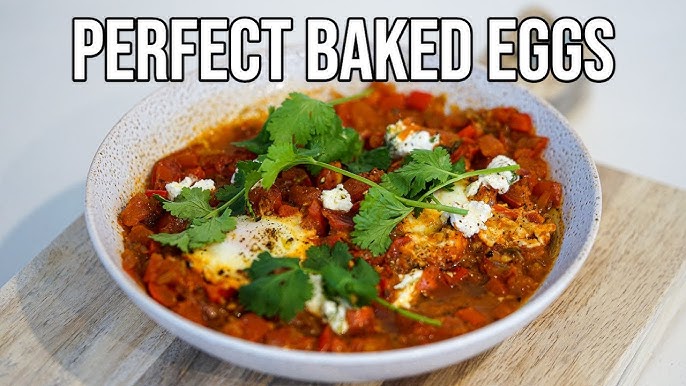
- Middle Eastern: Try a layer of shakshuka-style tomato sauce and cumin.
- Italian Flair: Sautéed mushrooms, mozzarella, sun-dried tomatoes, and basil.
- Breakfast Supreme: Add sausage crumbles, hash browns, and cheddar.
Want to go lighter? Use egg whites only, add more veggies, and skip the cheese. For a richer take, stir in a bit of heavy cream or top with hollandaise sauce.
Also, consider presentation: mini cast iron skillets, mason jars (oven-safe only!), or even bell pepper rings as “edible ramekins” can bring a wow factor to your table.
Common Mistakes to Avoid
Even a simple dish like baked eggs can go wrong if you’re not careful. Here are some pitfalls to dodge:
- Overcooking: The number one issue. It only takes a minute too long for eggs to turn rubbery. Stick to the recommended times and keep a close eye on them.
- Undercooked whites: If your yolks are perfect but the whites are still jiggly and opaque, they need a bit more time. You can cover the top loosely with foil to help the whites set without overcooking the yolk.
- Skipping the grease: Non-stick spray or butter is essential. Eggs will cling to ungreased dishes and ruin your presentation.
- Using raw, watery veggies: Always pre-cook and drain veggies to avoid soggy results.
- Overloading: Less is more. Stick to 2–3 toppings max to ensure even cooking.
A little care goes a long way in making baked eggs truly perfect—delicious, pretty, and just the way you like them.
Nutritional Value of Baked Eggs
Baked eggs aren’t just tasty—they’re also a powerhouse of nutrition, especially when prepared with wholesome ingredients.
Here’s a quick breakdown of the nutritional value (per serving of 1 large egg baked with minimal additions):
| Nutrient | Amount per Serving |
|---|---|
| Calories | 70–90 kcal |
| Protein | 6g |
| Total Fat | 5g |
| Saturated Fat | 1.5g |
| Carbohydrates | 0–2g |
| Fiber | 0g |
| Cholesterol | 185mg |
| Vitamin D | 10% DV |
| Vitamin B12 | 20% DV |
| Choline | 145mg |
Additions like cheese or meats can increase fat and calorie content, while veggies boost vitamins and fiber.
They’re naturally gluten-free, keto-friendly, and rich in nutrients vital for brain health, metabolism, and immunity. When compared to fried or scrambled eggs that often use butter or oil, baked eggs can be a lighter alternative with less added fat.
Looking to reduce cholesterol? You can substitute one whole egg with two egg whites. Want to increase fiber? Add chopped spinach, kale, or beans to the mix.
FAQs about Baked Eggs Recipe
Q1: What are baked eggs?
Baked eggs, also known as shirred eggs, are eggs cooked in a dish in the oven until the whites are set and the yolks are still runny or firm—depending on your preference. No flipping, no fuss!
Q2: Can I add veggies or meat to baked eggs?
Absolutely! You can toss in sautéed spinach, mushrooms, tomatoes, bacon, or even leftover chicken. Baked eggs are like edible blank canvases—get creative!
Q3: What’s the best temperature to bake eggs?
Bake your eggs at 375°F (190°C) for about 10–15 minutes. Keep an eye on them if you want that perfect soft yolk.
Q4: Can I make baked eggs ahead of time?
They’re best enjoyed fresh, but you can prep the mix-ins (like veggies or cheese) ahead and crack in the eggs right before baking.
Q5: Are baked eggs healthy?
Totally! They’re high in protein and low in carbs. Plus, you control the ingredients, so it can be as light or hearty as you want.
Q6: What kind of dish should I use?
Use ramekins or any oven-safe small bowls. Just grease them lightly to avoid sticking.
Q7: How do I know when they’re done?
The whites should be opaque and firm, while the yolks stay slightly wobbly if you like them runny. A jiggle test works wonders!
Conclusion
What truly makes baked eggs stand out is their flexibility. They’re perfect for busy mornings when you need something quick, but also shine as a showstopper for a more elaborate meal. You can keep them low-calorie with light ingredients, make them indulgent with rich add-ins, or even go full vegetarian or keto depending on your lifestyle.
Plus, cleanup is a breeze—no splattered pans or greasy stovetops. Just one dish, one oven, and a hearty, nutritious breakfast (or lunch, or dinner) is served.
So next time you open your fridge and wonder what to make with those extra eggs, remember this recipe. It’s reliable, delicious, and always a crowd-pleaser. Crack those eggs, pop them in the oven, and get ready to enjoy a bite of pure comfort.


