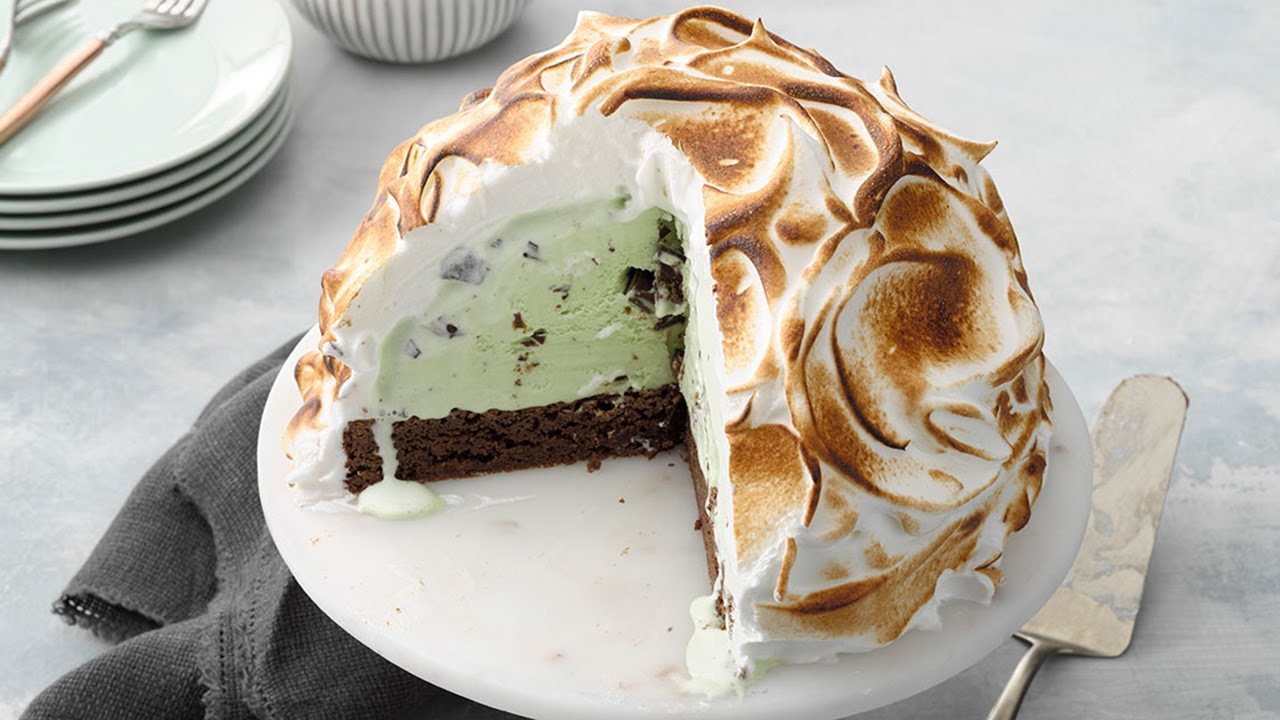
Baked Alaska Recipe: Baked Alaska is a show-stopping dessert that combines a cake base, an ice cream center, and a beautifully browned meringue topping. It’s a perfect balance of textures and flavors—warm, fluffy meringue covering a cold and creamy ice cream filling, all resting on a moist cake base. Whether you’re preparing it for a special occasion or just want to try something new, this step-by-step guide will help you create the perfect Baked Alaska.
History and Origin of Baked Alaska
Baked Alaska is believed to have been created in the 19th century. One of the earliest mentions of this dessert comes from 1867 when a French chef, Charles Ranhofer, made it at Delmonico’s restaurant in New York City. The dish was said to be named “Baked Alaska” in honor of the newly acquired U.S. territory, Alaska. The key to this dish’s magic lies in its scientific principle—the meringue acts as an insulator, preventing the ice cream from melting while the exterior is torched or baked.
Ingredients for Baked Alaska
Before we get into the steps, let’s gather all the ingredients you need.
Cake Base Ingredients
- 1 cup all-purpose flour
- 1/2 cup sugar
- 1/2 cup unsalted butter (softened)
- 2 eggs
- 1/2 teaspoon vanilla extract
- 1/2 teaspoon baking powder
- 1/4 teaspoon salt
Ice Cream Filling Ingredients
- 2 pints of your favorite ice cream (vanilla, chocolate, or strawberry)
Meringue Topping Ingredients
- 4 large egg whites
- 1 cup granulated sugar
- 1/4 teaspoon cream of tartar
- 1 teaspoon vanilla extract
Essential Equipment Needed
To make Baked Alaska successfully, you’ll need the following tools:
- 8-inch cake pan
- Mixing bowls
- Electric mixer
- Rubber spatula
- Baking sheet
- Blowtorch or oven
- Offset spatula
Step 1 – Preparing the Cake Base
Choosing the Right Cake
The base of a Baked Alaska should be firm enough to support the ice cream and meringue. A sponge cake or pound cake works best. Avoid delicate cakes that might become soggy.
Baking and Cooling the Cake
- Preheat the oven to 350°F (175°C).
- Grease and flour an 8-inch cake pan.
- In a bowl, mix the butter and sugar until light and fluffy.
- Add eggs one at a time, mixing well.
- Stir in vanilla extract.
- Sift in flour, baking powder, and salt. Mix until just combined.
- Pour batter into the pan and bake for 20-25 minutes.
- Let it cool completely before using.
Step 2 – Preparing the Ice Cream Layer
Selecting the Ice Cream Flavor
Choose a flavor that complements your cake. Vanilla, chocolate, and fruit flavors work well. You can also mix two flavors for a swirl effect.
Molding the Ice Cream
- Line a round bowl (the same size as your cake) with plastic wrap.
- Soften the ice cream slightly and press it into the bowl.
- Smooth the top with a spatula.
- Cover and freeze for at least 4 hours or overnight.
Step 3 – Assembling the Layers
Placing the Ice Cream on the Cake
- Once the ice cream is solid, remove it from the bowl.
- Place the ice cream dome on top of the cooled cake base.
Freezing the Layers
Put the assembled cake and ice cream in the freezer for at least 1 hour to firm up before adding the meringue.
Step 4 – Making the Meringue Topping
Whipping Egg Whites to Perfection
- In a clean, dry bowl, beat egg whites with an electric mixer until foamy.
- Add cream of tartar and continue beating until soft peaks form.
- Gradually add sugar, 1 tablespoon at a time, while beating.
- Continue beating until glossy, stiff peaks form.
- Stir in vanilla extract.
Step 5 – Covering the Baked Alaska with Meringue
Ensuring Even Coverage
- Remove the frozen cake and ice cream from the freezer.
- Using a spatula, spread meringue evenly over the entire dessert.
Creating Decorative Peaks
Use the back of a spoon to create decorative peaks in the meringue for a professional look.
Step 6 – Baking or Torching the Meringue
Using an Oven vs. a Kitchen Torch
- Blowtorch Method: Lightly toast the meringue using a kitchen torch.
- Oven Method: Bake at 450°F (230°C) for 3-5 minutes until golden brown.
Serving Baked Alaska
Tips for Cutting and Serving
Cutting into a Baked Alaska can be tricky since it has a frozen core and a delicate meringue exterior. Follow these tips for the best results:
- Use a sharp knife: Warm the blade in hot water, then wipe it dry before cutting. This helps slice through the ice cream smoothly.
- Work quickly: Since the ice cream can start melting, serve the slices immediately.
- Serve on chilled plates: This helps keep the dessert cool longer, preventing it from melting too fast.
Pairing Suggestions
- Drinks: A cup of coffee, espresso, or dessert wine pairs well with the creamy texture of Baked Alaska.
- Fruits: Fresh berries like raspberries or strawberries add a refreshing contrast to the sweetness.
- Sauces: A drizzle of chocolate, caramel, or berry coulis enhances the flavor.
Tips for a Perfect Baked Alaska
Want to ensure your Baked Alaska turns out perfect every time? Here are some expert tips:
Preventing Ice Cream from Melting
- Keep your ice cream completely frozen before adding the meringue.
- Work fast when assembling the layers.
- After adding the meringue, return the dessert to the freezer for at least 30 minutes before baking or torching.
Ensuring a Crisp Meringue
- Use fresh egg whites for the fluffiest meringue.
- Make sure the meringue covers the entire ice cream dome without gaps.
- If using an oven, preheat it well to ensure quick browning without melting the ice cream.
Variations and Flavor Ideas
Baked Alaska is a versatile dessert! Here are some creative twists to try:
Chocolate Baked Alaska
- Use chocolate cake as the base.
- Opt for chocolate or mocha ice cream.
- Drizzle with chocolate sauce before serving.
Fruit-Flavored Baked Alaska
- Try a citrus sponge cake base with lemon or raspberry ice cream.
- Garnish with fresh fruit or fruit compote.
- Add a touch of zest to the meringue for extra flavor.
Mini Baked Alaska
- Instead of one large dessert, make individual-sized portions using cupcake tins.
- This is great for serving at parties!
Common Mistakes to Avoid
Overbaking the Meringue
If left in the oven too long, the meringue can turn rubbery or burn. Always watch closely and remove it once it’s golden brown.
Using the Wrong Type of Cake
A cake that’s too soft or crumbly won’t hold the ice cream well. Stick to sponge cake, pound cake, or a firm vanilla or chocolate cake.
Not Freezing Long Enough
Skipping freezing steps can lead to a messy Baked Alaska. Each layer should be frozen solid before moving to the next step.
Storage and Make-Ahead Tips
How to Store Baked Alaska Properly
- Short-term storage: If you have leftovers, store them in an airtight container in the freezer for up to 3 days.
- Long-term storage: Baked Alaska can be stored for up to a week, but the meringue may soften over time.
Best Practices for Freezing
- If making in advance, assemble the cake and ice cream layers and freeze them for up to a week.
- Add the meringue just before serving to maintain its texture.
FAQs about Baked Alaska Recipe
What is Baked Alaska?
Baked Alaska is a classic dessert that features a core of ice cream and cake encased in a layer of browned meringue. This delightful contrast of hot and cold makes it a unique and popular choice for special occasions.
How do you keep the ice cream from melting when baking Baked Alaska?
The secret to keeping the ice cream from melting is the meringue layer which acts as an insulator. Make sure the meringue is completely sealed around the edges and covers the ice cream entirely. Bake it in a very hot oven (around 500°F) for a short time—just long enough to brown the meringue.
Can I make Baked Alaska ahead of time?
Yes, you can prepare Baked Alaska ahead of time. Assemble the dessert with its ice cream and cake base, then freeze it until you’re ready to add the meringue layer and bake. This makes it convenient for entertaining.
What kind of cake is best to use in Baked Alaska?
A dense cake like a sponge cake or a pound cake works best as they can support the weight of the ice cream and withstand the freezing and baking process without becoming too soggy.
Is there a quick method to prepare Baked Alaska?
For a quicker version, use pre-made cake layers and your favorite store-bought ice cream. Assemble these with the meringue and bake as directed. This shortcut can save time while still delivering a stunning dessert.
Can Baked Alaska be made with different flavors?
Absolutely! You can customize Baked Alaska with any flavor of ice cream and cake that you like. Experiment with combinations like chocolate cake with mint chocolate chip ice cream or vanilla cake with strawberry ice cream for a personalized touch.
Is Baked Alaska suitable for vegetarians?
Yes, Baked Alaska can be suitable for vegetarians. However, ensure that the ingredients, particularly the ice cream and cake, do not contain gelatin or other non-vegetarian additives.
Conclusion
Baked Alaska is an impressive yet surprisingly simple dessert when you follow the right steps. With a combination of a moist cake base, creamy ice cream, and fluffy toasted meringue, it’s a treat that’s sure to wow any crowd. Whether you’re making a classic version or experimenting with flavors, this dessert is a surefire way to impress your guests.


