7 Up Cake Recipe: Ever bitten into a slice of cake that’s so buttery, soft, and moist that it practically melts in your mouth? That’s the magic of the 7 Up Cake. This southern classic has been gracing kitchen counters and potluck tables for generations, thanks to its unique twist—a can of 7 Up soda. Yep, the fizzy drink you usually sip on a hot day becomes the secret ingredient that transforms an ordinary cake into a legendary dessert.
The 7 Up Cake is typically a pound cake, meaning it’s rich, dense, and oh-so-satisfying. But don’t mistake dense for dry. The carbonation from the 7 Up adds an airy lift to the cake, while the sugar and citrusy tang bring an unmistakable zing. It’s an old-school recipe that combines simple pantry ingredients into a showstopper of a cake. Whether you’re baking it for a Sunday family dinner or showing off at a holiday gathering, this cake always delivers.
Why is it Called 7 Up Cake?
Let’s address the obvious question—why 7 Up? The answer is deliciously simple. The recipe uses the actual soda in the batter. Not only does the 7 Up act as a leavening agent, helping the cake rise, but it also infuses it with a light citrus flavor that complements the buttery base beautifully.
Back in the day, creative home bakers started adding sodas like 7 Up and Coca-Cola to cakes to get that extra fluff and flavor. Over time, this became more than just a trend—it turned into a beloved recipe that’s now part of southern baking lore. And don’t worry, the soda taste isn’t overpowering; it adds just enough sparkle to make people ask, “What’s your secret?”
Ingredients You’ll Need
Basic Ingredients
Before you get baking, let’s talk ingredients. The beauty of a 7 Up Cake lies in its simplicity. You don’t need anything fancy—just everyday staples you probably already have in your pantry. Here’s your grocery checklist:
- 3 sticks (1½ cups) unsalted butter – room temperature
- 3 cups granulated sugar – for that classic pound cake sweetness
- 5 large eggs – room temperature
- 3 cups all-purpose flour – sifted for best texture
- 2 teaspoons lemon extract – adds a citrus punch
- ¾ cup 7 Up soda (not diet!) – the star of the show
Yes, that’s it. No baking soda, no baking powder. The carbonation in the 7 Up acts as your natural leavening, making this one of the easiest pound cakes to throw together.
Optional Add-ons for Extra Flavor
Want to take your 7 Up Cake to the next level? You totally can! Here are a few optional extras to experiment with:
- Zest of 1 lemon or lime – intensifies the citrus flavor
- 1 teaspoon vanilla extract – for a smooth, well-rounded taste
- Powdered sugar (for dusting) – adds a pretty finish
- Citrus glaze (recipe below) – for an extra touch of moisture and sweetness
Mix and match depending on your taste buds or the occasion. If you love lemon desserts, a glaze made from lemon juice and powdered sugar can make it irresistible.
Equipment Needed
Must-Have Baking Tools
While the recipe itself is easy, having the right tools makes a big difference in your results. Here’s what you’ll need to get started:
- Stand mixer or electric hand mixer – for creaming butter and sugar until fluffy
- Large mixing bowls – at least two for batter and egg mixing
- Measuring cups and spoons – accurate measurements = perfect cake
- Bundt pan or tube pan (10–12 cup capacity) – the traditional shape for 7 Up Cake
- Rubber spatula – for scraping every last bit of batter
- Cooling rack – helps cool your cake evenly
Using a well-greased Bundt pan is important here. The iconic ring shape not only looks great but helps the cake cook evenly. Be sure to butter and flour every nook and cranny to prevent sticking!
Helpful Tips Before You Start
Here are a few pro tips before you dive into mixing:
- Room temperature ingredients are a must. Cold butter and eggs won’t mix well, leaving you with a lumpy batter.
- Don’t overmix once the flour is added. Overworking the batter can make your cake tough.
- Avoid using diet soda. It won’t provide the same structure or flavor as regular 7 Up.
- Use fresh baking ingredients. If your flour or butter’s been sitting for a while, it may affect the final flavor and texture.
Prep everything first, and read through the recipe a couple of times. That way, you’ll be stress-free and ready to bake like a pro.
Step-by-Step Instructions for Making 7 Up Cake
Step 1 – Preparing the Ingredients
Before anything touches your mixing bowl, preparation is key. This isn’t just about gathering ingredients—it’s about ensuring they’re at the right temperature and ready to work together harmoniously.
Start by bringing your butter and eggs to room temperature. Cold butter won’t cream properly with sugar, and cold eggs can cause the mixture to curdle. Just leave them out on the counter for about 30–60 minutes beforehand. While you’re waiting, sift your flour. This breaks up any clumps and aerates the flour, which gives your cake a finer, lighter crumb.
Next, measure everything carefully. Baking is a science, and small mistakes can drastically affect the outcome. Use dry measuring cups for ingredients like flour and sugar, and liquid measuring cups for the 7 Up.
Once your ingredients are measured and prepped, grease your Bundt pan generously with butter or shortening. Then dust it with flour, making sure every groove is coated. Tap out the excess flour. This ensures your cake will slide out easily after baking, keeping that beautiful Bundt shape intact.
Step 2 – Mixing the Batter
Now the fun begins—bringing everything together into a rich, fluffy batter.
- Cream the butter and sugar together in a large mixing bowl using a stand mixer or electric hand mixer. This should take about 5–7 minutes on medium speed. The mixture should become light in color and fluffy in texture—this is crucial for creating volume in the cake.
- Add the eggs one at a time, mixing well after each addition. This step helps emulsify the batter, incorporating air and building a stable structure.
- Add the lemon extract (and vanilla if using). This injects bright flavor throughout the cake.
- Next, alternate adding the sifted flour and the 7 Up soda in three parts, starting and ending with the flour. Mix on low speed just until combined after each addition. Be gentle—overmixing at this stage can make the cake dense.
- Once the batter is smooth and velvety, use a rubber spatula to scrape down the sides and bottom of the bowl, ensuring everything is incorporated.
This batter should be thick, creamy, and slightly glossy with a citrusy aroma already coming through.
Step 3 – Baking the Cake
Preheat your oven to 325°F (163°C). That slightly lower-than-usual temperature is important—it allows the dense cake to bake slowly and evenly without over-browning.
- Pour the batter into your prepared Bundt pan, smoothing the top with a spatula to ensure an even rise.
- Bake on the center rack for 70 to 75 minutes, but start checking for doneness around the 65-minute mark. Insert a toothpick or long skewer into the center—if it comes out clean or with just a few crumbs, it’s ready.
Avoid opening the oven too early or too often. Sudden changes in temperature can cause the cake to fall or develop cracks.
As the cake bakes, your kitchen will fill with a rich, buttery, citrusy scent that signals something amazing is on the way. The top should be golden brown, and the cake should pull slightly away from the sides of the pan.
Step 4 – Cooling and Removing from Pan
Patience is key here—don’t rush this part.
- Once the cake is out of the oven, place it on a wire rack and let it cool in the pan for about 15–20 minutes. This allows it to firm up slightly, reducing the risk of breaking apart when removed.
- After that, gently invert the pan onto a wire rack or cake plate. If you’ve greased and floured the pan properly, it should release easily with a satisfying “plop.”
Let it cool completely—this usually takes another hour or so. Cutting into a warm cake might be tempting, but it can cause it to crumble and lose its structure.
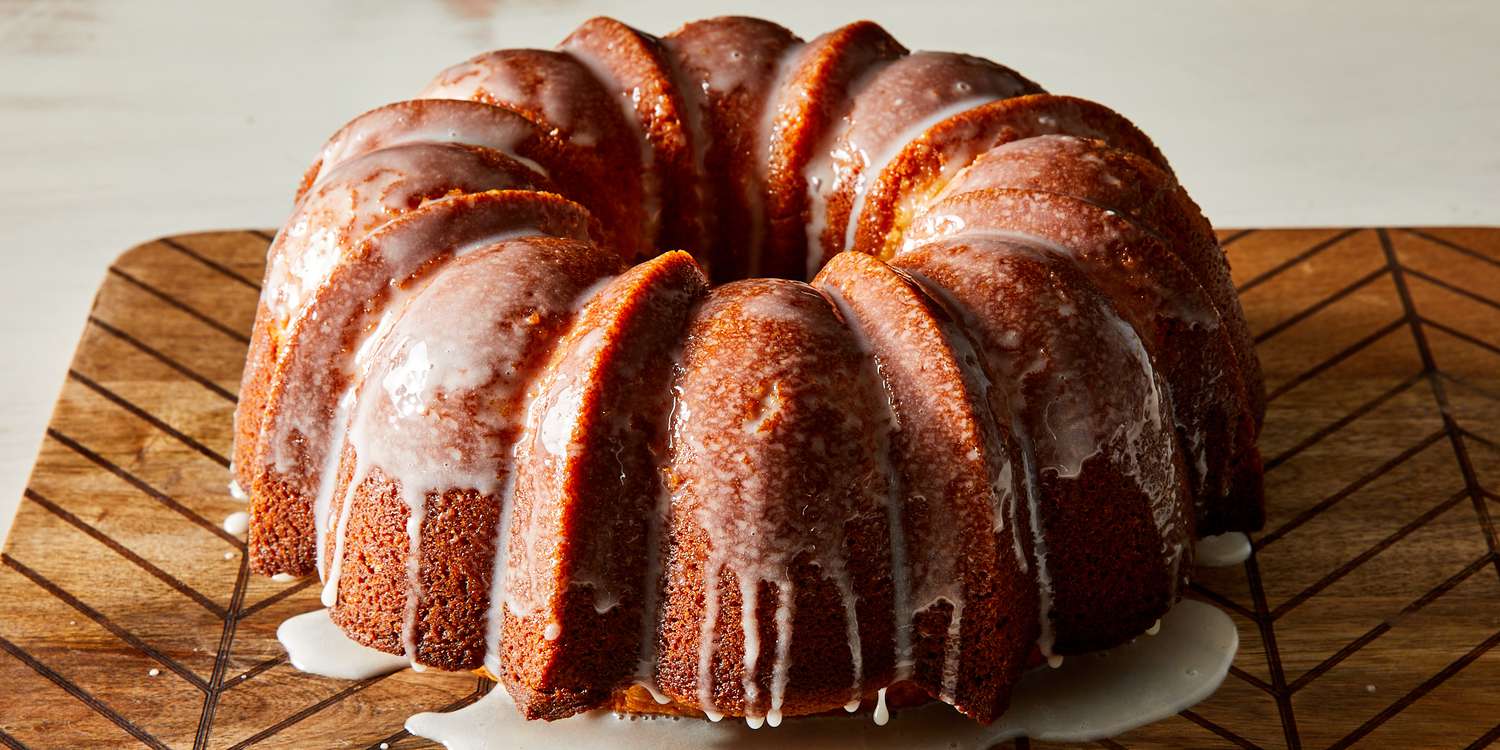
Step 5 – Optional Glaze or Frosting
The traditional 7 Up Cake is delicious on its own, but adding a glaze can take it from great to unforgettable.
Easy Citrus Glaze Recipe:
- 1 cup powdered sugar
- 2 tablespoons fresh lemon or lime juice
- 1–2 teaspoons of milk (if needed for consistency)
- Zest of 1 lemon (optional, for flavor punch)
Mix until smooth and drizzle over the completely cooled cake. The glaze will harden slightly and create a beautiful, glossy finish with an added pop of citrus flavor.
If you’re more of a sweet tooth, you can even add a cream cheese frosting or vanilla glaze. But honestly? The simplicity of the citrus glaze highlights the cake without overpowering it.
Tips for the Perfect 7 Up Cake
Common Mistakes to Avoid
Even the simplest cakes can go wrong if you’re not careful. Here are some mistakes to steer clear of:
- Using diet soda: Always use full-sugar 7 Up. The artificial sweeteners in diet versions won’t give you the same moisture or leavening.
- Cold ingredients: Butter and eggs need to be room temp for the best texture. Cold butter won’t cream, and cold eggs won’t incorporate well.
- Under-creaming the butter and sugar: This stage builds the structure. If it’s rushed, your cake might end up flat or heavy.
- Overmixing the flour: Once you add the flour, be gentle. Overworking the batter can make the cake rubbery.
- Not greasing the pan well: A Bundt pan has many grooves—missing a spot can lead to sticking and a broken cake.
How to Make It Extra Moist and Fluffy
Want a 7 Up Cake that’s a crowd favorite every single time? Here’s how to level up your baking game:
- Add sour cream (¼ cup) to the batter for extra moisture and tang.
- Use cake flour instead of all-purpose flour for a softer texture.
- Brush the warm cake with simple syrup (equal parts sugar and water) to lock in moisture.
- Use a kitchen scale for precise measurements—especially for flour, which can pack down in cups.
- Bake at a consistent temperature. Use an oven thermometer to check your oven’s accuracy. Even a 10–15 degree difference can change the bake.
These small changes make a huge difference in the final outcome. Moist, fluffy, flavorful—everything you want in a homemade cake.
Serving Suggestions and Variations
How to Serve 7 Up Cake
Once your cake is baked, cooled, and glazed (if desired), it’s time for the best part—serving! The 7 Up Cake is incredibly versatile. It can be dressed up or down depending on the occasion.
Here are a few fun ways to serve it:
- Classic style: Slice it thick, and serve with a hot cup of coffee or tea. It’s perfect for breakfast, dessert, or a mid-day treat.
- With fresh fruit: Pair it with fresh strawberries, blueberries, or raspberries. The fruit complements the citrus notes in the cake beautifully.
- A la mode: Add a scoop of vanilla ice cream on the side. The contrast of warm cake and cold cream is downright indulgent.
- With whipped cream and lemon zest: A dollop of fresh whipped cream and a sprinkle of zest add a luxurious finish.
This cake holds its own with or without extras, but when you want to impress guests or treat yourself, these serving suggestions go a long way.
Delicious Variations to Try
Want to get creative? The 7 Up Cake is a great base recipe to build from. Try these fun spins:
- Orange Creamsicle Cake: Replace the lemon extract with orange extract and use orange soda instead of 7 Up for a nostalgic twist.
- Coconut 7 Up Cake: Fold shredded coconut into the batter and top with a coconut glaze.
- Lemon-Lime Explosion: Add both lemon and lime zest for a bright, tart flavor that packs a punch.
- Mini Bundts or Cupcakes: Pour the batter into mini Bundt pans or cupcake tins for individual-sized treats—perfect for parties.
These versions add excitement to your bake and keep things fresh, especially if you make this cake often.
Storage and Shelf Life
How to Store 7 Up Cake Properly
One of the best things about this cake? It stays fresh for days. Proper storage ensures it remains moist and delicious.
- Room Temperature: Keep your cake in an airtight container at room temp for up to 5 days. Make sure it’s fully cooled before storing.
- Refrigerator: You can refrigerate the cake if needed, especially in warmer climates. Wrap it tightly in plastic wrap or foil to prevent drying.
- Freezer: Yes, 7 Up Cake freezes beautifully. Slice it into portions, wrap each slice in plastic wrap, then place them in a freezer-safe bag. It’ll last up to 3 months. Just thaw overnight at room temp before serving.
A quick tip: if your cake starts to feel dry, microwave a slice for 10–15 seconds or serve it with a drizzle of glaze or syrup to bring it back to life.
Reheating Tips for Best Texture
If you’re pulling your cake from the fridge or freezer, here’s how to reheat it:
- Microwave: Wrap a slice in a paper towel and microwave for 10–15 seconds. It will be soft and warm like it’s fresh from the oven.
- Oven: For larger portions, preheat your oven to 300°F, cover the cake loosely with foil, and warm for 8–10 minutes.
Avoid overheating—it can make the cake rubbery. You want just enough warmth to bring out that buttery softness again.
Healthier Alternatives and Substitutions
Can 7 Up Cake Be Made Healthier?
While 7 Up Cake isn’t exactly health food, you can absolutely make some tweaks to lighten it up a bit.
Here are a few healthier substitutions:
- Use Greek yogurt or sour cream in place of part of the butter. This adds moisture while cutting back on fat.
- Reduce the sugar slightly—try 2½ cups instead of 3.
- Use whole wheat pastry flour for a bit more fiber without sacrificing texture.
- Substitute applesauce for a portion of the butter. About ¼ to ½ cup can be swapped without affecting structure too much.
- Try a low-sugar glaze made with powdered erythritol or monk fruit sweetener.
These changes won’t give you a “diet cake,” but they can make it a little more guilt-free without losing what makes it great.
Gluten-Free and Dairy-Free Options
Good news—7 Up Cake can be made for those with dietary restrictions too:
- Gluten-Free: Use a gluten-free all-purpose flour blend with xanthan gum included. Make sure to sift it well.
- Dairy-Free: Replace butter with a plant-based substitute, and check that your 7 Up (and any glaze ingredients) are dairy-free.
When making major swaps like these, keep in mind the texture may change slightly, but the flavor will still be delightful.
Why Everyone Loves 7 Up Cake
The Nostalgia and Simplicity of a Classic Recipe
There’s something about 7 Up Cake that takes people back. Maybe it reminds you of grandma’s kitchen, or maybe it’s the simplicity of it all—flour, sugar, butter, and a little soda.
This cake doesn’t rely on fancy techniques or ingredients. It’s a humble, heartwarming dessert that’s just plain good. Whether you’re new to baking or a seasoned home cook, this recipe delivers consistent results and rave reviews.
Plus, it’s customizable. Want it extra lemony? Add zest. Need it gluten-free? Go for it. Like it sweeter? Glaze it. The recipe is forgiving and endlessly adaptable.
And let’s be real—there’s just something charming about baking with soda. It adds a touch of fun, a bit of nostalgia, and a lot of flavor.
FAQs about 7 Up Cake Recipe
Q1: Can I use diet 7 Up or other sodas for this recipe?
Yes, but regular 7 Up works best for flavor and texture. Diet sodas lack sugar, which may affect the cake’s moisture and rise. If you substitute with Sprite or another lemon-lime soda, results may vary slightly but still taste great.
Q2: Why is there no baking powder or baking soda in the recipe?
The carbonation in 7 Up acts as a leavening agent, helping the cake rise. It’s a classic Southern baking trick that delivers a light, airy crumb without extra leaveners.
Q3: Can I make this cake ahead of time?
Absolutely! 7 Up Cake stays moist for several days. Wrap it tightly or store in an airtight container at room temperature for up to 3 days, or refrigerate for up to a week.
Q4: How do I prevent the cake from sticking to the pan?
Generously grease and flour your Bundt pan or use a baking spray with flour. Let the cake cool for 10–15 minutes before inverting it to avoid breakage.
Q5: Can I add a glaze or frosting to 7 Up Cake?
Yes! A simple lemon glaze or powdered sugar icing enhances the cake’s citrus flavor. Just drizzle it over the cooled cake for a beautiful finish.
Conclusion
The 7 Up Cake is a timeless dessert that combines ease, elegance, and unforgettable flavor. With its moist, buttery texture and hint of citrus, it’s no wonder it has stood the test of time. Whether you’re baking for a special event or just craving something comforting, this cake is always a crowd-pleaser. So the next time you find yourself with a bottle of 7 Up and a free afternoon, why not bake a little joy into your day?